
If you have a HTTPS session captured and are looking at unlocking the secrets that lie within, you are probably looking at Wireshark with eternal optimism hoping that somehow the magical blue fin will answer all of problems….
Sadly that’s not quite the case…. but it will help.
(To help me structure this post I am going to use a CTF challenge as a walkthrough. It was originally a DEFCON CTF, then was later picked up by root-me.org, if you want to play along at home click here)
Encrypted Traffic in a PCAP? I’m outta here!!
Hold your horses, there is a lot of useful information in an encrypted PCAP that may help you to find a weakness, or even all the information you need. In this instance we can see that the network traffic is using a certificate that has had the private key published online.
People don’t publish private keys online!
……. ummm …… yes they do. A friend of mine, Kev ‘TheHermit’ Breen created a Pastebin scraper (PasteHunter) that uses Yara rules to check pastes for interesting stuff then indexes them. He did a presentation at CyberThreat 2018 giving a summary of (redacted) results, amongst them, private keys. It is also possible to find some using Google searches, however most people have become wise to this method (normally the hard way).
So you’re saying this is easy?
Well… no. 99.999…% of the time you will need to get the private key in a legitimate way. You can’t simply google for Microsoft’s private key. The exception is typically in a contrived situation, like a CTF. Which is what we are discussing!
However the point of this post is to show how to do this when someone gives you the private key file.
Back to the CTF
This CTF gives you a clue to use google and tries to lead you to an old Github page that has this key listed as ‘expired’ (https://github.com/Hypernode/M2Crypto/blob/master/demo/x509/server-expired.pem)
The fun thing about CTF’s is that there is no single way to solve them. So with some creative thinking and lots of searching I found that the certificate has been around the houses a few times:
- https://opensource.apple.com/source/ChatServer/ChatServer-37.4/libraries/Twisted-1.3.0/twisted/test/server.pem.auto.html
- https://github.com/vrjuggler/maestro/blob/master/server.pem
- http://mail.susaaland.dk/sharedoc/m2crypto-0.13/tests/server_key.pem
- https://twistedmatrix.com/pipermail/twisted-python/2001-August/000221.html
- https://marc.info/?l=zope3-checkins&m=116664586622004
Anyway, we are getting off topic! I suspect this is an old challenge and hasn’t been updated when the certificate was replaced on the original Github page.
The bit we are interested in is the Private Key, everything else will just break Wireshark. So we grab the following:
-----BEGIN RSA PRIVATE KEY-----
MIIBPAIBAAJBAKy+e3dulvXzV7zoTZWc5TzgApr8DmeQHTYC8ydfzH7EECe4R1Xh
5kwIzOuuFfn178FBiS84gngaNcrFi0Z5fAkCAwEAAQJBAIqm/bz4NA1H++Vx5Ewx
OcKp3w19QSaZAwlGRtsUxrP7436QjnREM3Bm8ygU11BjkPVmtrKm6AayQfCHqJoT
ZIECIQDW0BoMoL0HOYM/mrTLhaykYAVqgIeJsPjvkEhTFXWBuQIhAM3deFAvWNu4
nklUQ37XsCT2c9tmNt1LAT+slG2JOTTRAiAuXDtC/m3NYVwyHfFm+zKHRzHkClk2
HjubeEgjpj32AQIhAJqMGTaZVOwevTXvvHwNEH+vRWsAYU/gbx+OQB+7VOcBAiEA
oolb6NMg/R3enNPvS1O4UU1H8wpaF77L4yiSWlE0p4w=
-----END RSA PRIVATE KEY-----
You need to include the hyphens at the beginning and end to.
Now we have this bit, save it as a .pem file (server.pem maybe?), the name isn’t important, only the file extension.
Using the .pem file in Wireshark
Right, we have stuff we need. Stuff is important.
There are a couple of ways of doing this, I am going to use the menus on the main Wireshark window. This is done in version Wireshark 2.6.4. I doubt they will move the bits I am talking about… but they may go full-Microsoft on us at some point.
Go to Edit > Preferences
In the preferences screen that pops up, you want to go to the left side and look for “Protocols”, expand this out and find “SSL” (I typically press ‘T’ then it’s at the top of the screen).
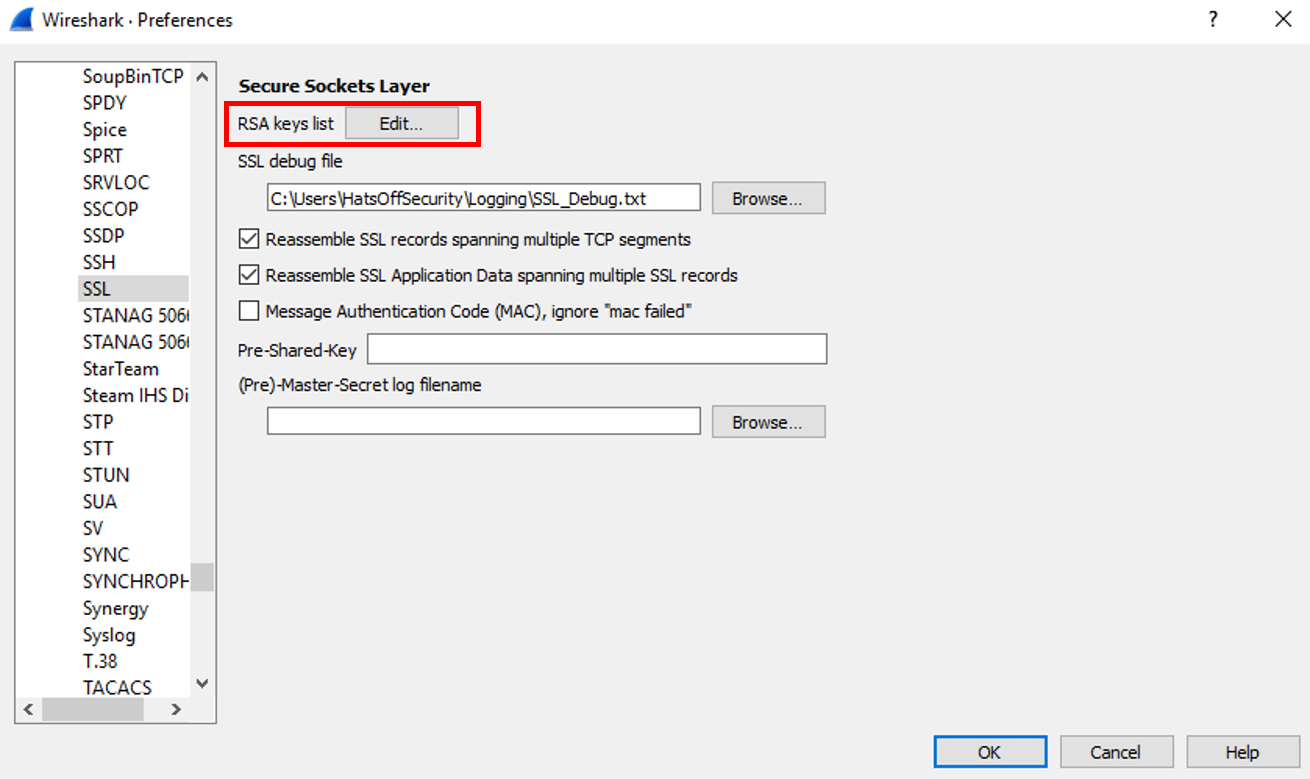
On this screen you want to click on the RSA Keys List button. You should also specify a debug file, this will create a text file that will help you should something not work. Have a look at a working version (after following this guide) so you know what it should look like.
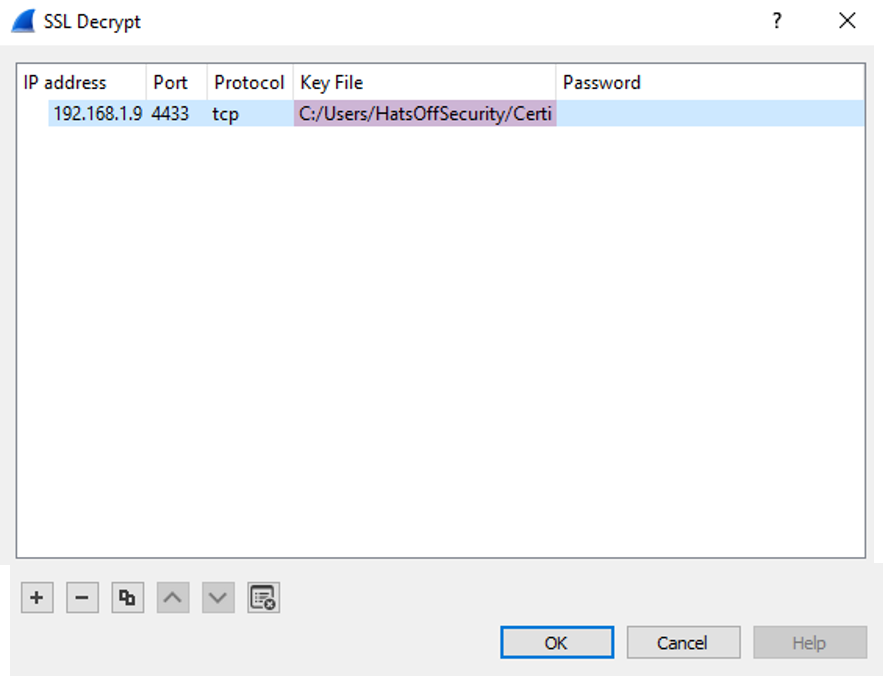
Add the server IP address, the port (in this case it’s 4433 instead of the default 443), protocol TCP and the location of the key file. Leave the password blank.
OK your way back to the main screen.
Normally you would now ‘Follow SSL stream’, however that doesn’t work here, possibly because Wireshark doesn’t know what to do with the data (it’s not web browsing, hence no ‘site details’ as per my previous post).
If we now look through the packets we can see that packet 13 sticks out, it has a lot of flags set and is a malformed packet. When we investigate further we see this…

If you look to the right, you can see why Wireshark declared this malformed, all of the fields have been manipulated to print out a message.
Why do I care?
The CTF was used as a mechanism to demonstrate how to decrypt data in Wireshark. So you don’t need to care about the challenge, but knowing how to add a private key is very important. This is the type of task IT staff would assume the security people can do, but if you have never tried it, this allows you to play.
Looking at encrypted traffic could provide the case your working on with that critical piece of evidence the bad guy thought they had hidden.
This also shows that network forensics is not going anywhere, HTTPS is a GOOD thing and should be embraced. We can put technical steps in place to allow us to keep using HTTPS and HSTS while still maintaining the level of detection we have always had.
