Because the victim doesn't care what colour hat the attacker was wearing. ============================ Uploading my brain to the Cloud for faster access
Not all IoCs are created equal. Some are easier for attackers to change than others. RFC9424, authored by Kirsty Paine, Ollie Whitehouse, James Sellwood and Andrew Shaw, talks about the Pyramid of Pain to illustrate this.
Hashes of malicious files are low pain for attackers to change. IP addresses and domain names require a little bit more work. Network and endpoint artefacts like traffic patterns or file timestamps take more effort to alter and tools used in attacks are painful to substitute. Finally, an attacker’s tactics, techniques, and procedures (TTPs) require the most effort to change, these are more about human or team habits.
When selecting IoCs, choose indicators across the pyramid to create layered defences. Combine fragile indicators like hashes with more robust TTP-based IoCs. These indicators will have different amounts of value over time, that match up to the pyramid. For example a hash may only be useful for that specific attack, an IP address may be useful for the duration of the incident, but the method of attack, or location of tools may last across several engagements.
Consider this scenario:
An attacker exploits a vulnerability and drops a Webshell, they then use that to connect to the webserver, they escalate privileges on the box and start dropping tools, gaining legitimate credentials and dropping persistence. From here they connect to the VPN using non-MFA credentials (it’s not uncommon), carry out recon activity on the network initially target the Domain Controller where they drop the NTDS.dit, they then use legitimate Domain Admin credentials to attempt to deploy Ransomware.
The IOCs you capture are as follows:
Tool/TTP
Details of Tool
IOC
Webshell
ASPX/PHP file (either works for this)
SHA256 Hash Folder Location Vulnerability of choice
Priv Esc Tool
Customised GitHub PoC
SHA256/GitHub Repo
Persistence Task
Scheduled Task
Task Name Task Location (root task, or in a sub-folder) Task details which are calling a Persistence Binary frpm,
Persistence Binary
Cobalt Strike Binary connecting to IP. Binary saved to C:\Users\Public\Music
SHA256 of Binary Binary Name Binary Location Attackers C2 IP (from reverse engineering/sandbox of binary)
VPN/RDP
Attacker connects to the VPN and RDPs from their attack machine
Attacker’s IP Address Attacker’s Hostname Attacker Operating System Any other leaked data from their system RDP Cache may provide insight into TTPs
Recon Tools
Legitimate network scanning tools
TTPs from tools Output from these tools
Lateral Movement Tools
Tools such as PSExec or Impacket
TTPs from tools TTPs from how they use these tools, what arguments they use etc
Dumping NTDS.dit
VSS Exploitation
TTPs from method of exploiting VSS Location of output files from dump Did the attacker clean up, or leave the data Compromised user account details
Ransomware
Ransomware as a Service (RaaS) tool
TTPs from tool Potential attribution to known attack group/gang Contact details on ransom note Method of Ransom deployment SHA256 of Ransomware binaries
From the above (very high level, very vague) scenario we have a list of IoCs that range across the pyramid of pain. In terms of how we use them, this will depend massively on the maturity of the security team and their tooling.
Some teams will be able to block based the hash value, or location, others could alert, and some will be blind to this.
Consider all of the IOCs above and think about how your team would see them. Could you do this on 1 host, how about 1,000? Could you do this in near real time for multiple days with the ability to add more?
If you answered ‘no’, you may need to review your technologies and raise this with the business owners.
Managing the IoC Lifecycle
Having hashes for an attack that happened 5 years ago is not helpful, not having the domain name for an active attack is not helpful. Having an AWS IP address blocked by your firewall is not helpful! Consider points like this when thinking about the IoC lifecycle as pointed out in RFC 9424:
Discovery – Extract IoCs from compromised systems, network traffic, threat feeds, etc.
Assessment – Evaluate IOC quality and provenance before deployment.
Sharing – Distribute IOCs with rich context to enable appropriate defences.
Deployment – Get IOCs to controls like firewalls and EDR for detection/prevention.
Detection – Monitor for and react appropriately to IOC matches.
End of life – Retire stale IOCs to avoid false positives.
Automating ingestion, deployment, and retirement is key for managing large volumes. However remember the philosophy of “shit in, shit out”. If you accidentally pick up the hash for explorer.exe because it was a parent process to malware, you are going to be having a bad day.
Adopt a Defence-in-Depth Approach
Because different IoCs work at different layers, utilize IoCs as part of a layered defence-in-depth strategy. Relying solely on endpoint security can be risky if the EDR product is not up to the task, or is not able to provide the blocking functionality. Deploy network-level IoCs to complement endpoint protections.
Why should I care?
This type of work is the bread and butter of defenders, it also helps highlight how defenders operate if you are on the red-team.
Understanding what is useful for looking backwards vs forwards is important. Hashes, IPs and other items at the easy end of the pyramid of pain are typically for looking backwards, seeing what has already happened and responding to that. Things that are near the top of the pyramid help us to look forward. What can we expect the attacker to do in the future? What is common thing that 99% of attackers do? How do we monitor for that?
Asking these questions and understanding where and how to find the answer is why RFCs like RFC9424 are important and why we need to not just read them, but understand them.
PowerShell has grown since its introduction in 2003 and implementation in Windows XP in 2006. What started as a closed source, proprietary upgrade to the Command Prompt has now grown into an open-source, resource rich Command Line Interface (CLI) and scripting utility. PowerShell can now be used cross-platform to manage any environment whether that be on-premises or cloud based.
Because of this flexibility PowerShell is used in many aspects of IT, and Security. In this post we will cover some of the basics of using and understanding PowerShell, as well as confirming that what you are seeing is accurate.
PowerShell ISE
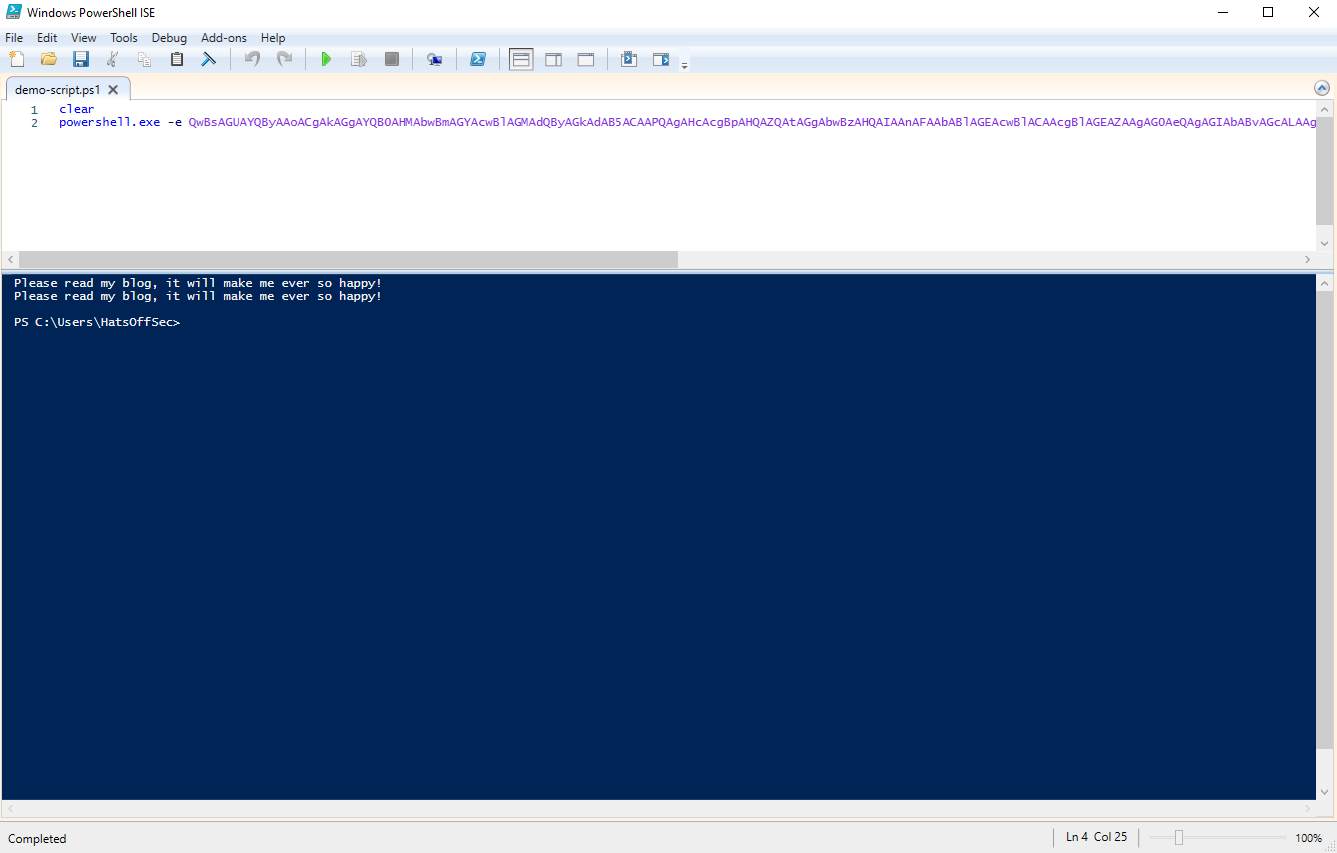
PowerShell has an ISE (Integrated Scripting Environment) version that can be used to create PS1 files. These can then be tested and run. You do not need to use the ISE to create PS1 files, any text editor or external ISE will do the trick! (cough Notepad++ cough). The main difference here is being able to test your script immediately.
This is useful for an investigator to know if the malicious PowerShell script was run from PowerShellISE.exe or PowerShell.exe. If the ISE executable was used this shows that the person running the script had GUI access. This does not imply that there was a human at that host at the time, tools like AnyDesk, TeamViewer, VNC and even RDP could have been used.
If it was just powershell.exe then this could have been run from a remotely connected attacker, from a compromised external USB device or even a persistence mechanism such as a registry run key.
Tab Completion
PowerShell has the option to hit the Tab key to complete a command. This can be useful if (like me) you regularly forget what the command is called, or which argument to pass to it.
Test this out by typing 'get-‘ then tab through SOOOO many options. You can also use shift-tab to go back through the list. Hours of fun!
Get-Help
Thor Ragnarok (2017)
The Get-Help command, which can also be called via ‘help’ or ‘man’, is followed by the command that you wish to have explained. This is useful to see what the correct syntax of a command is as well as accepted arguments.
It is not used to distract guards by throwing your adopted-brother at them.
Aliases
As the name suggests, the Alias command shows alternate commands that will call the same code behind the scenes. From a security perspective it is worth remembering that this can be changed.
While this is rare outside of CTF environments, it is worth knowing how to confirm the commands you are running, and if the output of a command is ever in question, this can be one of your first port-of-calls.
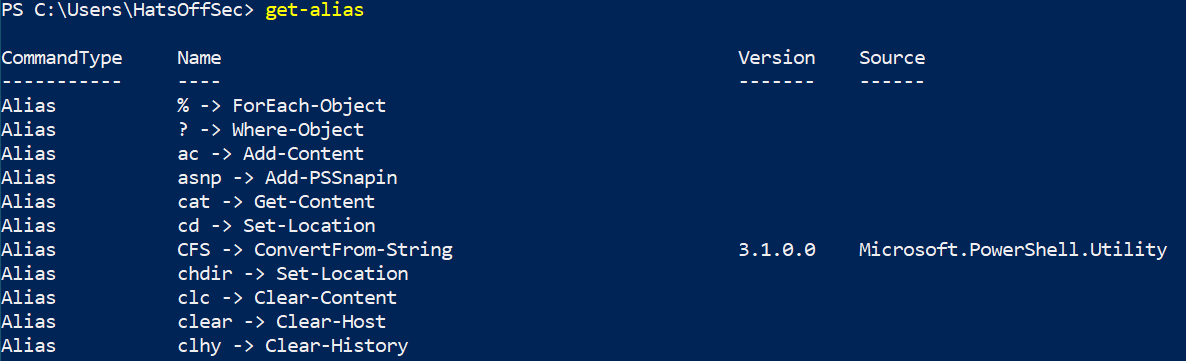
Get-Alias
Which gives the following output.
The ‘Name’ field is a little mis-leading as this is technically the ‘Name -> Definition’ field. If you want to show the Aliases for ‘Get-Process’ for example, you would need to run the following command:
Get-Alias -definition Get-Process
Which by default would show the following:
Meaning PS or GPS would give the same result as ‘Get-Process’ and all arguments or piped outputs would also be the same.
Just for fun, I changed ‘PS’ to open Notepad, to show how these can be changed. If you don’t think that is fun, then you are most likely a well-balanced human being. Well done. Get off my blog.
The ‘-option Allscope’ at the end is due to this being a protected Alias and gives an error otherwise.
Now when you type PS, you get Notepad.exe launch, which is almost as evil as Calc.exe being launched
This could be used to call a fake process list, in an attempt to confuse the investigator, or more creative aliases could be used to alert an attacker that they are being investigated, or even destroy evidence.
Base64 Encoded Evilness
There is a misconception with less experienced security professionals that any Base64 encoded PowerShell command is evil.
This is simply not true.
I have seen administrators use this technique for logon scripts, companies use this for updating software and of course bad guys.
Base64 in PowerShell needs to be UTF16 encoded. So if you are looking to run a script, ensure you do this first. My example at the start of this post was as follows:
Key things to look for once you have decoded the text is weird capitalisation, or commands being broken apart with a + symbol. These are basic string based detection avoidance techniques.
Piping
PowerShell allows the output of a command to be piped into another command. While this sounds similar to Linux, PowerShell outputs are seen as Objects, rather than text.
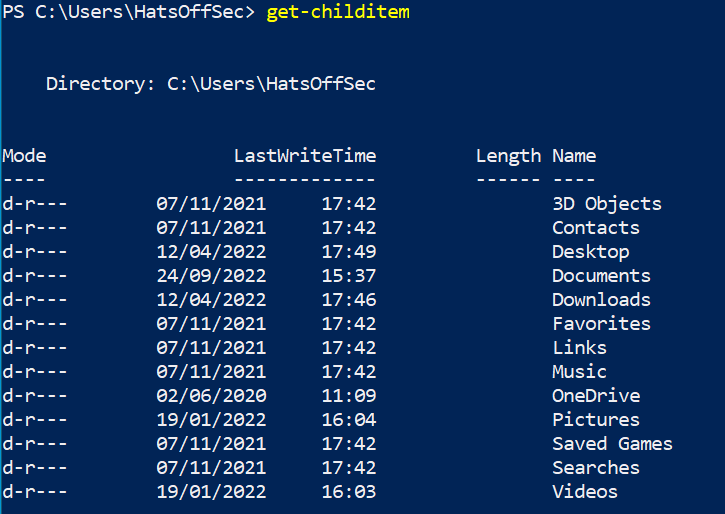
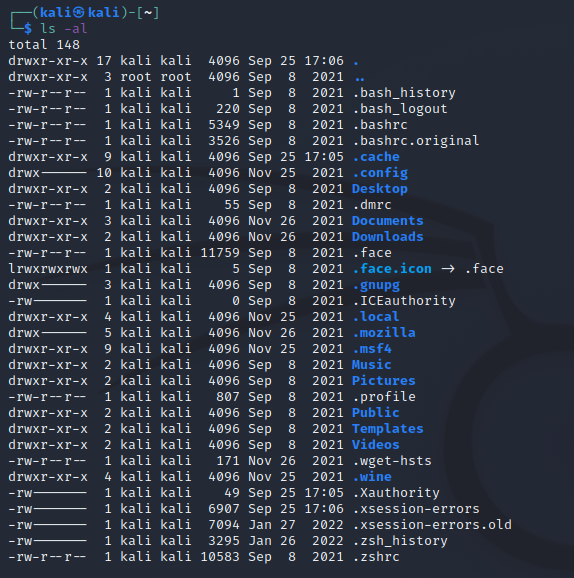
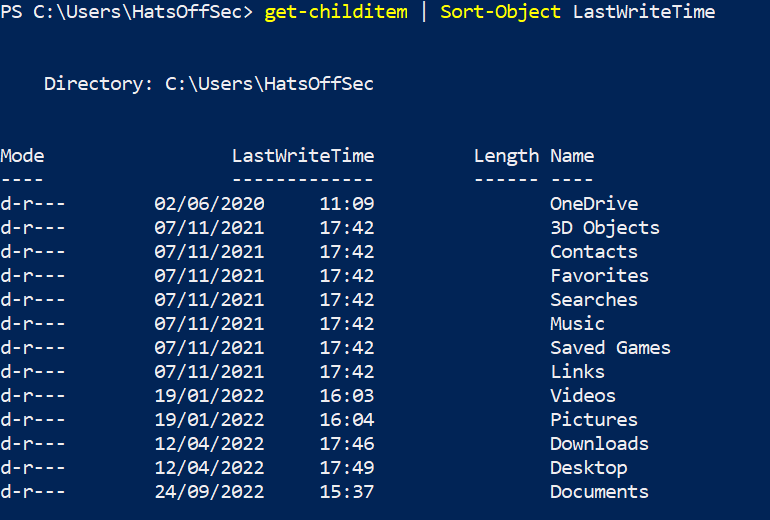
What this means is that you can manipulate the output with another command rather than trying to move the text around. A good example would be Get-ChildItem (gci, ls or dir as aliases). This will output the contents of your current directory in its default state.
Below we have a screenshot of PowerShell on a Windows host, vs the obligatory Kali VM I have because… reasons (CTFs mostly).
Both outputs look fairly similar.
If you want to change the output to be by last write time, with Linux I need to change the initial command, using -t sorts by last modified time. If you pipe the command into something like sort it sorts by the first character on each line.
For PowerShell you pipe the command into another command such as Sort-Object LastWriteTime which gives the following
The ability to manipulate the data as an object has some great benefits, such as being able to add or remove fields with select. However it can also cause the command to be come quite cumbersome and for people who have been scripting in Bash for a long time it can be quite jarring.
Logging
Unless you are fortunate enough to have an Endpoint tool that can record commands being run, you will need to manually enable PowerShell logging. The steps to enable this are a blog post of their own. So rather than side-track this post I will leave a couple of links here to external sites. (this is not an endorsement of products)
(yes is actually has a t on the end of the Mandiant URL… typos, amirite?)
Logging is essential if you want to see what PowerShell was doing on the host, especially if the script file was deleted before the investigation started!
Conclusion
This was a whistle-top tour of PowerShell and I am planning to follow up with shorter, more focussed posts. Judging by my posting schedule the next one should be out just before the heat death of the universe! I am also planning on dropping these on a YouTube video on my channel, but the process is a little more involved and requires a thing called “planning”, which I am unfamiliar with.
Now for the PowerShell conclusion! PowerShell is a really powerful tool that allows for manipulation of data in many ways. This is why threat actors like it so much! There is a lot more I could cover around how malicious scripts can be run or blocked, but that is better covered by someone on the pentesting side of security.
Learning PowerShell as a defender isn’t about learning how an attacker will use it, although that will be a useful side effect, it is about learning how to quickly and efficiently collect data from a compromised host. Once you have mastered this, you can use PowerShell to scale that up to as many hosts as you need to access.
Running scripts across an entire domain may feel daunting, but this is a great way to check for compromise at scale with no expensive or fancy tools.
I have conducted easily over 100 interviews during my career, almost all of which have been technical, and I have seen some great and terrible actions from both sides of the table. In this post, I want to cover off a few hints, tips and tricks that will help candidates and employers to get more out of their interview experience.
There are many sites out there offering questions and answers at varying levels of depth. I am hoping that by reading this you don’t just get the answer, but an understanding of why it is being asked in the first place. This knowledge benefits both the interviewer and the candidate.
We will focus on technical interviews for this post, with some fun horror stories added to make sure you keep reading!
Let’s get some personal annoyances out of the way early:
Memory Tests
I have a shocking memory, so I hate asking people to recall data, as I think it adds very little value. For example, asking for specific port numbers for applications (which is silly anyway, but I digress), or asking for Event IDs.
Ask yourself ‘What understanding does the candidate need to demonstrate?’
Using my one of my examples above, let’s try to make a better question by looking at what we need the candidate to demonstrate:
List the ports associated with <insert network application here>
Chances are you are trying to see if the candidate has experience with monitoring networks and understands that certain common network applications may be vulnerable, or mis-used for attacks. So how about instead asking
Can you talk me through some common network applications, specifically any that can be mis-used by an attacker
This is an open-ended question that passes the power to the candidate, they can now answer to their strengths and may even have some good examples of a time when they caught a Zone Transfer going to a workstation, or how they spotted lateral movement over SMB using PSExec with legitimate credentials. It can also be built upon by the interviewer to dig out more details and to push the limits of the candidates technical knowledge.
Which is much better than answering “Port 443 for SSL assuming no proxy in use”
Gatekeeping
No one likes gatekeeping, stopping someone based on silly requirements. What am I talking about? These questions:
Tell me about your home lab?
What Cyber stuff do you do in your spare time?
Do you have a blog?
What language do you code in?
If you are asking these questions, there is a good chance you are (unintentionally) gatekeeping. I have asked the first two questions in interviews previously, until it was pointed out to me that the security industry has changed, and we need to change with it.
We no longer purely need the uber geeks who live, eat, sleep and breath ‘Cyberz’, you don’t need to know a coding language to provide value to this industry.
It is OK to employ someone who sees this as a job and not a lifestyle.
The Technical Interview
I will skip the standard interview etiquette, as that has been done many times and isn’t specific to the security industry. All I will say is be on time and be professional.
A quick caveat to these questions is that my background is blue team, I will try to keep the questions as neutral as possible, but it wouldn’t be very professional of me if I didn’t recognise my own bias.
And now for the part you all scrolled down to (damn you!)
Questions!
I will put down notes to some of these questions as I go, they are not meant to be definitive answers, but should be research prompts and talking points depending on which side of the table you are. Some questions may have answers, but it’s my blog, my rules.
I have also added “Other discussion points” as ideas for what else can be talked about. These aren’t required and are more for if the candidate is stuck, or absolutely annihilating your questions.
These answers/talking points assume the interview is for a highly technical role, and not a management, or less technical position.
Where do you go to get information on vulnerabilities/exploits or to keep up to date with security?
This one is not gatekeeping, it is making sure the candidate knows where and how to get information. For example if a new vulnerability is found a SOC analyst would need to know what software is effected, how to detect any potential attack as well as understand if something is a false positive.
A pentester would need to know more in-depth information on how the vulnerability works to build an exploit, or look for proof-of-concept exploits to use as a baseline
A ‘bad’ answer for a technical person would be to simply state a news site. If someone is applying for a technical role and answers “The Register”, or worse yet “Instagram” (yes someone said Instagram to me once) without going into context as to why then these are bad. Not because the source is poor or disreputable, but because they are designed to be easily consumed at a less technical level.
Answering with “I get high level information from The Register, then follow the source links, or further reading links to get in-depth technical data” is much better.
Other discussion points:
CVE scores.
POC code use.
Reliability of blog posts/news articles
What is the difference between an ‘exploit’ and a ‘vulnerability’
This is a base level question in my mind, we talk about these on a daily basis and I would expect a technical candidate to understand the difference between them. Explaining it can be tricky, so don’t mistake someone struggling to find the right words with not understanding.
If the person is really struggling try asking pointed questions like “If I left a window open on my house, would that be considered a vulnerability or an exploit?”
You can change this around to something more like “If my window lock was found to be defective….” as that’s technically closer to being a ‘vulnerability’.
Other discussion points:
CVE Scores.
POC Code use.
Is the misconfiguration of a system a vulnerability?
Encoding vs Encryption. What are they and in which order would you apply them to a file
This can be separated into two questions, as the second half can push people into thinking they are for files only.
Encoding: The candidate could talk about sending unencoded data across the network and the restrictions that would need to be put in place to stop the data accidentally being interpreted as a command by the application. SMTP being a prime example, and its use of Base64 for attachments.
Encryption: The candidate should talk about how encryption protects data and can only be unencrypted by a the intended owner, or key holder. Talk about the different types of ‘key’ whether that be a password or a public/private key pair. Try not to get too bogged down in specific methods of encryption unless it is part of the role.
Other discussion points:
SSL vs HTTPS.
SSH Certificate handling.
Tools to decode (CyberChef).
What is the difference between an IDS and an IPS and which is better?
IDS stands for Intrusion Detection System, IPS is Intrusion Prevention System. The acronyms do give a big clue to the answer, but if this is a junior role you can talk instead about if prevention is better than detection. The easiest answer is to say “yes of course”, but what happens if the system is not finely tuned and you are flooded with False Positive preventions?
This can lead into business risk acceptance conversations, or stay at a technical level
Often the difference between IDS mode and IPS mode is a tick box on the device itself. If you are talking Network based IDS/IPS then you can also discuss if the device is in-line or mirrored. Most systems are in-line now, but historically the risk was deemed too great and security products where given a copy of the traffic rather than being able to manipulate the traffic directly.
Other discussion points:
True/False Positive/Negative.
Network architecture and sensor placement.
Business risk and risk acceptance.
Which is better, network based security or host based?
There are a few “it depends” style answers to this question, my typical go-to on this is that all network traffic needs to originate from somewhere and is being sent somewhere. Meaning host based is superior. However, not all host based technologies work on all devices (think printers, or routers). Meaning if you purely chose endpoint you may be blind to someone attacking a device that can’t have host based monitoring.
A good candidate will explain that this shouldn’t be one or the other, but how to implement BOTH network and host based security. This naturally leads into ‘Defence-in-Depth’ models where no single security product should be relied upon. Even users are considered part of model; with the right training and support, users can report when something isn’t right.
Other discussion points:
How to monitor for lateral movement.
How to secure ‘non-standard’ devices SCADA/IOT etc.
Defence in depth.
What is the difference between a Vulnerability Assessment, a Penetration Test and a Red Team Engagement?
This is less about the dictionary definition of each of these, but instead the understanding of depth. A VA will typically be very superficial and some security products will ignore it as noise.
A penetration test (pen test) is often done from a position of strength, meaning the tester may have been given an account with a high level of privilege and are testing a specific target. The scope of a pen test varies massively, but it is important to understand that these are done in a controlled and deliberate manner.
A Red Team Engagement, or a Black Box test are more akin to what an attacker would look like and have the highest potential risk for a business. However, they also provide the most accurate picture of how an attacker would get access to the environment. These are also the types of engagement where physical access may be attempted to the customer site.
A non-technical customer may use these terms interchangeably, but as a security professional, we need to understand there is a difference. Even if they do overlap on a Venn diagram.
Other discussion points:
Value provided by each of these engagements
Detection options for someone with physical access
Scope creep and out of scope detections
What are the different ‘families’ of HTTP response codes and give some common examples? Also explain which could indicate an attack or preparations for an attack?
The above is from the Mozilla Developer blog, and is a memory test, which we have already said we don’t like. So instead, make this list a bonus answer, but provide it to the candidate if needed and get them to explain which could indicate an attack, or recon, and why.
There are a couple of options on this one, and it is mostly based off context. For example seeing a ‘404 Not Found’ response to a request is nothing of real interest, but if there are thousands of them from the same IP address, then something weird might be going on.
Same if you are seeing a ‘500 internal server error’ on your database server, this may be an IT related problem, or someone may be attempting to compromise that server.
You would need to be looking at the log files and looking into more detail around what was actually being requested.
Other discussion points:
Webshells
‘Low and slow’ attacks vs ‘smash and grab’
Weblogs
Can you list some artefact locations, or methods, that an attacker or malware would go to maintain persistence on a host?
This question is a borderline memory test, however it is important for both Red and Blue teams to understand in order to do their job well.
Registry, Services, Scheduled Tasks, LNK Files, Startup Folder, and WMI are the most common ones. and can each be broken down. You can also talk about user initiated persistence like rogue accounts, or infected removable media devices. There are also Kernel level attacks like Rootkits or BIOS tampering/replacement.
This is less about getting a whole definitive list, and more about understanding why persistence is used. For a defender, seeing that malware re-infect, or the attacker popping back up means that something has been missed. For an attacker if the victim reboots the host, or applies patches, how will they get back onto that host?
Other discussion points:
Persistence via the network (WMI/Active Directory/Remote Accounts)
Windows Registry in general
Asking the ‘first place’ the candidate would look for persistence
Explain, in your own words, how a DoS attack would work. Specifically how the attacker would hide their identity and how they could ensure a larger payload was received than was sent?
Most people are aware that a Denial of Service (DoS) attack is generally about sending too much data to the victim in order to overload the system. But less people understand how this is achieved. For example there was a vulnerability in a web server (I forget which one, sorry) where if data was put into the initial GET request it would cause excessive load on the webserver, meaning this required very small amounts of data to be sent and didn’t need a huge botnet or other forms of Distributed Denial of Service methods.
The less subtle types of DoS is a Distributed Denial of Service (DDoS) attack. This typically means overwhelming the target with ‘legitimate’ data.
The attacker may also used a reflected and amplified attack. For example you could send a DNS request to a server with a spoofed source IP meaning the response would go to your victim (who you spoofed). This is a reflective attack. The amplification comes in the type of DNS request you would send, for example a DNS request with ‘any’ as an argument will provide all DNS names at that level. Meaning the response will be larger than the request.
Any service that uses UDP and provides a response larger than the request can be used in a reflective amplification DDoS attack.
Other discussion points:
Ways to detect if your systems are being used as amplifiers
Mitigations against DoS attacks
Which services should be publicly and anonymously accessible
What are the limitations to using ‘atomic’ IOCs (IP addresses, host names etc) and what can be done to overcome these limitations?
IOCs like IP addresses, domain names, file hashes are by their very nature historical, or backwards looking. Meaning that we are only looking at what has been seen before. They are also trivial for the attacker to change.
Instead identifying ways to look for the Tactics, Techniques and Procedures, or TTPs of the attacker allows us to look forward and proactively detect a new attack.
If asked this in an interview, respond by talking about what the attacker does that is less likely to change. What tools do they use, and what artefacts are left behind when they use them. Does the attacker favour a particular persistence method? Or do they put their tools into a specific folder? These types of indicators are still subject to change, but are less likely. If the attacker needs to use a different tool each time they attack, they will run out of tools very quickly. Instead they may iterate their current tooling, which will give an indication of timeline.
Everything an attacker does can and should be noted. If it’s relevant enough it can then be turned into an indicator and used against them.
For more advanced teams there is also the ‘Indicator of Attack’ which is looking at commands or actions taken to see if they constitute a malicious act. For example ‘whoami’ alone is a weak IOA, however ‘whoami’, ‘locate nc’, ‘ip addr’ and ‘netstat’ all being run in short order certainly raises the suspicion level.
Other discussion points:
Retroactive hunting for IOCs
Threat Intelligence methodologies
Sharing of TTPs responsibly
If you were to ping Google and watch the response on your host in a network capture tool, such as Wireshark, whose MAC address would be seen as the ‘sender’?
This one is a bit of a mind twister, but basically we are seeing if the candidate understands networking. The sender’s MAC on the return trip would be the last ‘hop’, or last routing device.
A basic switch does not have a MAC address for each port, but a router would have.
The answer that a lot of people typically give is “It would be Google’s MAC address”. Which is incorrect, it would be Google’s IP address, but not their MAC address.
We aren’t going to talk about load balancers or any other type of device here, as this is a thought experiment question, rather than a network architecture question, we use ‘Google’ as it requires no explanation, but feel free to swap this with something more unique to the role if needed.
Other discussion points:
Other information in the packet
How the TTL field can help identify the OS of the attacker
Other network tools such as Tracert
If you were to hack into a company, how would you do it?
Depending on the role this can be made simpler or more difficult. For a junior role, you would say that no patching is done and every user is a Domain Admin. This is checking to see if the candidate has a base level understanding of what tools could be useful.
For more senior levels, throw in a fully patched environment and escalate difficulty as needed if the role is for a pen-tester.
Dig into each step only if where appropriate for the role you are interviewing for. For example a junior SOC Analyst most likely doesn’t need to know which command line arguments are needed to make Mimikatz work, especially if the SIEM only collects Windows Event Logs.
Typical answer at a basic level would be to look for publicly facing, exploitable, systems such as websites or exposed RDP servers. You could also start with a phishing attack or other social engineering attacks to get that initial foothold.
From here following something like the ‘Cyber Kill Chain’ would give you the process, and looking at pen-test tooling such as the Metasploit Framework, Nessus or Mimikatz to name just a few.
Other discussion points:
Objectives of an attacker
What if this was an inside threat?
Exfiltration of data and how to detect it
If malware is seen attempting to execute on a host, talk about what actions you would take?
This one is a little ‘woolly’ by design, it is open ended in the sense that the obvious route to take is to remediate the host. However we said the malware was blocked.
Questions should be asked at this point; what details do you have? For example, if this was blocked from the user’s downloads folder the chances are this is a quick chat with the user and delete the file, did it run from a temp directory? If so which one? Was it associated with a Zip file, Outlook, Web Browsing?
Understanding how the malware got on the host in the first place is more important in this scenario than removing it. This gives the opportunity to talk about forensic artefacts like Alternate Data Streams to see where a file was downloaded from, LNK files if this was a masquerading as a document.
There are very few questions that give you insight into the analytical mind, so when a question like this is presented it is important for both sides to understand why it is being asked and probe into the possibilities of the answer.
Other discussion points:
What if it wasn’t blocked?
When should a host be re-imaged vs remediated
Is there ever a time when malware should be allowed to run?
Question ideas
We have gone through a number of questions (I was aiming for 10, then I stopped counting). We could continue infinitum with these questions and we could even take each question and spin it a different way, but let’s face it. No one wants to read that much!
So instead I will drop some questions below that you can use in interviews, or lookup answers for. All I will say is try to keep in mind the point of this post; to understand WHY you are asking or being asked these questions. Rather than just simply dropping “answer = this”
If you were to steal data from a company without being caught, how would you do it?
How would you mitigate this if you wanted to catch yourself?
Talk about why we use hashes for files
Talk about password hashing and how they help prevent password cracking
What is a rainbow table and how can it be mitigated?
Are rainbow tables still a viable option for an attacker?
Give some examples of how you could prove a user (opened a file || executed an application)
What is the NTDS.dit file?
Which registry hive would you need if you wanted to steal this and crack it?
How would you mitigate the theft of this file?
How would you steal this file as it is always locked?
Talk about methods of lateral movement and how to detect them from a host and network perspective
If a system cannot have security patches applied, how would you mitigate the risk to this system?
Conclusion
Interviews are a way to ensure the right person is being put into the right job. This works for both the candidate and the employer. This is why the correct questions are critical, they need to be relevant to the role in order to tick both of those boxes.
Look at what you ask your candidates and make sure you are asking the right question
Just to make you feel old, “i, Robot” was released in 2004. 18 years ago…. if you got this reference, you are old like me. Congratulations 🙂
AnyDesk is a legitimate, non-malicious piece of software that is used by companies world wide to manage their IT systems, and can be used for free to help family members with IT issues.
It is the scammer’s tool of choice because it is very easy to download and set up. There are also several options within AnyDesk that will allow the attacker to lock the victim out of their own machine, giving complete control to the attacker.
AnyDesk have taken steps to present the victim with alerts, and even disallow certain actions by the remote device, but the scammers utilise social engineering techniques to bypass these easily.
AnyDesk can be downloaded from the AnyDesk website here
Technical Aspects
AnyDesk can be run in two ways; installed like a tradition piece of software, or as a portable executable (PE). The way the software is run, will dictate the artefact locations on the disk. However the artefacts discussed here will be the same in both locations.
PE
C:\Users\<username>\Appdata\Roaming\AnyDesk\
Installed
C:\ProgramData\AnyDesk\
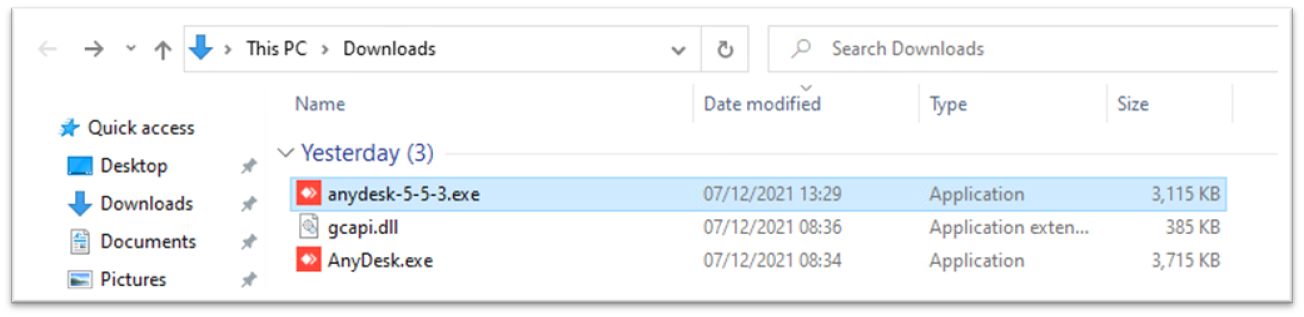
To check which way this application is being run, look at the file properties of the AnyDesk application. If this is from a scammer, it is most likely going to be in the Downloads folder, or the Desktop.
GCAPI.DLL
GCAPI.DLL is required for AnyDesk to run and for PE version may be seen in the same location as the executable, or will be seen in the Temp folder.
For user temp (PE) you will be looking by default in
c:\users\<username>\appdata\local\temp
For system temp (installed) files you will be looking
c:\windows\temp
AnyDesk will search for this file and download it if it is not already present. Later versions uses hash check due to search order DLL vulnerabilities, which will be covered later.
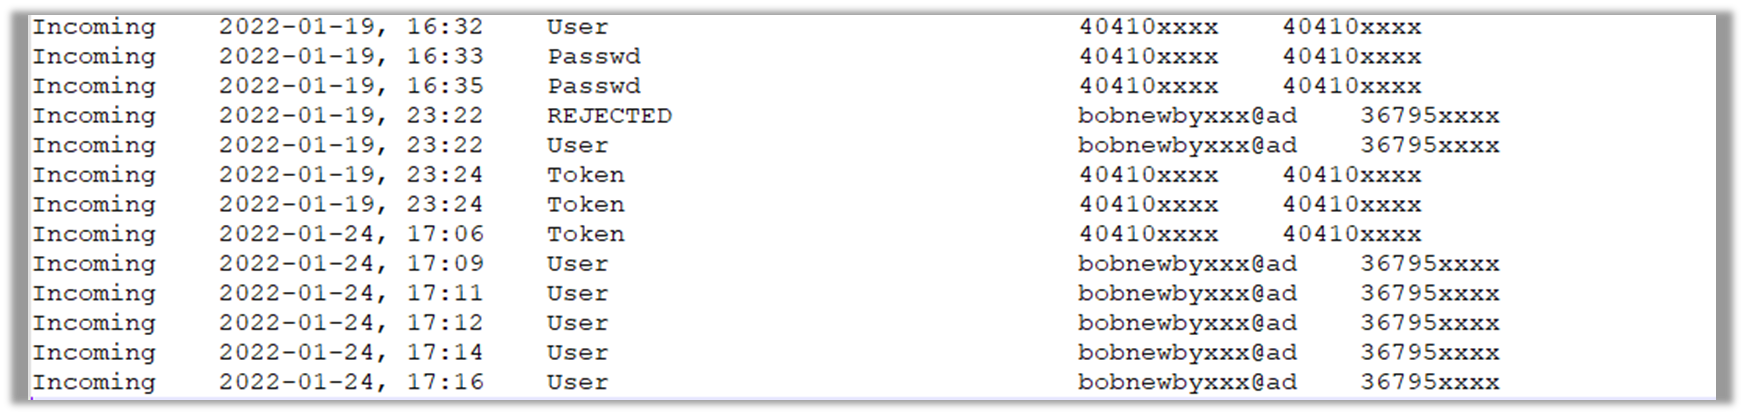
Connection_trace.txt
The Connection_trace.txt file shows incoming requests with a status of
User – for the local user accepting the request
Passwd – a password being entered by the remote system
Token – a ‘remember password’ check box being checked by the remote system
REJECTED – if the local user has rejected the request
The ‘Passwd’ and ‘Token’ settings are only relevant if the local system has set a password forunattended access. It is important to note that this is for incoming requests only, and does not display any outgoing connection data.
This provides you with time stamps and IDs to help focus your investigation and give you that initial hook that the baseline of a DFIR investigation. Below is an example that I have redacted to stop you all trying to connect to my lab!
Connection_trace.txt
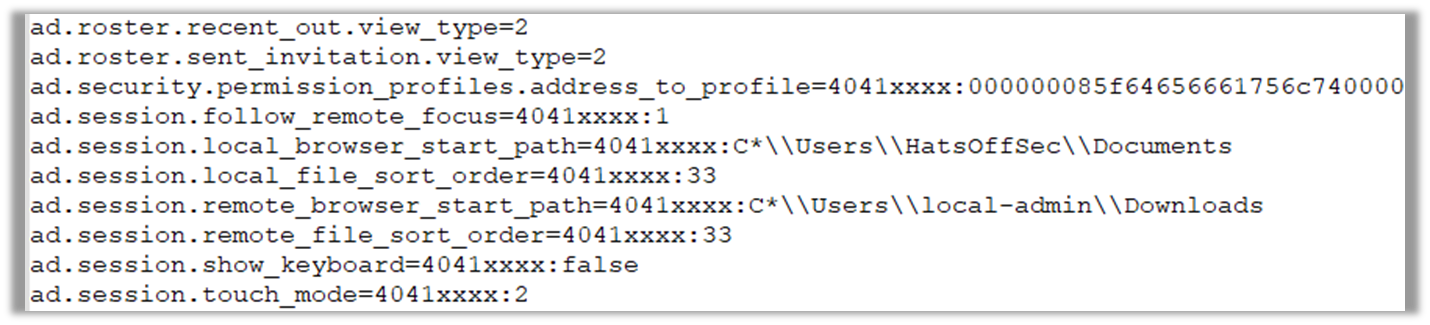
User.conf
The user.conf file is useful if an attacker has attempted to transfer files. You will get to see a directory path which, by default, will give away the username.
The connection from this host was ‘totally not a hacker’ which we can see is an alias for the local admin account.
This tells us a couple of things, for one the account ‘local-admin’ is not created by Windows, which means this account was intentionally created with that name, and based off the name is most likely a local account and not part of a domain.
It also shows that the attacker is running (most likely) as an administrator on that host. This type of information helps to build a bigger picture, and when law enforcement are involved these small pieces of evidence help them to prove that this system was the one the attacker used.
Ad.Trace
The ad.trace file is a verbose log and will be where the majority of effort will be spent. Use the timestamps and IDs from the Connection_Trace file to focus your investigation.
If this host was a scamming victim that has never used AnyDesk before, this file will still be heavily populated, but at least the investigation will be simpler.
So what can we see in this file?
Well straight off the bat we can see the version of AnyDesk that is installed. This can be important if the attacker is intentionally using an old version. We can also see the version of Windows used by the victim. Which is more useful if the host is not available to the forensicator. Finally on this screenshot we also can confirm that AnyDesk was not installed when it was run.
When looking at the version of AnyDesk the victim was running, we need to ask; why use that version?
Maybe it has features that don’t exist later? Maybe there are security vulnerabilities they can exploit? AnyDesk has worked to make the attackers life more difficult by adding features to highlight scam connections and disabling certain features. If an older version is being used, maybe it pre-dates these features.
Next up we look for the ID we picked up in the Connection trace file that was active at the time we need to investigate
First up 40410xxxx, which has been redacted for privacy (I don’t want you connecting to me… sorry.)
As previously seen, the alias of this is ‘totally not a hacker’, this alias field is typically the same as the local username, meaning this person has knowledge of the tool and what information is presented to the victim. While this alias is obviously done in jest, it could easily be ‘Microsoft Support’ or whichever agency the attacker is attempting to pass themselves off as.
This also shows us the remote version of AnyDesk and the Operating System in use
When setting this up I created an external AnyDesk system, rather than simply being on my own LAN, this was because I could see references to my own public IP address, but couldn’t prove if this was an artefact of the victim or attacker.
This screenshot shows the external IP address of the attacker, meaning we are able show where they connected from.
Obviously the attacker could take steps to use a remote proxy device or a VPN, but this is still another artefact to add to the collection that we are building around this user. If this is not their IP, could the IP owner be contacted? Are they aware that their systems are being used in this way? Do they keep logs?
Ad_Svc.Trace
As the attacker in this scenario forced a reboot of the remote machine, we are presented with a new artefact, the ad_scv.trace file. Typically you would only expect to see this on an installed version of AnyDesk, because it is the log file for the AnyDesk service.
We are able to see that the restart was initiated remotely and the volatile service was created on the victim machine.
What does this mean? Simply means that the attacker set up unattended access on the victim machine and then restarted the host. This unattended access means the attacker can connect at anytime by using a password they set, or tricked the user into setting, on the host.
Next we see that the attacker reconnects with the same ID and same IP address. This could prove useful if the attackers are using a ‘speak to my manager/support/customer retentions’ method. It will show if that person is using the same host, or is using the same IP address as the initial connector. This may also prove useful if the victim reports unusual activity involving the mouse moving on its own, or other indicators someone has control of the host.
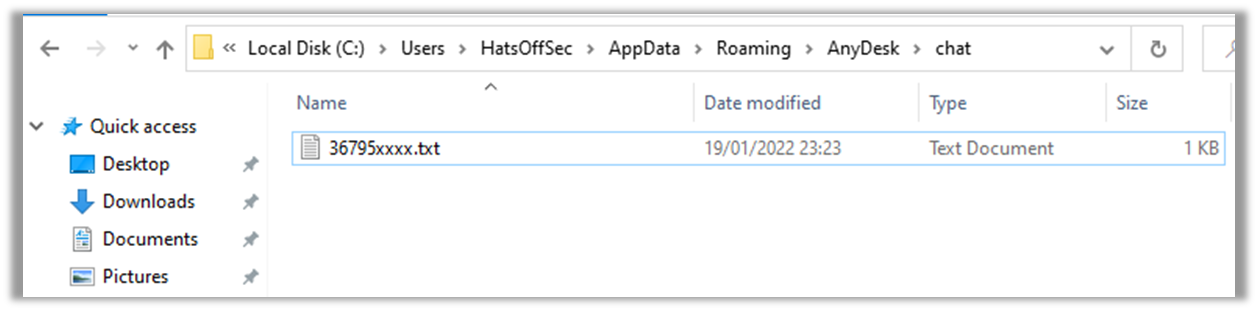
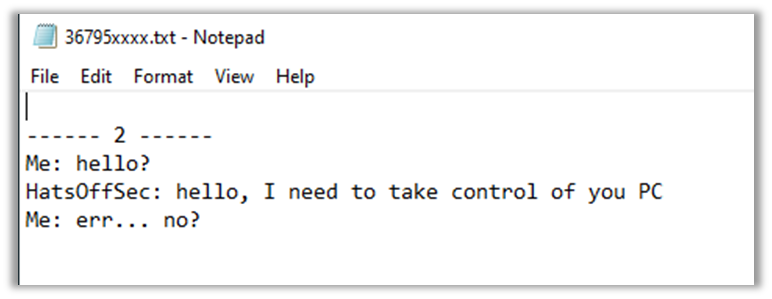
Chat
Anydesk has a built in chat feature which allows the remote and local user to communicate over text messages. The log of this file is held in a subfolder of the AnyDesk directory
This will have a text file named as per the client ID of the connecting AnyDesk. In here will be both sides of any chat conversation that was had. This could be very useful if the attacker used that to communicate with the victim. However most scammers will use the telephone.
These chat logs may not be used too often by Scammers, but they may prove useful in other forensic investigations.
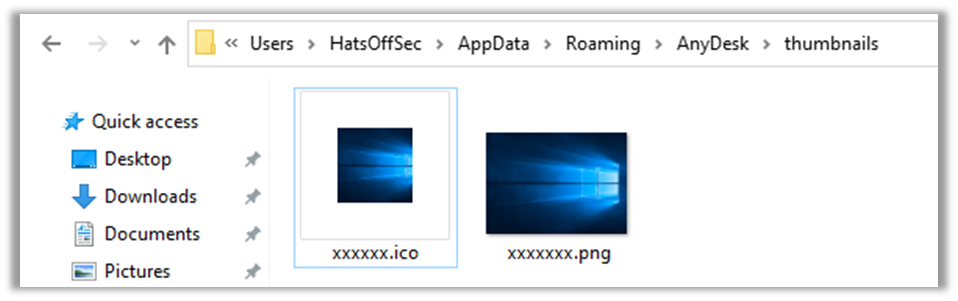
Thumbnails
Finally there is the Thumbnails folder, which keeps a small image of any machine connected to from this AnyDesk session, typically this will show the wallpaper in use by that machine, however is only available when an outgoing session has been established.
This would prove most useful to the law enforcement agencies whose job it is to prove the machine they are investigating is the one responsible for the connections.
Vulnerabilities
Earlier in the post we talked about using a specific version of AnyDesk and what that may mean.
There have been several vulnerabilities relating to the product, but mostly these would not be of interest to a scammer. Instead these are more interesting if you see old versions of AnyDesk downloaded as part of a malware campaign, or an attack. Especially if the GCAPI.dll file is provided as well.
Below are a list of CVEs relating to older versions of AnyDesk that could be exploited. The local privilege escalation in CVE-2021-40854 is trivial, but requires GUI access to the chat logs. the tl;dr is that you open the chat logs in a SYSTEM level notepad by default, then use File > Open to run cmd.exe.
CVE-2020-13160
AnyDesk before 5.5.3 on Linux and FreeBSD has a format string vulnerability that can be exploited for remote code execution.
CVE-2020-27614
AnyDesk for macOS versions 6.0.2 and older have a vulnerability in the XPC interface that does not properly validate client requests and allows local privilege escalation.
CVE-2020-35483
AnyDesk for Windows is vulnerable to a DLL hijacking attack, where an attacker places a malicious “gcapi.dll” file in the application directory and then sets the read-only attribute to prevent the file from being overwritten. AnyDesk will then attempt to load this DLL file when executed.
If an attacker can place a “gcapi.dll” file in the application directory, AnyDesk will run any malicious code contained in that file. The code will run with normal user privileges, unless the user specifically runs AnyDesk as administrator.
Note: this is especially critical for the portable version of AnyDesk, which is likely to be started from an unprotected non-system directory like the browsers download directory.
The vulnerability affects AnyDesk for Windows from versions 5.4.2 to 6.0.8.
CVE-2021-40854
AnyDesk before 6.2.6 and 6.3.x before 6.3.3 allows a local user to obtain administrator privileges by using the Open Chat Log feature to launch a privileged Notepad process that can launch other applications.
CVE-2018-13102
AnyDesk before “12.06.2018 – 4.1.3” on Windows 7 SP1 has a DLL preloading vulnerability.
CVE-2017-14397
AnyDesk prior to 3.6.1 on Windows has a DLL injection vulnerability.
AnyDesk offer advice to users, however the sad truth is that most home users who would be scammed have probably never even heard of AnyDesk before they are scammed out of their money. As such it is the job of people like you, reading this blog post, to help ensure that when this does happen. We can provide as much detail to law enforcement as possible to help them catch the scumbags behind this.
This point could be it’s own video. However in short: this can range from a Vulnerability assessment, simulating an attacker through to working with your internal teams to help threat hunting and defending
Vulnerability*
A weakness in Software code that can be used by an attacker to exploit that system
*In the context of the Log4J video. With a different context the definition may change.
Do I have software that is vulnerable?
Check out this page from the Dutch NCSC around known software and it’s vulnerability status, and a post from Bleeping Computer that shows a list of known vulnerable applications
We are re-engaging the Hats Off Security blog content onto YouTube. This means that instead of simply reading my insanity, you get to hear me say it instead.
Please head over to YouTube and take a look at this videos, and subscribe if you like the content.
Wait… Why aren’t there many videos?
This is a new project for me, and it takes significantly longer to create and edit videos than it does to write a blog post. I basically have to write the blog post, then record it, and edit it.
Over time more videos will be uploaded, but I am going to focus on making each video a higher quality than the previous one. The first ones may be a little rough, and there will 100% be some duds in there too (like the 2nd password short video)
Does that mean this blog is dead?
No.. although it hasn’t exactly been a hotbed of activity from me for some time. I will continue to use this platform for long form content that will enhance the YouTube experience.
Translated into English, that means I will be putting the technical (or boring) parts on here, as further reading for anyone who needs or wants it.
So what will this look like now?
Blog posts will be shorter and some may seem out of place without the video context. For example, I may put up a glossary of terms that I use in the video on here.
But I love reading your stuff!
Don’t worry you can still read my amazingly articulated anecdotes, while also listening to the soothing sound of my voice.
I have been creating network and computer security ‘Capture the Flag’, or ‘CTF’, challenges for a number of years now. My latest job had me doing this full-time for events that would attract several thousand players. During this time my team and I have learnt many important lessons on what to do and more importantly what not to do.
I want to share some of these lessons here as I see more and more CTFs being created. Note. My specialty is in forensics and the blue team, I have working knowledge of most disciplines, but you will notice most of my examples will be around the blue side of the house. They should all translate quite happily to the red side of the fence.
Why do you want to make a CTF?
Answering this will help guide your decision making. Bear in mind that these are not mutually exclusive and may bleed into one another. Some of the most common reasons include:
Business reason – This may be a trade show, or a way to get your company name out there. This reason obviously needs the most care and attention as your reputation is on the line
Teaching – You may want to show off some new tools or techniques, or maybe you feel there is a skills gap that needs to be addressed. This can be separate or joined with the Business element
Conference – There are many security events around the world, and whether your CTF is on-site only or for people who aren’t able to physically make it, this type of event allows everyone to feel that they are part of the action
Fun – You just want to make something because you love the topic and you want to share that with the community. This might be a solo undertaking or may be something that you get a peer group together for
I have tried to put these in order of ‘required structure’. What I mean by that is; if you are doing this as a business it should follow the same pattern as any project. There needs to be requirements, deliverables and all of the usual planning that would be put into a large piece of work. If you are doing this for fun, you should still have these, but they may simply be in your head. You will be given a lot more leeway by the people playing your CTF if they know it was a labour of love and is not trying to be a representation of what your company is offering.
Target Audience
Think about who you are going to be presenting this CTF to. If you are teaching people, then you will need to have entry challenges that are easier to solve. Whereas if you are looking professionals at a conference, you will most likely want to pull out the big guns and have some really difficult challenges. Look at the demographic in terms of discipline too. Are you presenting this to pen-testers, forensicators, developers? We will discuss discipline of challenges later in this post, but it is important to know who will be playing your CTF, or at least who you are targeting it at.
Difficulty
Most CTFs have a progressive difficulty. For example, with forensics your first question might be “what is the hash value of the forensics image”. This is typically generated by the capture tool and stored as a text file with the image. It is a simple ice breaker that allows people to ensure they understand the flag format for submission, and proves the file they are using is intact and correct. Bear in mind that if your target audience is entry level with regards technical skill, your entry challenges may need to be even simpler.
I have previously made trivia questions that prompt the user to think about their environment. For example, “Which command allows you to list files on a Linux workstation?”. Or “In Volatility v2 which plugin will show you the operating system the memory file was taken from?” Difficulty is best measured in 4 categories; easy, medium, hard and extreme.
Easy will be the ice-breaker and trivia type questions. Extreme will be something that only someone with a very in-depth knowledge of the subject would be able to do. An example might be having to carry out several different techniques in sequence in order to find the answer. Hard and Medium will sit in between. Think about the spread of difficulty in terms of weighting. If you are teaching you will probably want 35% easy 35% medium 25% hard 5% extreme (or 35/35/25/5). If you are looking at a conference or highly technical you may change to 10/25/40/25. Be honest about your own ability too, making an extreme challenge that is fun, engaging and realistic is not always easy. This is your CTF, you are making the rules!
Expertise/Discipline
As you can tell by now, my expertise means I am a lot more comfortable creating forensic challenges (network/host/memory) than I am making something like cryptography or malware reversing. You need to be honest about what you are able to do and play to those strengths. If you have a multi-skilled team like I had, then you will able to have a diverse discipline set.
Think about why you are making the CTF, if you are at a conference that is focused on pen-testing, or coding, then forensics challenges will most likely not go down too well. Conversely having a lot of challenges based on a single language also may not be ideal. Target audience is important here. You can have a mix of disciplines, but seek validation of any challenges you make that are not in your discipline. For example, if someone solves a challenge you wanted to be ‘extreme’ using strace, then you will look a little bit silly.
Learning Objectives
This is often overlooked, or lost, when creating challenges. Even if you are creating the CTF for fun, you are still teaching, or reinforcing, a skill. Ask yourself what it is you are teaching, and what the real-world application would be.
Something my team and I discovered is that we were pushing out too many challenges that had very limited real-world application. Examples of this were steganography challenges, mostly using the same tool but with different ways of hiding the password. Another was putting challenges on Twitter which were either simple XOR, rotation cipher or Base64/32/85 encoded. While these are interesting for an ice breaker, they were being over used and detracting from the overall experience.
Even at the high end; I got sick of hearing “CBC bit flip” whenever it came to difficult challenges. Looking again at relevance, do your challenges represent the real world? A perfect example of forensics would be to have everything based on Linux. While Linux forensics is an important skill and should be in a CTF, it should be put into the correct context. Perhaps the Linux image is from a web server that was compromised. Linux desktops are quite rare when held against Windows and Mac.
Narrative & Easter Eggs
A narrative isn’t strictly necessary, but it can be the difference between an OK CTF and a great CTF. If you have a general underlying story then it allows the player to play along in their heads. Quite often forensic challenges will be around stealing company data, you can enrich this with Easter eggs; have some emails, documents, web-browsing etc that plays into the narrative.
SANS DFIR team do an excellent job of this. When playing their ‘capstone’ events you can see the huge amount of time and effort they put into generating the evidence. While this is above and beyond what the average CTF will contain, remember that they are able to re-use this data for years with new artefacts being found each presentation. Putting a little extra effort into the challenges early will make for a more enjoyable experience later.
I would often post amusing (I thought they were funny at least) messages to Pastebin which were never referenced in the challenge questions, afterwards I would have people telling me they found, and it would become a conversation piece over beers. Having extra data in a forensics challenge also raises the difficulty. If I say “which docx file was opened on this date” and there are only 3 files, why bother looking up the data in the intended way when you can simply brute force it?
Flag Format
Traditionally a flag would be formatted as “flag:text_here” or some derivative of this. Using the word “flag” is not the best idea, as people can search, grep or otherwise look for that string instead of actually completing the challenge. You can have the player manually append the word “flag” in the submission field if need be.
Challenges that I have made recently now include dates from the evidence. For example, “What time/date did xx happen?”.
If you use this method don’t be afraid to over explain the format expected. In my previous example I would need to say “format is yyyy/mm/dd HH:MM:SS and in UTC”. Often new CTF creators make the assumption people will know what the flag should look like. This simply isn’t the case!
If you do use the traditional flag format, I would also recommend adding some fake flags to stop people finding alternative ways to find them. I have put 25,000 lines of random flag strings to stop people using forensic tools to search for the word “flag”. The truly evil part of that is that I didn’t use the word flag in any of the answers. Just be careful not to troll your players too hard with fake flags, only use them to discourage trivial challenge bypass!
Hard != Esoteric
Esoteric is a word I have come to use a lot when planning CTF challenges.
esoteric
/ˌɛsəˈtɛrɪk,ˌiːsəˈtɛrɪk/
adjective
1. intended for or likely to be understood by only a small number of people with a specialized knowledge or interest.
I have played many CTFs which had challenges involving a simple concept with an esoteric element added to it, to then claim it as a difficulty level. While this is a possible way of making something harder, it should not be relied upon.
A silly example would be “Guess the password on this zip file. Hint: The password is my date of birth, followed by my parent’s anniversary”. There is no way I would expect any of you to know that. I don’t even know what my parent’s anniversary was! (they divorced <redacted> years ago).
Other examples could be using a vulnerable PHP version, then tweaking the vulnerable piece of code manually. This then means you have changed it from a simple out of the box challenge that could be solved with metasploit/burp, to a challenge that needs a custom exploit based on a patch that was implemented and never published. Or a Vigenère cipher where you expect them to brute force the key. This only works if the key is easily guessed after getting the word ‘flag’ at the start.
This point deserves far more discussion that what I have written here, a general rule of thumb is to remember something I have said to my team many times “The challenge should be hard because the subject is hard, not because you’re being a dick”.
Evidence & Scope
Do you have a really cool forensic challenge, something that’s really exciting, revolutionary? All you need to do is download this 500GB file.
It’s probably not going to get the attention it deserves!
A trick I started to use on Forensic challenges was to use a tool like Kape to copy all of the important data to a USB stick, then copy extra ‘fluff’ data across, this was typically the contents of program files, and user appdata. I would then capture the USB stick which was 8GB in size. Since the unallocated space was empty this compressed down into a couple of hundred MBs.
With memory images reduce the RAM on the VM to something more manageable. You may have a bad day due to slow responsiveness, but it’s better than 8GB of memory just to capture a PID or two.
With regards to scope, make sure you have permission from the service provider to carry out the CTF, especially if you are hosting web applications. Azure and AWS have allowed CTFs to be carried out using their infrastructure. But I would recommend contacting them, or you could find your CTF being cut short.
Documentation
We all love writing documentation, right?… right?
You may think you don’t need to document your challenges because you can remember them, and even if you don’t you can re-solve them. No. This is a bad mindset to have. When you are getting 50 questions and complaints that a challenge isn’t working, you don’t want to be solving your own challenge, trying to remember the arguments to a tool, or trying to remember which offset the important thing as on. Write. It. Down!
By having good, simple walkthroughs you can test your challenges easily. You can get them validated easily! And you can re-use aspects of them in the future.
Testing & Validation
This proves to be one of the most difficult parts of creating a CTF; getting someone to test it. As we all know, testing your own work is never a good idea. You need external validation.
This is typically harder for a business to do than an individual (unless the business is a security consultancy or similar), as they would need to employ a small QA team to go over the challenges. With an individual, you can ask friends, or peers to help out. But in my experience, the uptake on actual testing is very low, especially if the discipline or difficulty is outside what your peer group is comfortable with.
Shouting out on social media, like Twitter, can really help. Asking for volunteers to test your challenges. Validation is more around confirming the difficulty. Does someone with the target demographic skill set agree with the difficulty? Do your peers agree? Who is right? No one and everyone! The stats at the end of a CTF will often be the real truth-teller. Did everyone solve your hard challenge? This happened to my team with a crypto challenge; it took ages to build and minutes to solve because there was a tool that had been developed for a very similar challenge used on a different CTF.
Do all of your challenges work? If you have documented the challenges then you can get people to carry out functional test. These are, as the name implies, a simple test to make sure the challenge works and can be solved in the way you intended. The testers will have your walkthrough and will be following it step by step. They can then feed back to you if they thought your route to solve made sense and if they think it would be reasonable to expect a player to take that route.
Platform
Where and how are you going to present your CTF?
There are engineering considerations to take into account when choosing a platform. Having a really popular CTF may seem like a great problem to have, but when people aren’t able to play, they may get frustrated quickly. Think load balancers and how to host these systems. Should you be looking at hosting on a cloud service provider rather than the old trusty 386DX you have lying around in the cupboard?
The current leader in open source CTF platforms seems to be CTFd. This platform can be cloned from GitHub, or installed via Docker allowing for quick set ups. It also has the ability to work alongside external platforms such as Major League Cyber.
There are other open source platforms out there and companies are now starting to pop-up with CTF Platform-as-a-Service. But these are still few and far between, as this is a growth (sub) industry, I expect to see a lot more managed CTF platforms going forward.
When choosing a platform look at if they have case sensitivity in the submission field. This type of detail is often overlooked when creating flags. Does the service offer any sort of post-CTF stats? Can you look at how many people participated? How many challenges were solved? etc etc.
Write-Ups
Players will write about your CTF, they will spoil, or burn your challenges. Accept this as part of the process and encourage it. I have seen companies claim that doing this was an infringement of intellectual property. I am no legal expert, but I doubt that would hold up in court!
By having people write up your challenges you are getting free and unfiltered feedback and your CTF will get even more publicity. Meaning if you run a second CTF you will have more players. Also, these write-ups will create more footfall to your website (if you have one!).
Retrospectives
Regardless of whether you run the CTF for profit generation or for run, you should run a retrospective analysis on how the CTF went. As this can be a blog post in itself I will advise you to read up on it here, or any other project management blog.
Conclusion
There is a lot to take in from the post, and not as many pictures as normal. I hope that you find this helpful when creating your own CTF. Keep creating and keep pushing what we know.
In this blog post I plan to show that using the NoScript plugin it is possible to glean information about what sites, or files, a user accessed while in a private browsing session and also whilst using the TOR browser. There are a number of assumptions that need to be made, most importantly that the user is actively using the NoScript plugin as it was intended, or in regards TOR that the user has “safer” or “safest” set as the security setting.
Other assumptions will be covered throughout the post, but these are not outside the realms of what would be considered expected user behavior.
What is NoScript?
NoScript is a browser plugin that enables the blocking of scripts/plugins (JavaScript, Flash, Java etc) from running on pages. These scripts are often used to correctly display a page to a user, but can also be used for more nefarious, or intrusive, purposes. NoScript looks to protect users by allowing them to decide which sites are allowed to run these scripts.
But surely there aren’t that many scripts?
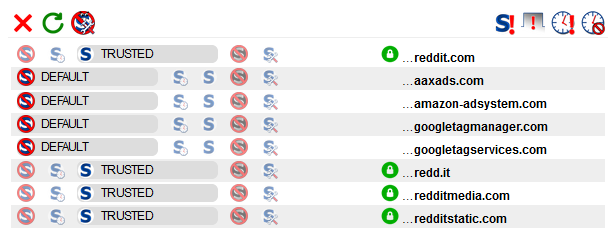
This image is from the Reddit home page. I would say it is safe to assume that Reddit would never knowingly deliver malicious content to visitors (and there is nothing in this image that would make me think that’s the case!). That is a very quick way to kill off a business. Like many sites they use tools to track site usage, and to deliver adverts.
For the purposes of this post, I won’t be going into what each entry means or why there are a number of different domains. The point here is that for a well know site there are several entries, not just one.
Plugins & Private Browsing
By default, plugins installed on both Firefox and Chrome do not persist to private browsing mode. Note that setting the browser to never remember your history is different to private browsing when it comes to installing plugins.
This means that the user will need to have enabled this feature for private browsing if we are to get artefacts from there.
What is Private Browsing?
Private browsing, or ‘incognito mode’ on Chrome, are designed to allow a user to browse the internet without leaving session data behind. This can be very useful if using a shared computer, for example in a library, or if you need to log onto your bank from a friends house. It is also useful for developers to fault find as it ignores existing cookies and deletes any newly cookies created at the end of the session.
It can also be used to hide evidence of malicious or criminal activity. Some users believing that anything done in private browsing is untraceable.
Private browsing can cause issues for a forensicator, and unless you capture the memory from a running machine, it can be very difficult to show what was done during that browsing session.
Private browsing does not protect against what the destination server is tracking. This is where plugins that protect a users privacy come in.
Browser Fingerprinting
‘Browser fingerprinting’ is a way of identifying your browser on the internet. Sites like AmIUnique.org can check your device to see how unique you are. JavaScript is often used to glean more information about your browser that will increase the likelihood of your browser being unique. By using NoScript you disable this additional layer of potential invasive behaviour.
Browser fingerprinting is worthy of its own blog post, so instead I will add screenshots from AmIUnique with NoScript enabled and disabled. Both will be done in private browsing on Firefox to avoid cookie contamination.
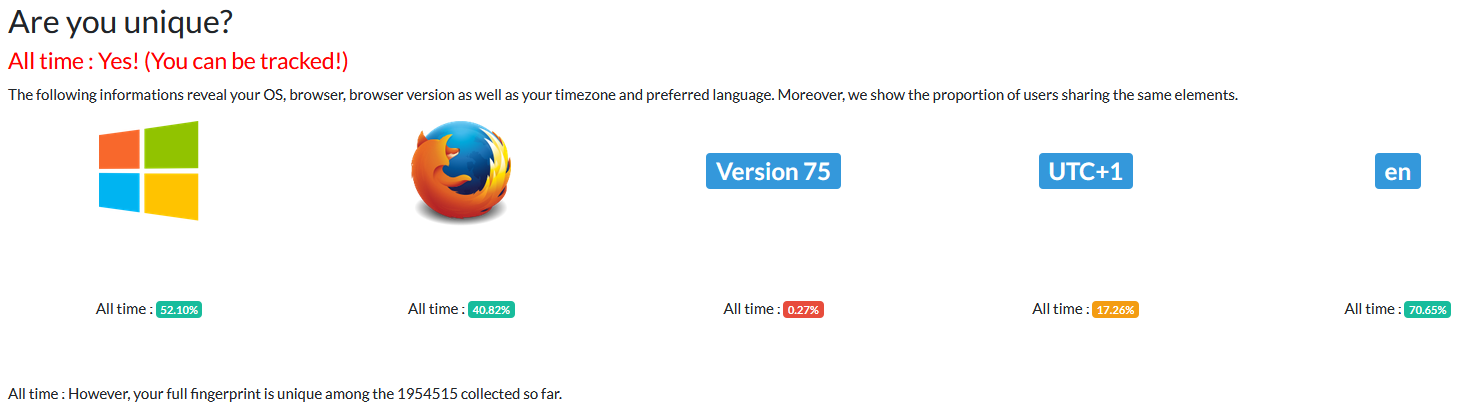
Firstly with JavaScript enabled (NoScript disabled)
The bottom line tells me that my fingerprint is unique across almost 2 million browser fingerprints. This means that beyond reasonable doubt this site can uniquely identify me.
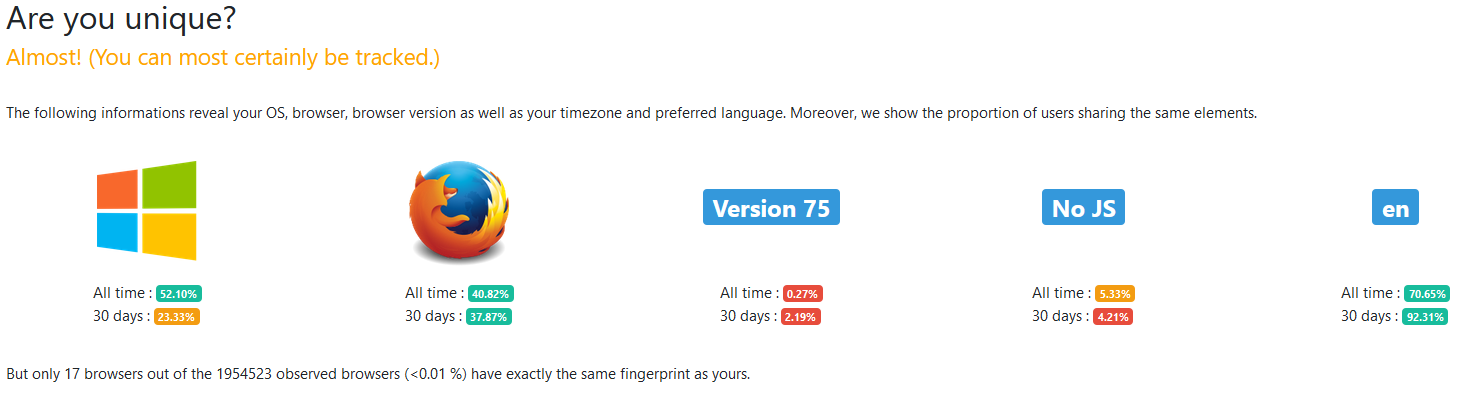
Now with JavaScript disabled (NoScript enabled)
With Noscript doing its job we can see that I am now one of 17 browser fingerprints out of almost 2 million. While this is still a crazy small amount, it adds an element of doubt that was not there previously. In a criminal case, this element of doubt could be the difference in this evidence being critical to the case.
The main use of browser fingerprinting, and the main reason NoScript exists is not because of criminal investigations, but to help prevent aggressive and invasive advertising. If you are looking to purchase a gift for a loved one, you do not want every advert you see to be attempting to sell you that gift. There are obviously many other examples but I will leave that to your imagination.
Recording of Settings
NoScript very helpfully remembers what you set, this helps if you visit a page on a regular basis and don’t want to have to keep adding it to the whitelist. This data persists across private browsing.
I visited cnn.com using Firefox private browsing with NoScript installed. I then manually allowed all scripts and allowed the page reload. Next I closed the private browsing screen and browsed to cnn.com. The settings from NoScript had been preserved. This means this data is being stored somewhere and can be extracted for our use.
Allowing Embedded Media
Certain investigations concentrate heavily on proving if certain media was viewed. If the user downloads the media then traditional forensics methods can be used to identify them. If the user views embedded media in a webpage whilst in private browsing, this becomes more of a challenge.
NoScript is able to allow a specific file embedded in a page without allowing scripts to be enabled on the whole site. This can often give a sense of security to the user as they only want to view a specific file and not have to worry about hidden scripts spying on them.
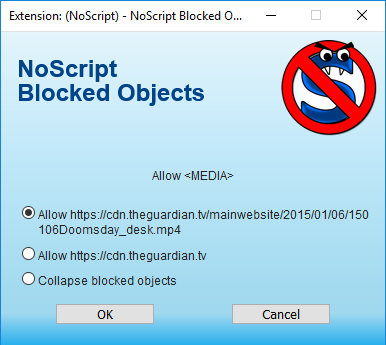
When a user visits a page where the script used to load the media have been disabled they will be presented with the above image in place of the media. When they click on the hyperlink in the center of the video the following pop-up is presented.
Whichever of the top two buttons the user presses, we will be able to see evidence in both live and captured systems.
From a Live System
In Firefox type about:addons into the address bar, this will take you to the built-in extension management page.
You can see from the image above that the private browsing icon is displayed, which indicates this plugin has been given permission to run in private browsing mode.
By clicking on ‘options’ from the ellipses menu we are presented with a page with 4 tabs
This can also be accessed from the ‘options’ button from within the plugin.
The ‘Per-site Permissions’ and ‘Advanced’ tabs are what we are most interested in here.
Per-Site Tab
From this page we can see which sites have been allowed access to play, as well as any individually files.
We can see here that a file named “150106Doomsday_desk.mp4” was allowed from “theguardian.tv”. I will go over how this works from the user’s perspective shortly.
Additionally on this screenshot we can see that “sans.org” has been temporarily trusted. Temporary trusts are per session only. So we know that sans.org was visited since the browser was launched, and that the user interacted with the plugin on that site.
The site “test.com” was added manually from this screen. The padlock icon is “match HTTPS only” and the only time I could make it appear this way was by manually adding it via this web interface. When the padlock is red this means that the permissions do not apply when HTTPS is in use. I would recommend reading the NoScript forums for more details on this feature if it is critical to your investigation.
Advanced Tab
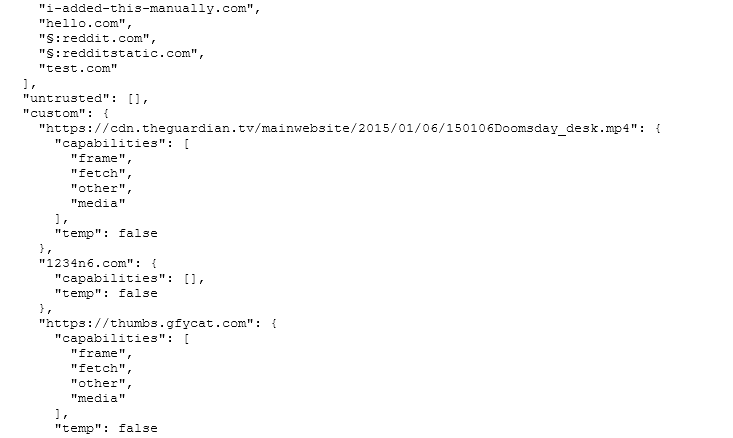
The advanced tab places all of the sites into a structured format and places the sites into order of last changed. You can see under “hello.com” where I was re-testing Reddit in order to find a link to an embedded video. “test.com” and “1234n6.com” (site of a friend, worth a visit!) were to test the ‘HTTPS Only’ feature.
From the hierarchy of the file “untrusted” and “custom” are siblings, do do not look at the MP4 as being a child of “untrusted”. “gfycat.com” was also used to test embedded media, except this time, I pressed the second radio button on the pop-up and enabled media across the site.
Finally the section symbol “§” appears to be used to donate the padlock symbol from the previous page.
Account Sync (live)
You can check if account sync is active on in the browser, the top right of the page will have the three lines that allow you to access the menu, when the menu is displayed you will be either asked to sign in:
or you will see the email address of the currently logged in account:
If you browse to
about:preferences#sync
you will see which items have been set to sync
From a Captured Image (Dead Box)
Before we can acquire this data from a forensic image, we need to know where it is stored. This is not documented anywhere that is easy to find and some dynamic analysis to see which files were being accessed by this plugin. Eventually this led me to “storage-sync.sqlite” database held at the following location
If you have a system with multiple profiles, you can find the default profile from the profiles.ini file which sits under the “Firefox” folder in this structure.
Account Sync
Account sync is the synchronisation of data between multiple devices. By default this will include data from plugins.
The data still appears in this location regardless of whether account sync is enabled or not. Be aware though, that if account sync is turned on this activity may not have occurred on this device, or even this user account.
A quick way to check if account sync is enabled is to see if key data is included in the same storage.sync database.
Below we can see what the data looks like without any sync information:
And now a different test user account with Sync enabled
As you can see there is an additional entry called “storage-sync-crypto” which shows that synchronisation is in play.
Interrogating SQLite databases
There are several tools that will interrogate a SQLite database, with varying degrees of success. I opted to use a Powershell module called PSSQLite.
Instructions on how to install it can be found here. On RamblingCookieMonster’s Github page.
Once installed I created the following script.
Notes:
– The export CSV is going to drop the file into the current directory. Bear this in mind when executing.
– You will need to complete the $database variable path yourself as I don’t know where you store your data!
Import-Module PSSQLite
#set variable with path to SQLITE database
$database = "<path-to-extracted-file>\storage-sync.sqlite"
#show columns
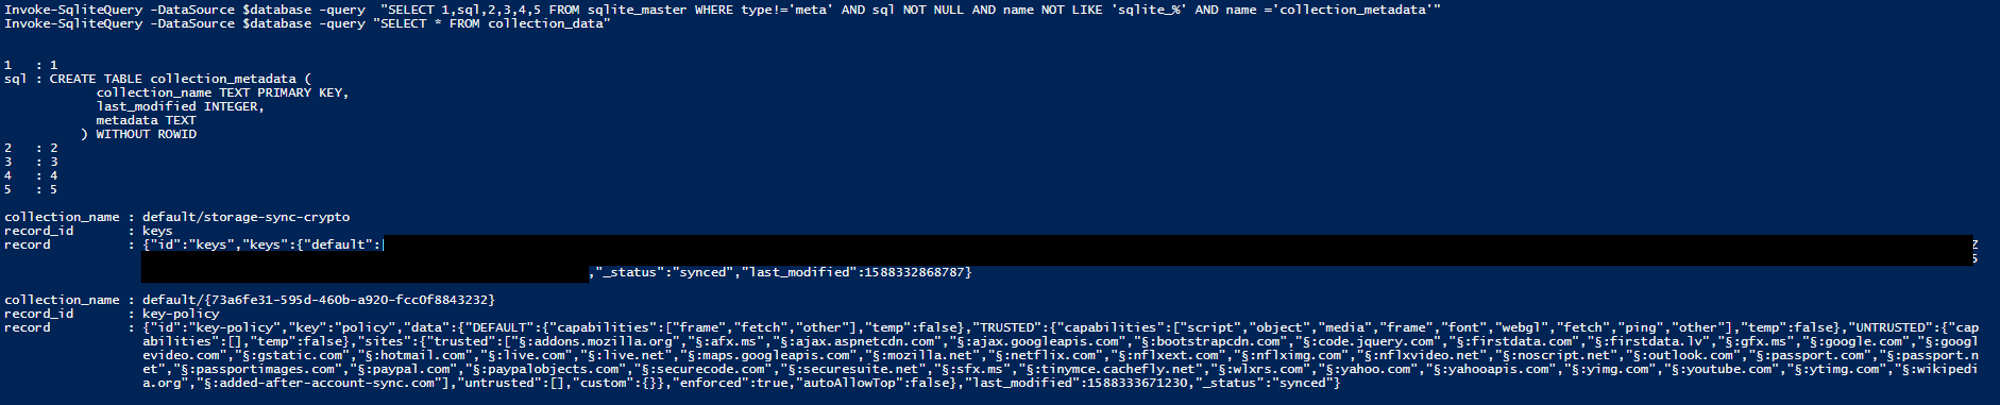
Invoke-SqliteQuery -DataSource $database -query "SELECT 1,sql,2,3,4,5 FROM sqlite_master WHERE type!='meta' AND sql NOT NULL AND name NOT LIKE 'sqlite_%' AND name ='collection_metadata'"
#show data
Invoke-SqliteQuery -DataSource $database -query "SELECT record FROM collection_data WHERE record LIKE '%key-policy%'" |
Export-Csv -Path .\output.csv
This allow you to manipulate the data from the CSV how you see fit. With a little more time I am sure this data can be formatted and prettified. If anyone wants to make a tool from this, please do so, but add a credit line linking back here.
TOR Browser
The TOR browser also works off a more secured version of Firefox. When the settings are changed to disable Javascript it loads the NoScript plugin in the background. So does this mean we can discover browsing activity from the TOR browser? Yes…. sort of.
Obviously the user would need to have set their security settings to either “Safer” or “Safest”, this is what will the plugin.
Another key point here is it appears the browser clears the profile data each time it loads. So the best we appear to be able to retrieve is anything that was accessed on the last browsing session.
And when interrogated using the same script as earlier, with an updated file location looks like this:
Here we can see evidence that I visited, and allowed scripts on, two sites. The first is DuckDuckGo’s onion site, the second is the onion version of Facebook.com. I didn’t want to risk attempting to find embedded videos on TOR for obvious reasons, but I am confident if I had viewed embedded videos, they would also be allowed here.
I was first introduced to Keybase a few years ago. It was explained to me as a place to validate your identity with regards to sharing public keys for email encryption. Showing that a Twitter account is controlled by you, or that a github repo is truly yours.
It is a good way to view the ‘web of trust’ around a person, especially if this is a person you would not expect to meet face to face.
I personally never paid much attention to it, not because of anything bad around Keybase, just because it didn’t solve any problems that I was facing.
Forensics on a Website?
At first glance, or if you used Keybase historically you may think that this is simply a website offering a web of trust style service. However Keybase was brought to my attention by a friend. They asked if I had ever carried out an investigation or researched it.
I was very confused, so I went back to see what had changed. I saw that there is now a downloadable app which offered encrypted chat, file transfer and groups. This piqued my interest as this is the criteria bad guy would look for if they wanted to discuss bad things!
Is Keybase Bad?
Just to get this out of the way first, at no point in this post am I attempting to say Keybase is anything other than a legitimate company/app offering a service. Anyone abusing this service is the same as those who abuse other communication mediums. I am carrying out this investigation purely as I feel it could benefit a forensicator that hasn’t come across this before.
Lab, Set-up and Basic Scope
I will be using virtual machines for this investigation. One is Windows 10 (1703) the other is Ubuntu 16.04. I will be creating 3 accounts on Keybase:
Windows 10 App
Linux App
Chrome Browser
My primary focus will be on the Windows machine, but I will be cross checking with Linux to see if similar artefacts exist.
I will create a ‘team’ and also ‘follow’ my accounts. I will look to see if I can find proof that the accounts are connected from host based artefacts alone. I will also look to see if I can capture files that were transferred privately or via the team and any other information that might be available.
The images I will use will be from unsplash.com or something I create in Paint (I am a terrible artist!!)
I intend to look at browser extensions, but that may wait for another blog post.
I won’t be looking at mobile apps, I do not presently have the set up to do so. I hope that someone reading this will pick up that research. I would be very interested to see how we could tie a user to a device.
Signing Up
Initial sign up is very easy from the app. You only need to provide a username, password and a name for your device. All of these are public. You do not need a valid email address and testing has shown you can use throw away services such as Mailinator.
Artefacts
Now the part you are really here for. Lets start going through the artefacts at what they mean.
Firstly the application itself is in the Local Appdata folder (I will refer to this from the ‘Local’ root folder in future file paths)
There is also a Roaming AppData folder created (I will refer to this from the ‘Remote’ root folder in future file paths)
<drive>\Users\<username>\AppData\Roaming\Keybase
There is no sign of this program in the Program files Directory.
Avatars
On both Linux and Windows there is an ‘Avatars’ folder which contains the profile picture of anyone who has appeared in the app. Unfortunately the app auto suggests people to you, as such this would be difficult to prove a connection. It does however indicate how active a person has been. 10-20 avatars were recorded from a couple of clicks after creating the account
Windows:
Local\Keybase\avatars
Linux
~/.cache/keybase/avatars
The files are named ‘avatar<9-digits>.avatar’ on both operating systems and after testing known profile images I can say that the 9 digits do not match. I confirmed the MD5 of two profile images. While the hashes matched, as did the image, the filename did not.
Within a few clicks I had this directory over 1,500 avatars.
Viewed Images & Avatars
The following folder contains a cache of image files that were viewed within Keybase. This includes Avatars and any images sent or received by the machine being investigated. It does not store all files, for example documents, that are transferred. Instead it is my belief this is simply caching any image that was viewable in the app.
\roaming\keybase\cache
This location is probably the most important to criminal investigations as the files in here show what images were shared. These files no not have a file extension, but are in their native format. In order to filter out Avatars from Images I would suggest sorting by size as the Avatars are typically no larger than 60kb in size, where as images are more in the region of 100+kb
Location of last sent file
It is possible to see the location of the last file that was sent over Keybase chat. There is no obvious difference from this artefact alone as to whether it was sent in a team chat or a 1:1 chat.
The following file does not have a file extension, but can be read using a normal text editor.
\AppData\Roaming\Keybase\Preferences
This could be useful if you suspect external media, encrypted media, or network locations may be in use. The artefact should read
The ‘1053’ appears to be an iterative Hex value for the log entry. The ‘go’ value and the makeup of the ‘tags’ field require further investigation.
Added to a Team
I believe it is important to know that a person can be added to a team without their explicit consent. I simply clicked on the individual I had previously spoken to (in my case my test account) and added them. I then got a notification to tell me I had been added.
When a person is added to a team the same keybase.service.log file will record the following entry
When trying to join a new team, the name must be accurate, you do not appear to be able to search for Teams from a direcory, but instead must know the Team name. There are several log entries relating to a Team not existing such as this one
<date/time> - [DEBU keybase teams.go:4180] 5b34 - TeamAcceptInviteOrRequestAccess -> Root team does not exist (error 2614) libkb.AppStatusError [time=238.3055ms] [tags:TM=IL6Xi8j8UVec]
Unfortunately the team name they searched for does not appear in this log if they were not successful.
Requesting to Join a Team
When a user requests to join a team the following log entry will appear in keybase.sevice.log
There does not appear to be any correlation, in this log file, between the invitation and acceptance to a group. The name of the group is only disclosed once an invitation has been accepted.
Team Chat Members to Team Name
I found that “Chat-Trace” was very useful in linking team members to team names. I have not done extensive research on this artefact to guarantee fidelity, however I was able to use the term to identify the users of the public team chat I joined.
<date/time> - [DEBU keybase user.go:333] 7d64 + Store user UserName [tags:chat-trace=M9L0hrvapdnb,platform=windows,LU=SwGnJf0KDRR7,CHTUNBOX=5ObRJV-ynRzY,CHTLOC=Sk6db9l6bidX,apptype=desktop,user-agent=windows:Keybase CLI (go1.13):5.1.1,CHTLOCS=KKNAAQHUSra6]
<date/time> - [DEBU keybase user.go:355] 7d67 - Store user UserName -> OK [tags:CHTUNBOX=5ObRJV-ynRzY,CHTLOC=Sk6db9l6bidX,apptype=desktop,user-agent=windows:Keybase CLI (go1.13):5.1.1,CHTLOCS=KKNAAQHUSra6,chat-trace=M9L0hrvapdnb,platform=windows,LU=SwGnJf0KDRR7]
Once you have a chat-trace you can use that to pivot either to or from the team name
Once you have filtered the log by chat-trace you can then filter again by “keybase user.go” to get a list of users. This list appears to be online users only, further testing required to confirm. In my test the channel info reported 11k users, but the log shows 84 unique usernames.
Leaving a Team
When a user leaves a team the following log entry will be seen
The Keybase app leaves a lot of useful information behind for forensicators to use in their investigations. While currently it is not possible to capture the chat history, we can see Usernames, Team Names and importantly what images where shared in these groups.
It is easy to fall into familiar habits as a human being, we see patterns in what we do and expect those patterns to persist. However when these patterns can be the difference between a person keeping or losing their job, we need to make sure we are being as vigilant as possible.
During the course of creating a forensics CTF which would be made available to 28,000 14-18 year olds, an image was taken of a Windows 7 machine. The learning objective of this challenge was to show program execution. In order to make the image more authentic a controlled amount of user activity was scripted and carried out by the author.
The challenge was created, tested and then made available to the target audience. During the event we received a message from one of the players telling us they had found “evidence of inappropriate browsing”. While the player reporting this was doing so in a ‘tongue-in-cheek’ way, we took this very seriously.
While I was confident the author had not acted inappropriately, proof was needed to show she hadn’t.
The following screenshot was all of the evidence that was provided:
We know that the various Index.dat files track user browsing activity, so looking at the screenshot, we can see why this was the players first assumption.
The player reported that they had run autopsy against the image and then looked through the URLs that Autopsy reported. This URL was listed alongside legitimate browsing activity as the search function used was a regular expression looking for anything matching a that structure.
My initial observation was looking at ‘ietld’, this seemed an odd thing to be at the beginning of a URL and was the first focus of the investigation. Additionally we could see ‘Internet Explorer’ was being reported as being related to this artefact by Autopsy.
IETLD
The first step was to see if there was a quick win for this. Had it been seen before? Did Microsoft have a knowledge base article on this?
As many people in the forensics world will be familiar with; the results were not as helpful as we had hoped, with Yahoo answers providing
While this is factually accurate, it is not overly helpful.
This Forensics site shed the most light on the situation, however as you can see by the screenshot below that was still not a complete answer, but at the very least we could see that it had been seen before and was the first confirmation that this file was expected behaviour and as you can see not indicative of user browsing.
This find was a relief, but was not a good enough answer for a company that prides itself on going that extra mile when it comes to all things security. From here I was determined to find out why this file exists and what it is used for.
Domain
Before following the rabbit hole, I decided to prove that browsing was not possible to this domain as I had a pretty good idea that the TLD portion of IETLD was a thing we like to refer to as a clue
The next logical step was to see if the domain had a IP address active on it. It did not.
Looking back through historical DNS records I could see no evidence of an IP address ever being associated with this domain. I knew that the domain hadn’t been visited by the content author already, but was the final nail in that coffin.
Index.dat
When you begin to research index.dat using the evidence provided above, you can see when someone not well versed in the nuances of Windows would jump to the conclusion this is browsing activity. There are many articles, forum posts and Q&A sites that indicate anything in index.dat is evidence of browsing history. Fortunately we know this is not the case, and the location of this index.dat makes it different to its namesakes.
This file was located in %APPDATA%/Roaming/Microsoft/Windows/IETldCache. Again notice the final folder name, this is indicating that this is not the browser history that we are looking at.
Additionally this file was filled with a list of domains, none of which would have been visited by the author.
Further Research
Carrying out more research, including looking up the various domain names we found in this file, we began to notice that these domains appeared on a list called the Public Suffix List, this list was originally created started by Mozilla in an attempt to stop TLD level cookies
A “public suffix” is one under which Internet users can (or historically could) directly register names. Some examples of public suffixes are .com, .co.uk and pvt.k12.ma.us. The Public Suffix List is a list of all known public suffixes.
The Public Suffix List is an initiative of Mozilla, but is maintained as a community resource. It is available for use in any software, but was originally created to meet the needs of browser manufacturers. It allows browsers to, for example:
Avoid privacy-damaging “supercookies” being set for high-level domain name suffixes
Highlight the most important part of a domain name in the user interface
Accurately sort history entries by site
We maintain a fuller (although not exhaustive) list of what people are using it for. If you are using it for something else, you are encouraged to tell us, because it helps us to assess the potential impact of changes. For that, you can use the psl-discuss mailing list, where we consider issues related to the maintenance, format and semantics of the list. Note: please do not use this mailing list to request amendments to the PSL’s data.
It is in the interest of Internet registries to see that their section of the list is up to date. If it is not, their customers may have trouble setting cookies, or data about their sites may display sub-optimally. So we encourage them to maintain their section of the list by submitting amendments.
History of Public Suffix List
The Public Suffix List was originally a Mozilla project before being open/crowd sourced. As such we can also find relevant references on the Mozilla Wiki page
Previously, browsers used an algorithm which basically only denied setting wide-ranging cookies for top-level domains with no dots (e.g. com or org). However, this did not work for top-level domains where only third-level registrations are allowed (e.g. co.uk). In these cases, websites could set a cookie for co.uk which will be passed onto every website registered under co.uk.
Clearly, this was a security risk as it allowed websites other than the one setting the cookie to read it, and therefore potentially extract sensitive information.
Since there is no algorithmic method of finding the highest level at which a domain may be registered for a particular top-level domain (the policies differ with each registry), the only method is to create a list of all top-level domains and the level at which domains can be registered. This is the aim of the effective TLD list.
As well as being used to prevent cookies from being set where they shouldn’t be, the list can also potentially be used for other applications where the registry controlled and privately controlled parts of a domain name need to be known, for example when grouping by top-level domains.
TLD vs ccTLD
There is some confusion about how to name the various parts of a URL or domain name. This is relevant when looking at ‘country code top level domains’ or ccTLD. Traditionally the “letters after the last dot” where considered to be the ‘top level domain’, with the word before that dot being called the ‘root domain’ and finally anything before the root domain being called a ‘child domain’ or more commonly with internet based systems the ‘sub domain’.
This logic begins to get confusing when we look at domain names ending ‘.co.uk’ for example. While ‘.uk’ is technically the ccTLD and ‘.co’ is the ‘second level domain’, it is generally accepted that ‘co.uk’ is the ccTLD.
Browsers are able to natively detect ccTLDs as these are heavily documented and are regulated under ISO standards. Non-standard TLDs are not regulated in the same way.
Conclusion
The domains contained within this particular index.dat are not evidence of browsing, they are simply evidence of Internet Explorer. This list is part of a publicly available list that is designed to allow domain owners to declare that they are controlling a TLD.