In this blog post I plan to show that using the NoScript plugin it is possible to glean information about what sites, or files, a user accessed while in a private browsing session and also whilst using the TOR browser. There are a number of assumptions that need to be made, most importantly that the user is actively using the NoScript plugin as it was intended, or in regards TOR that the user has “safer” or “safest” set as the security setting.
Other assumptions will be covered throughout the post, but these are not outside the realms of what would be considered expected user behavior.
What is NoScript?
NoScript is a browser plugin that enables the blocking of scripts/plugins (JavaScript, Flash, Java etc) from running on pages. These scripts are often used to correctly display a page to a user, but can also be used for more nefarious, or intrusive, purposes. NoScript looks to protect users by allowing them to decide which sites are allowed to run these scripts.
But surely there aren’t that many scripts?
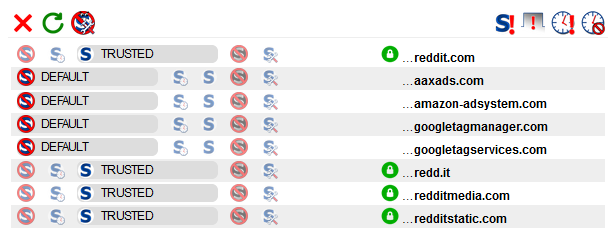
This image is from the Reddit home page. I would say it is safe to assume that Reddit would never knowingly deliver malicious content to visitors (and there is nothing in this image that would make me think that’s the case!). That is a very quick way to kill off a business. Like many sites they use tools to track site usage, and to deliver adverts.
For the purposes of this post, I won’t be going into what each entry means or why there are a number of different domains. The point here is that for a well know site there are several entries, not just one.
Plugins & Private Browsing
By default, plugins installed on both Firefox and Chrome do not persist to private browsing mode. Note that setting the browser to never remember your history is different to private browsing when it comes to installing plugins.
This means that the user will need to have enabled this feature for private browsing if we are to get artefacts from there.
What is Private Browsing?
Private browsing, or ‘incognito mode’ on Chrome, are designed to allow a user to browse the internet without leaving session data behind. This can be very useful if using a shared computer, for example in a library, or if you need to log onto your bank from a friends house. It is also useful for developers to fault find as it ignores existing cookies and deletes any newly cookies created at the end of the session.
It can also be used to hide evidence of malicious or criminal activity. Some users believing that anything done in private browsing is untraceable.
Private browsing can cause issues for a forensicator, and unless you capture the memory from a running machine, it can be very difficult to show what was done during that browsing session.
Private browsing does not protect against what the destination server is tracking. This is where plugins that protect a users privacy come in.
Browser Fingerprinting
‘Browser fingerprinting’ is a way of identifying your browser on the internet. Sites like AmIUnique.org can check your device to see how unique you are. JavaScript is often used to glean more information about your browser that will increase the likelihood of your browser being unique. By using NoScript you disable this additional layer of potential invasive behaviour.
Browser fingerprinting is worthy of its own blog post, so instead I will add screenshots from AmIUnique with NoScript enabled and disabled. Both will be done in private browsing on Firefox to avoid cookie contamination.
Firstly with JavaScript enabled (NoScript disabled)
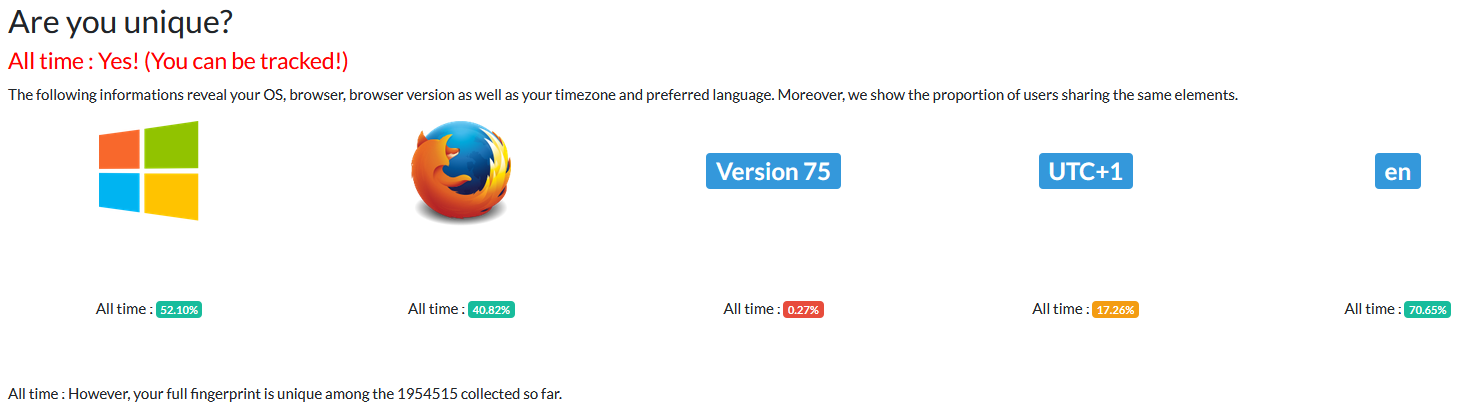
The bottom line tells me that my fingerprint is unique across almost 2 million browser fingerprints. This means that beyond reasonable doubt this site can uniquely identify me.
Now with JavaScript disabled (NoScript enabled)
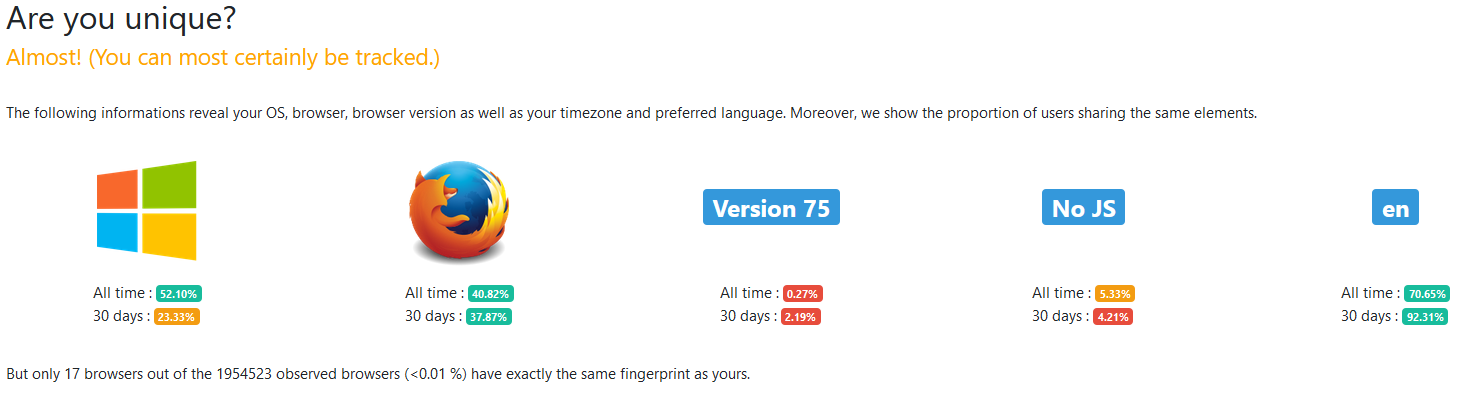
With Noscript doing its job we can see that I am now one of 17 browser fingerprints out of almost 2 million. While this is still a crazy small amount, it adds an element of doubt that was not there previously. In a criminal case, this element of doubt could be the difference in this evidence being critical to the case.
The main use of browser fingerprinting, and the main reason NoScript exists is not because of criminal investigations, but to help prevent aggressive and invasive advertising. If you are looking to purchase a gift for a loved one, you do not want every advert you see to be attempting to sell you that gift. There are obviously many other examples but I will leave that to your imagination.
Recording of Settings
NoScript very helpfully remembers what you set, this helps if you visit a page on a regular basis and don’t want to have to keep adding it to the whitelist. This data persists across private browsing.
I visited cnn.com using Firefox private browsing with NoScript installed. I then manually allowed all scripts and allowed the page reload. Next I closed the private browsing screen and browsed to cnn.com. The settings from NoScript had been preserved. This means this data is being stored somewhere and can be extracted for our use.
Allowing Embedded Media
Certain investigations concentrate heavily on proving if certain media was viewed. If the user downloads the media then traditional forensics methods can be used to identify them. If the user views embedded media in a webpage whilst in private browsing, this becomes more of a challenge.
NoScript is able to allow a specific file embedded in a page without allowing scripts to be enabled on the whole site. This can often give a sense of security to the user as they only want to view a specific file and not have to worry about hidden scripts spying on them.

When a user visits a page where the script used to load the media have been disabled they will be presented with the above image in place of the media. When they click on the hyperlink in the center of the video the following pop-up is presented.
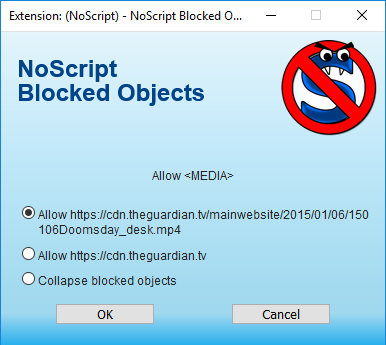
Whichever of the top two buttons the user presses, we will be able to see evidence in both live and captured systems.
From a Live System
In Firefox type about:addons into the address bar, this will take you to the built-in extension management page.

You can see from the image above that the private browsing icon is displayed, which indicates this plugin has been given permission to run in private browsing mode.
By clicking on ‘options’ from the ellipses menu we are presented with a page with 4 tabs

This can also be accessed from the ‘options’ button from within the plugin.

The ‘Per-site Permissions’ and ‘Advanced’ tabs are what we are most interested in here.
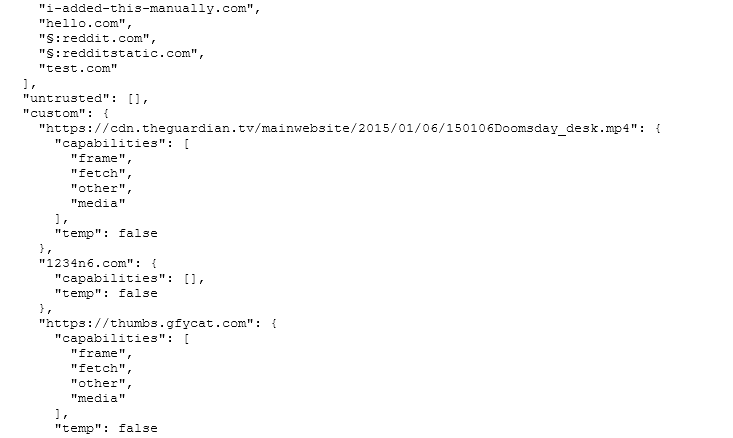
Per-Site Tab
From this page we can see which sites have been allowed access to play, as well as any individually files.

We can see here that a file named “150106Doomsday_desk.mp4” was allowed from “theguardian.tv”. I will go over how this works from the user’s perspective shortly.
Additionally on this screenshot we can see that “sans.org” has been temporarily trusted. Temporary trusts are per session only. So we know that sans.org was visited since the browser was launched, and that the user interacted with the plugin on that site.
The site “test.com” was added manually from this screen. The padlock icon is “match HTTPS only” and the only time I could make it appear this way was by manually adding it via this web interface. When the padlock is red this means that the permissions do not apply when HTTPS is in use. I would recommend reading the NoScript forums for more details on this feature if it is critical to your investigation.
Advanced Tab
The advanced tab places all of the sites into a structured format and places the sites into order of last changed. You can see under “hello.com” where I was re-testing Reddit in order to find a link to an embedded video. “test.com” and “1234n6.com” (site of a friend, worth a visit!) were to test the ‘HTTPS Only’ feature.
From the hierarchy of the file “untrusted” and “custom” are siblings, do do not look at the MP4 as being a child of “untrusted”. “gfycat.com” was also used to test embedded media, except this time, I pressed the second radio button on the pop-up and enabled media across the site.
Finally the section symbol “§” appears to be used to donate the padlock symbol from the previous page.
Account Sync (live)
You can check if account sync is active on in the browser, the top right of the page will have the three lines that allow you to access the menu, when the menu is displayed you will be either asked to sign in:
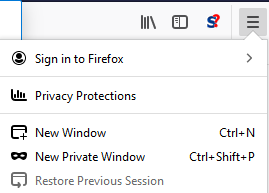
or you will see the email address of the currently logged in account:

If you browse to
about:preferences#sync
you will see which items have been set to sync

From a Captured Image (Dead Box)
Before we can acquire this data from a forensic image, we need to know where it is stored. This is not documented anywhere that is easy to find and some dynamic analysis to see which files were being accessed by this plugin. Eventually this led me to “storage-sync.sqlite” database held at the following location
%appdata%\Mozilla\Firefox\Profiles\<profile>\storage-sync.sqlite
If you have a system with multiple profiles, you can find the default profile from the profiles.ini file which sits under the “Firefox” folder in this structure.
Account Sync
Account sync is the synchronisation of data between multiple devices. By default this will include data from plugins.
The data still appears in this location regardless of whether account sync is enabled or not. Be aware though, that if account sync is turned on this activity may not have occurred on this device, or even this user account.
A quick way to check if account sync is enabled is to see if key data is included in the same storage.sync database.
Below we can see what the data looks like without any sync information:

And now a different test user account with Sync enabled
As you can see there is an additional entry called “storage-sync-crypto” which shows that synchronisation is in play.
Interrogating SQLite databases
There are several tools that will interrogate a SQLite database, with varying degrees of success. I opted to use a Powershell module called PSSQLite.
Instructions on how to install it can be found here. On RamblingCookieMonster’s Github page.
Once installed I created the following script.
Notes:
– The export CSV is going to drop the file into the current directory. Bear this in mind when executing.
– You will need to complete the $database variable path yourself as I don’t know where you store your data!
Import-Module PSSQLite
#set variable with path to SQLITE database
$database = "<path-to-extracted-file>\storage-sync.sqlite"
#show columns
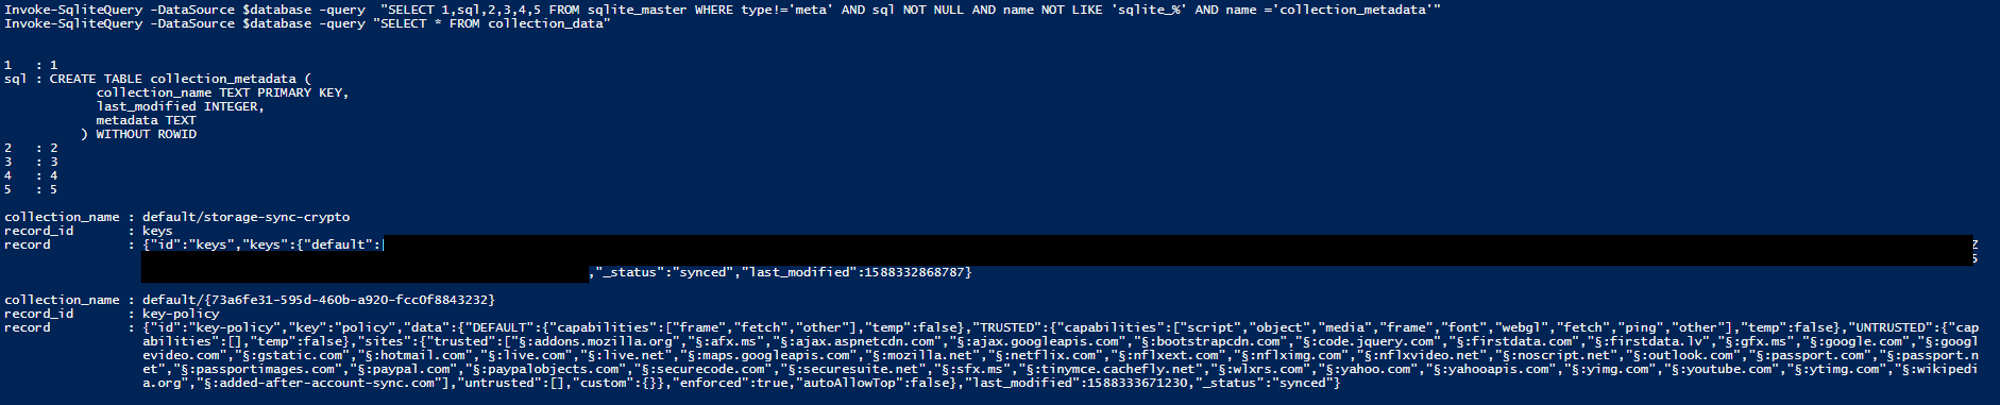
Invoke-SqliteQuery -DataSource $database -query "SELECT 1,sql,2,3,4,5 FROM sqlite_master WHERE type!='meta' AND sql NOT NULL AND name NOT LIKE 'sqlite_%' AND name ='collection_metadata'"
#show data
Invoke-SqliteQuery -DataSource $database -query "SELECT record FROM collection_data WHERE record LIKE '%key-policy%'" |
Export-Csv -Path .\output.csv
This allow you to manipulate the data from the CSV how you see fit. With a little more time I am sure this data can be formatted and prettified. If anyone wants to make a tool from this, please do so, but add a credit line linking back here.
TOR Browser
The TOR browser also works off a more secured version of Firefox. When the settings are changed to disable Javascript it loads the NoScript plugin in the background. So does this mean we can discover browsing activity from the TOR browser? Yes…. sort of.
Obviously the user would need to have set their security settings to either “Safer” or “Safest”, this is what will the plugin.
Another key point here is it appears the browser clears the profile data each time it loads. So the best we appear to be able to retrieve is anything that was accessed on the last browsing session.
The profile data is saved here:
<installed location>\Tor Browser\Browser\TorBrowser\Data\Browser\profile.default\storage-sync.sqlite
And when interrogated using the same script as earlier, with an updated file location looks like this:
![]()
Here we can see evidence that I visited, and allowed scripts on, two sites. The first is DuckDuckGo’s onion site, the second is the onion version of Facebook.com. I didn’t want to risk attempting to find embedded videos on TOR for obvious reasons, but I am confident if I had viewed embedded videos, they would also be allowed here.

Thanks foor this