
Finding the last Drive letter used by the USB device is actually quite simple…. or at least it should be! Go to the following Key:
SYSTEM\MountedDevices
Each drive letter is listed, however in my example on the VM the E: drive has no usable data in it (correction at the bottom of the page). The Seagate drive is not identifiable in the list, neither the volume name or serial number are in the descriptions, I am assuming this is because of the previous issues with it being an actual Hard Disk and not flash memory.
The Generic USB device *is* in the list with the serial number
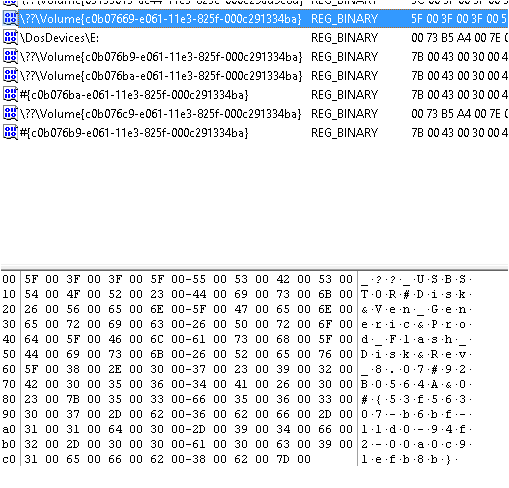
But as you can see from the details of the data, there is no mention of a drive letter.
In an ideal world highlighting the last drive letter (seen above under as \DosDevices\E:) would have, in its description, the serial number of the last attached device. I believe it is not there because the Seagate hard drive was the last device to use the E: drive, which as we saw in a previous post was quite stubborn about sharing its serial number.
Conclusion. Fail?
You may be wondering why this is lack of data may be important, after all its just a fail right? Wrong. By including this in your report you are showing that you have covered the bases, there is an explanation as to why the drive letter is not showing the data you expected. If this is missed out of a report which ends up in court the defence lawyer will use it to show that you are omitting data which may “prove” his client innocent. Obviously this is not the case, but you do not want the guilty to be let off because of a lack of confidence from the jury in your technical integrity.
Obviously that’s a worse case scenario, but even if you wind it down a little; I write every technical report as if another person with a higher level of experience than myself will criticise it. That way you find yourself justifying the parts of the report that don’t work.
Does this lack of data prove anything?
Yes. This proves that both devices were not present at the same time, if they were there would be another drive letter present. After all
- A: – Reserved for floppy drives (still!!)
- C: – Main system drive by default
- D: – CD-ROM by default
- E: – Next available drive letter
of course check to make sure the other drives are being used at their default settings! You may look silly if there is no CD-ROM and your report assumed there was.
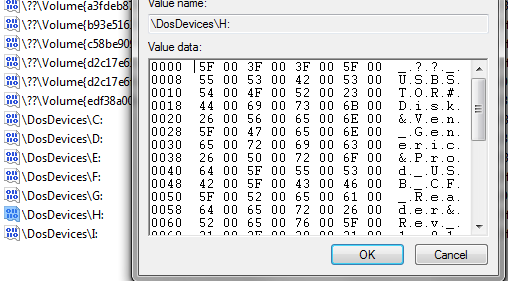
To prove it does work
Just to show you what you would expect to see, I had a look at my Windows 7 host live registry and found the USB device was last plugged in as the H: drive on my machine.
 E: drive has no usable data in it
***Late Addition***
Disk Signature
I would like to make a correction to the first paragraph of this post, I stated that “E: drive has no usable data in it” after continuing research I have discovered that is not accurate. The data held under E: does have useful information in it! From the screen capture above we can see the Hex value “00 73 B5 A4” this is the “Disk Signature” of the drive used. Using a Hex editor like HxD it is possible to open the physical disk and find this string under 0x000001B8-0X000001BB – this is where I have found it in relation to “00 55” marking the end of the MBR sitting at 0x000001FE-0x000001FF on the devices I had available to me.
This ID assigned to the Master Boot Record (MBR) so is not permanent, but if the disk has not been formatted or you can recover the data around the MBR, it may help to prove this device was connected.

Pingback: USB Forensics Update | Hats Off Security