Mounted Devices Key

Here is a screen capture of a Mounted Devices key. As you can see it can appear quite daunting.

Mounted Devices

In a previous blog post I covered how a USB Mass Storage devices would simply convert ASCII to Hex and use that as the data field as seen here:

mounted devices usb ascii

This explains the longer Hex strings starting 5F (_) and 5C (\). Now let’s look at the shorter strings….

When I carried out the USB Forensics research for my earlier blog posts I did not believe there was much use in the other Hex values from the first image. I know “C:” and “E:” are physical installed hard drives and “D:” is a CD ROM drive; leaving “F: G: H: I:” as removable devices.

You will notice that there is a distinct difference between F & G and H & I. Both drives H & I are USB “Pen Drives” and although look identical are actually two different devices with “Generic&Prod_USB” at the start of the description.

F & G however are seen as disk drives (one is actually an Android device, but I am not going to touch mobile forensics today 🙂 ). The G: drive is the elusive “My Drive” device from the USB Forensics series I did earlier in the year.

What does it all mean?

Let’s start with the C drive.

C drive hex

You can see from the ASCII translation this disk starts with “DMIO:ID”, this threw me a little during my initial research as both drives have the same information. I then realised this was because they are Dynamic Disks. I am not going to talk about using this key to identify Dynamic Disks as this is regarding removable devices and in my experience it is highly unlikely a Dynamic Disk would be used as removable storage due to the limitations of Operating System that would come with it.

CD-ROM (DVD, showing my age)

D drive hex

As you can see from the ASCII this tells you it’s a CDROM drive. Simples.

Skip the USB Pen Drives as they are covered in the USB Forensic series

“My Drive”

Here we have the G: drive which is the USB HDD known as “My Drive”

G drive hex

The first 4 pairs of Hex (00 73 B5 A4) are the important ones in terms of identifying the drive. These show the Disk Signature of the drive.

Using a program like HxD it is possible to open the drive up (other Hex editors are available) and so far I have always found the Disk Signature at 001b8-001bb

hxd output

This disk signature will change if the disk is formatted. Therefore proving with a high degree of certainty that this is the device you are looking for. After all in order to get this number twice from the generated system would be 1:(16*16*16*16*16*16*16*16), so possible, but very unlikely.

The remaining Hex is related to offsets, if you search for “disk cloning” or “disk signature collisions” you will see many articles explaining the full breakdown.

How is this even useful?

Well from the USB Forensics series you will see that it was a little inconclusive in places and proving that the “My Drive” device was plugged and hadn’t been formatted since was difficult. Using this method you now at least have an alternative to the volume ID for slower non-readyboost devices.

Posted in USB Forensics, Windows Forensics, Windows Registry Forensics | Tagged , , , , , , | 2 Comments

USB Forensics Update

Update #1

This is a late update to USB Forensics Part 4 – Volume Serial Number

An important side note: As I have done more investigations I realised that this key will not be populated if the machine is deemed “too fast” for Ready Boost. This also changes depending on the OS

  • Windows 7 – If an SSD is present Ready Boost is defaulted to off
  • Windows 8 – If an SSD is present the system will test to see if Ready Boost is required

The reasoning behind turning off Ready Boost as far as I can tell is to do with write times to an SSD. As we all know SSDs are not as write tolerant as the older cylindrical disks therefore automatic defrag is disabled as is pre-fetch (which is another pain in the backside from a forensics standpoint!).

Knowing more about Ready Boost means that it should hopefully help to understand why a drive may not appear as expected in the EMDMgmt key; Windows wouldn’t attempt to make a cylindrical disk a Ready Boost device as there would be no increase in performance associated with it.

Update #2

In relation to USB Forensics Part 5 – Determine the Drive Letter

Disk Signature

I would like to make a correction to the first paragraph of this post, I stated that “E: drive has no usable data in it” after continuing research I have discovered that is not accurate. The data held under E: does have useful information in it! From the screen capture above we can see the Hex value “00 73 B5 A4” this is the “Disk Signature” of the drive used. Using a Hex editor like HxD it is possible to open the physical disk and find this string under 0x000001B8-0X000001BB – this is where I have found it in relation to “00 55” marking the end of the MBR sitting at 0x000001FE-0x000001FF on the devices I had available to me.

This ID assigned to the Master Boot Record (MBR) so is not  permanent, but if the disk has not been formatted or you can recover the data around the MBR, it may help to prove this device was connected.

Posted in USB Forensics, Windows Forensics, Windows Registry Forensics, Windows Registry Forensics | Tagged , , | 1 Comment

Research: Decoding LanmanServer\Shares

For my first fully independent research topic I chose to look at the registry key created when an object is shared.

This all started with a job we were investigating recently where the indicators we were given did not turn up any good evidence, as such we started looking wider across the system. I stumbled across the LanmanServer\Shares key and realised that an exfiltration method could involve a shared folder. While this ended up having no relevance to the job we were looking at, I decided to learn something new. Especially as the answers don’t appear to be at the other end of Google!

Methodology

I tested this on the versions of Windows I had available to me, these were Windows XP SP3, Windows 7 SP1 and Windows 8.1. I have the technical release of Windows 10 too, but I’m not going to base any research on an O/S that can change any number of times before release.

I don’t have a copy of Vista sadly(?), however as Vista appears to take the worst parts of XP and 7, the results wont be wildly different. If you are dealing with a Vista case you will need to carry out your own testing I’m afraid. In fairness though, you should validate all of my results for yourself before putting them into a report. I am just hoping to save you some time 🙂

I created shares on the root of C: calling them share## (## = incrementing number). I then manually shared each folder using all of the methods I could think of! Including “simple” sharing mode in XP, Powershell in 7 & 8 and command line in all.

I tried to test every combination of share available, after a while the results became largely predictable.

Finally, the only tool I used outside of a vanilla Windows build was MJRegWatcher, this simple tool has proven to be extremely useful when I am researching changes to the registry! It monitors changes and then prompts you to accept them giving you a copy of the key that changed. You can manually select a key or hive and it accepts wildcards…. it’s freakin awesome! (I know, I know, I need to get out more!)

Location

Before we look at the results, the key in question is located

SYSTEM\currentcontrolset\services\lanmanserver\shares

The sub-key of Security handles Share user permissions, which I will not be covering in this post.

Format of Data

The data field is broken down into the following areas

Data_Breakdown

CSCFlags

The CSCFlags deal with caching and breaks down into the following:

CSC_Breakdown

While discussing the options for caching, I am not going to discuss the effects of offline folders or how each caching option differs from the last, this information is already well documented on the web.

CSCFlag=0 is the default setting for shares on all versions of Windows tested. With this setting is up to the user to manually specify which folders will be cached.

CSCFlag=16 This is option 3 on the screen shot below “All files and programs that users open from the shared folder are automatically available offline” with the “optimize for performance” unticked.

Command line for this would be “net share <name>:<path> /cache:documents

CSCFlag=32 This is option 3 again however this time with the “Optimize performance” checked.

Command line for this would be “net share <name>:<path> /cache:programs

CSCFlag=48 This setting has offline caching disabled.

Command line for this would be “net share <name>:<path> /cache:none

Win7_Cache_OptionsWin8_Caching_Options

CSCFlag=2048 This setting is only on Win 7 & 8 and is the default setting until you disable “Simple file sharing” or use the “advanced” sharing option. It also appears to be the default setting for the “Homegroup”

CSCFlag=768 This setting was only seen on shared Print devices.

The command line option also has a “/cache:BranchCache” option, however that caused an error or simply set the share to default options. Branchcache refers to WAN technologies and may simply be because for this experiment all of the machines were isolated.

Why do I care about the Cache settings?

What better way to avoid exfiltration evidence than using offline files? The attacker sets the folder to cache all documents and copies all of the IP data to that folder. Once it is opened all you will see is folder caching. Also if the folder is set up to allow caching and an insider takes a copy of the offline files, did they steal them or did you give them access? Honestly I am asking 😉

MaxUses

The MaxUses field deals with how many concurrent connections can connect to the share. By default this is set to “4294967295”.

In XP this can be limited to a maximum of 10 users or below, if you attempt to set >11 it will default to 10. Only if you change the radio button to “maximum allowed” will it let you have more than 10.

In 7 & 8 this has been increased to 20, however the restrictions work the same here as in XP, you can have 20 users and less or 4.3 billion users (32 binary bits set to 1, converted into base10).

Path

Nothing too shocking here, this will relate to the full path of the shared folder you are using. The only time this looks odd is for a printer. I set my test machine up with one of the first printers in the list and got the following in the key:

“Path=Brother Color Type3 Class Driver,LocalsplOnly”

Permissions

The permissions field will tell you how the share was created*

*sometimes

I will explain in a moment. First lets look at the options:

Permissions_Field

Permissions=0 is the only permission you will see from Windows (GUI) based shares in XP regardless of settings. In 7 & 8 you will see this for all simple/wizard created shares.

However, you will also see this if the cache option is changed regardless of where the share was created from. This is a real shame as it makes the Permissions field unreliable in showing how a share was created.

Powershell also sets the permission to zero, which is a real shame, in fact using Powershell to create shares looks identical to creating one through the GUI (in respect to this specific registry key. I have not tested for other Powershell artefacts).

Permissions=9 field is set if the share is created in Win 7/8 from the “advanced” sharing option. With the caveat; if you set caching this will set to zero.

Permissions=63 field is set if the share was created via the command line. Both net.exe and net1.exe create the exact same results. Once again caching changes this setting to zero.

Why do I care about this?

If you know your attacker prefers to use GUI or command line to exfiltrate data, this can show which way the share was created, as previously shown it’s not a guarantee, but if you see a suspicious share with a permissions value of 63, then it probably just became a whole lot more suspicious!

Remark

The remark field is present whenever the share Permissions field is set to zero. It is only present in the 63 and 9 shares when /remark:<remark> is set or a remark typed into the remarks window.

Kind of odd I know, I assume this is a legacy feature. From what I have surmised the Permissions=0 is the legacy setting.

Type

The Type field was driving me nuts, I could only get it to either be 0 or 1 for folders and printers respectively. I was sure there must be more settings, and as I was researching Powershell I came across this list . I haven’t had the chance to test all of these, but providing disk drive is synonymous with folder, then I see no reason to instantly dis-trust it.

[Source]

Type_Breakdown

CATimeout

Windows 8 brings in a new field; CATimeout. I couldn’t get this to display anything except zero, so I did some research online instead. I came across an MSDN page which had the following description:

[Source]

“In case of a failover, the number of seconds the client will wait before failing the operation.”

I am going to assume this is for domain environments, as I cannot see a setting for failover/time out. Not overly exciting from a forensics standpoint, but could be useful to admins.

Conclusion

We have looked at all of the fields in the data portion of the lanmanserver\shares key. I am happy that I have learned something from carrying out this research, I only hope that it helps someone in a job one day. At least now I know when I look at a shared folder I have options to see how it was created. Previously that would have to be via pre-fetch or shellbags. Now I can combine those with this data and hopefully the stars will align!

As always, feedback is appreciated, especially if you disagree with any of my findings. The average time of day for my research was between 2300-0200 (same as writing this blog post).

Posted in Cyber, Research, Shared Folders, Windows Forensics, Windows Registry Forensics | Tagged , , , , , , , , | 7 Comments

Google Analytic Cookies

Google Analytic Cookies are very powerful at tracking what we do and where we do it, by knowing how they work you can use this to your advantage.

Assumptions

Quite rare I add in assumptions, but this topic could potentially end up in a rabbit hole, so I will add assumptions here as I go through the post.

  • Whether the Client ID is random or pseudo random is unknown right now, so we will work on the assumption it is random for the sake of this post.
  • The cookies can be customised by the site’s designer/developer however as we are not looking at how to use these cookies in an evil way I will not go into great detail about this.

Basics

What are they?

According to Google:

“Google Analytics is a simple, easy-to-use tool that helps website owners measure how users interact with website content. As a user navigates between web pages, Google Analytics provides website owners JavaScript tags (libraries) to record information about the page a user has seen, for example the URL of the page. The Google Analytics JavaScript libraries use HTTP Cookies to “remember” what a user has done on previous pages / interactions with the website.” [Source]

The part of this we are currently interested in is the “use HTTP Cookies to “remember” what a user has done on previous pages / interactions with the website” part.

1st Party vs 3rd Party

Google Analytics only sets 1st (or first) party cookies, these are cookies set by that domain for that domain. 3rd party cookies also exist, these are set with a domain which you haven’t even visited……. sounds evil to me! I may look at different cookie parties in the future (heh cookie party) but its outside the scope of this post.

The Structure of a Cookie

Using the Firefox plugin Cookie Manager+ I am able to see that there are 6 fields within the cookies

  • Name
  • Content
  • Domain/Host
  • Path
  • Send for
  • Expires

Name

Quite simply; this identifies what the cookie is to the rest of the system. Nothing to see here, move along.

Content

This is where the really interesting stuff lives…. so lets come back to this one at the end of the list.

Domain/Host

This field will change depending on the leading dot. A domain would be ‘.hatsoffsecurity.com’ and a host would be ‘www.hatsoffsecurity.com’ the only oddity to this is that occasionally I have seen cookies with ‘.www.hotsoffsecurity.com’ which makes them a domain not a host.

Cookies_UTMA_WWW_Domain

Cookies_UTMA_WWW_Host

A sub-domain can also take the place of ‘www’ on the Host entry.

Path

The default path location is /. and Google Analytics “strongly discourage” changing this location.

Send for

The two options here are “Any type of connection” and “Encrypted connections only”. Most likely for seeing who logs in vs who visits sites. I am sure you can think of other examples when encrypted only would be useful. However all of the cookies on my machine (including banking and retail) are set to “Any type of connection”.

Expires

Quite self explanatory really, when does this cookie expire. Using Cookie Manager+ I can see the calendar date as well as a countdown in days, hours, minutes, seconds. As well as a % of life left.

Cookies_UTMA_Expire_Timer

_ga

The _ga cookie contains the client id, this is the randomly* generated unique identifier for each user visiting a site. The ID will look like this

GA1.w.xxxxxxxxxx.yyyyyyyyyy

Replace x with randomly generated ID and y appears to relate to the creation date of the __utma cookie.

the GA1 may relate to a version of Google Analytic cookie in use.

The W seems to be avoid duplication of cookies, however I have not as yet managed to confirm this is the case.

The cookie domain can be set to Auto, for http://www.hatsoffsecurity.com that will work in the following way:

  1. .com – Failed to create cookie as is TLD
  2. hatsoffsecurity.com – Root domain detected cookie created
  3. http://www.hatsoffsecurity.com – not required as cookie already exists

The key point to take from this is the _ga cookie will be created at the highest level domain that is not a TLD. So cookies from evil.hatsoffsecurity.com would not exist in the form of a _ga cookie.

It is possible for the cookie to be manually configured differently to this, so if you do see a _ga cookie for a subdomain it means that it has been deliberately altered to work that way.

The expiration time of a _ga cookie is 2 years and each time a hit is sent to Google Analytics the expiration time is updated to be the current time plus the time set in the cookieExpires field.

_gat

The _gat cookie is described by Google as “Used to throttle request rate” although there is little data about these cookies the value (other than the domain) is set as “1”. I suspect these cookies are simply to stop a DoS attack or accidental DoS against the Google Analytic servers. The life of the cookie is 10 minutes.

__utma

Firstly note the double underscore, not sure if it will be relevant, but I am sure your competence would be called into question if a lawyer noticed and you didn’t!

This cookie has a 2 year life the same as the _ga, and like the _ga cookie, this expiration clock is updated each time the cookie is used.

The __utma cookie is used to define users and sessions, you should expect to see one of these each time you see a _ga cookie.

The Interesting Part

Content!

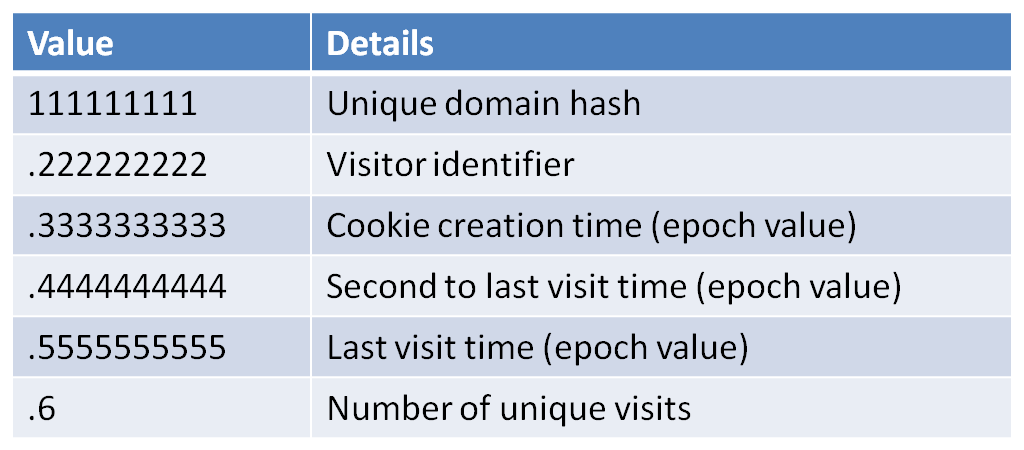
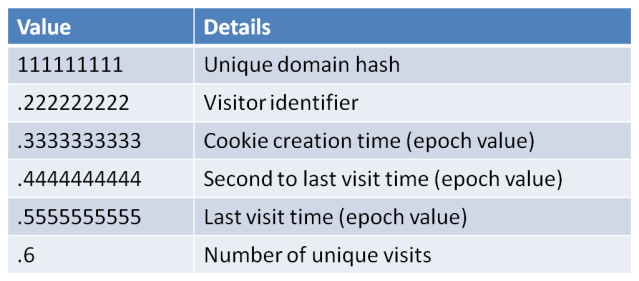
111111111.222222222.3333333333.4444444444.5555555555.6

There, now isn’t that useful….. no? Lets break it down a bit then

The first block “111111111” is the domain hash. This is a unique hash for the domain or host field. From a forensic standpoint this can basically be left alone as we already have that data from the cookie. As such I haven’t found any research into decoding the hash (not that I looked that hard).

The second block “222222222” is the visitor identifier which will marry up nicely with the first long string of the _ga cookie

The third block “3333333333” is the creation time of the cookie in epoch time. The odd part about this is that it matches exactly the _ga cookie timestamp. Even though the system time stamp shows that the two files are created at different times.

During my research I also discovered there was a 12 hour difference on some of the epoch values and the system created timestamp. As I live in the UK I cannot put this down to UTC vs timezones, but it did happen on a number of cookies with no obvious correlation between them or the times.

The fourth block “4444444444” is the time of the second most recent visit.

The penultimate block “5555555555” is the most recent visit timestamp

aaaaand

The final block is the number of visits! This count is not incremented on page reload so is an accurate way of counting actual page visits. It is possible this is related to the _gat, __utmc or __utmb cookies.

Summary

Cookies_UTMA_Table

__utmb

__utmb is used for session tracking the expiration time on this cookie is 30 minutes.

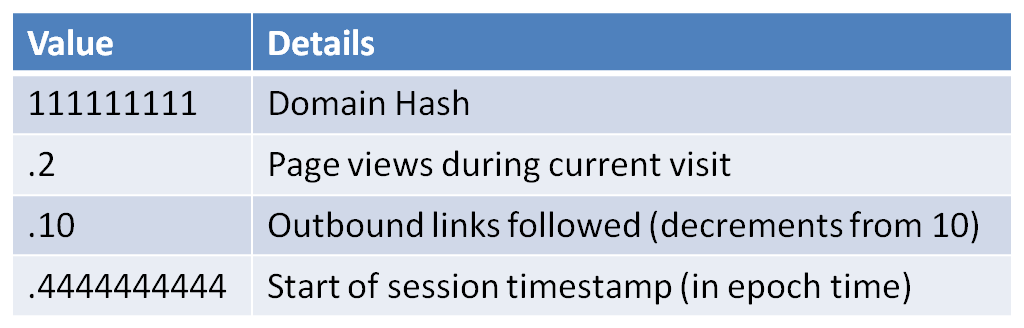
Once again the interesting part of this cookie is held with the content field, so lets jump in.

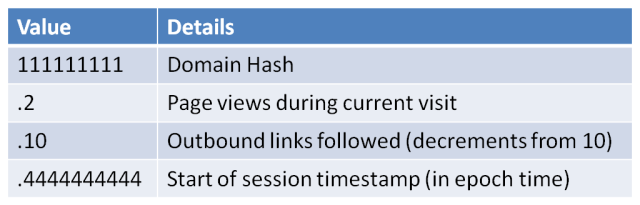
111111111.2.10.4444444444

Block one “111111111” is the domain hash which will match the domain hash of the other Google Analytic cookies for this domain.

Block 2 “2” this is very useful from a forensic standpoint as it shows the number of pages viewed on a site. This can help to show that a user did not simply open the page by mistake and close it straight away.

Block 3 “10”. The reason this block reads 10 instead of 33 is because the default value is 10 and it decrements. Each outbound click from that webpage subtracts a value. Obviously if this is at a value of 0 then 10 or more outbound clicks occurred. Outbound clicks means a link away from that site. This helps prove user interaction on that site.

Block 4 “4444444444” This is the epoch timestamp of when the session began.

Summary

Cookies_UTMB_Table

__utmc

Google claim this cookie is only used for legacy purposes, however it is still active in many browser sessions. This cookie is created as a browsing session ends. Designed to be hand-in-hand with __utmb (which opens the session).

The __utmc cookie only contains the Domain Hash value. However the file creation time can give an indication regarding the time a session ended.

It is worth pointing out that if the file creation time is the only evidence you have that a browser session ended at a particular time….. you don’t know when the browsing session ended. Filesystem timestamps with cookies thus far have proven to be sketchy at best. Use this information to help confirm other artefacts rather than relying on it alone.

__utmz

The __utmz cookie is very helpful, especially if you don’t have traffic flow data, as it shows how a user arrived at that site. Much like the referrer field in a HTTP header.

111111111.2222222222.3.4.utmcsr=google|utmccn=(organic)|utmcmd=organic|utmctr=(not%20provided)

Block 1 “111111111” you guessed it, domain hash

Block 2 “2222222222” Last update time of the cookie (epoch time)

Block 3 “3” Number of visits to the site

Block 4 “4” Number of different campaign visits.

The rest of the cookie relates to the campaign details.

Different types of campaign are: [Source]

  • utm_source
  • utm_medium
  • utm_campaign
  • utm_term
  • utm_content

utmcsr = >It represents campaign source and stores the value of utm_source variable. For example, from the image above we can see that the campaign source for the current visit is Google.

utmccn = >It represents campaign name and stores the value of utm_campaign variable. For example, from the cookie above we can see that the campaign name for the current visit is organic.

utmcmd = >It represents campaign medium and stores the value of utm_medium variable. For example, from the cookie above we can see that the campaign medium for the current visit is organic.

utmctr = >It represents campaign term (keyword) and stores the value of utm_term variable. For example, from the image above we can see that the campaign term for the current visit is not%20provided (Possibly because Google now uses SSL in its searches meaning the search term is encrypted).

utmcct = >It represents campaign content and stores the value of utm_content variable.

__utmv

The __utmv cookie is used by each site differently. It is designed to give specific information about you as a visitor. This can range from

11111111.|2=user-type=visitor=1

to

111111111.|6=isRegistered=false=1^7=signupDate=false=1^8=facebookConnected=false=1^9
=registrationPath=false=1^10=userFlags=false=1^11=allowsEmailUpdates=false=1^12=
gender=false=1^13=age=false=1^14=origReferrer=l.facebook.com=1^15=origPageType=
Buzz=1^18=lastVisit=1411332012=1^19=numShares=0=1^20=numSharesFacebook=0=1^21=
numSharesTwitter=0=1^22=numSharesEmail=0=1^28=categoryCounts=
12%2C66%2C42%2C83=1^35=intlEdition=uk=1^43=nDHPV=0=1

As always the first block is the Domain Hash

The rest is whatever tracking value the site has decided to track you with. From a forensic standpoint this could be very useful. As you can see from the second cookie there is potentially some useful stuff in there, including lastVisit=1411332012 looks a lot like an epoch timestamp to me!

__utmt, __utmx

__utmt simply has a value of “1”. although painstaking research could show what this value is, with no forensic value I wont be doing it for this post.

I have seen __utmx reference as an experimental cookie, but I have not seen one on my test machine (or live machine)

This was a crash course in Google Analytic cookies, I hope you enjoyed it, and as always I value all feedback 🙂

Posted in Browser Forensics, Cookies, Decoding Time, Google Analytics | Tagged , , , | Leave a comment

Link Files

Link (lnk) files are a valuable source of information in a forensic investigation and should not be casually overlooked.

What are Link files?

Link files are created by the system when a file is opened, even if that file is opened and edited on removable media and never copied to the system, a link file will be created. Link files contain a whole host of useful information including the original location of a file, the volume information from the location the file was opened from, MAC times of the file and the drive letter associated with that file.

They are stored under the Recent Documents folder and Office Recent folder. Located:

  • Win XP
    • c:\documents and settings\<user>\Recent\
  • Windows 7/8
    • c:\Users\<user>\AppData\Roaming\Microsoft\Windows\Recent
    • c:\Users\<user>\AppData\Roaming\Microsoft\Office\Recent

How to Extract Data

When you browse to the link file location with Explorer you will see the following screen

Recent

Each item in this directory is a link file, a short cut to the original. If you were to double click one of these files you would be taken to the location of the original file it links to.

The top most entry (highlighted) shows creation date to the left and modification date to the right. this is the first and last opened time of the file or folder respectively.

When we view the link file through exiftool we get the following output:

Recent_Properties

The relative path is set with ..\..\..\ because the exiftool program was executed from the Desktop. We have the path as a folder on the desktop and the drive as C:\. We can also see that it is a directory all 4 relevant timestamps (remember access timestamps are no longer reliable) are in agreement, which is always nice.

For the sake of completeness I have also included a link file which points to a removable device:

Recent_Properties2

Notice the difference in the timestamps, this is a legitimate file with no manipulation of the timestamps. The “File” timestamps show when the link file was created on the machine, but the second set of timestamps show from the original .zip file. This file has been on a backup drive of mine for some time (it’s a useful program), hence the dates. It is interesting how the Access date is later than the modify date, especially as it was downloaded on a Windows 7 machine. The drive it sits on was formatted by a Windows XP machine however.

If anyone would like to explain the details of the timestamps please leave a comment, I will make sure you get full credit 🙂

But I want to check all of the Link files at the same time! This will take ages!!

Stop whining! There is a command line tool called LP.exe which can output the data to a CSV file. And I was just kidding about the whining, it was a valid point.

Posted in Link FIles, Windows Forensics | Tagged , , , , , | Leave a comment

Jump Lists

What is a Jump List?

A Jump List looks something like:

Jump_List1 Jump_List2 jump_list4

From left to right we have;

  • Windows Media Player
  • Start Menu, Wordpad
  • Internet Explorer

Jump Lists were introduced in Windows 7 to allow frequently used files/tasks/webpages to be selected before opening the file. This can be anything from a recent Wordpad file to setting yourself to invisible on Skype.

By default applications have the following Jump List options available:

  • Launch the application
  • Pin to taskbar
  • Close all currently open windows

Each jump list is split into “Destinations” and “Tasks”. Destinations are the upper part of the Jump List and will include recently opened files or website history. The Tasks are the lower part of the Jump List and may contain frequently used commands.

Where are Jump Lists Stored?

Woah! Steady on there Billy, first off we need to discuss Application ID’s (AppID). These are universally unique identifiers for each application. Of which there are quite a few

http://forensicswiki.org/wiki/List_of_Jump_List_IDs

Here are a couple of examples from the Forensics Wiki

  • 32bit Outlook – be71009ff8bb02a2
  • 32bit Powerpoint 2010 – 9c7cc110ff56d1bd
  • Truecrypt v7 – 17d3eb086439f0d7
  • 64bit WinRAR – 290532160612e07

The location of the Jump Lists is split into two locations

  • C:\Users\<user>\AppData\Roaming\Microsoft\Windows\Recent\AutomaticDestinations
    • This list is created by the O/S and not the application
  •  C:\Users\<user>\AppData\Roaming\Microsoft\Windows\Recent\CustomDestinations
    • This holds all of the information the application has created and would need testing and verification of each application to prove the data held here says what you think it says!

The Automatic Destinations folder is a good place to start as the parameters of the data held in there will be the same as the automatic Destinations folder on another machine of the same operating system.

Automatic Destinations

What can we learn from this folder? Well for starters, when the program was first run. Use the AppID to track down the program in question and read the creation date. Simples.

The files themselves are a little less simple, they are stored using Structured Storage Format and need forensic tools to read them. For this we shall use MiTec’s Structured Storage Viewer.

I used this on my profile, attempted to find AppID f01b4d95cf55d32a and found nothing. After reading through the MiTec program I realised that it had my Documents, Pictures, Music and Videos on there as well as another random folder. The only icon on my task bar which contains those five locations was File Explorer. I confirmed this by browsing to another folder, re-opening the file and noting the new folder location had been appended to the file and was also visible on my Jump List for File Explorer!

The output from Structured Storage Viewer is not perfect (not the fault of the program, it’s not designed for looking at Jump Lists) but it allows you to view the Hex of the file and look for clues.

Custom Destinations

The files in this folder need to be viewed with a Hex Editor, the MiTec program will not open them. The contents of these folders can vary from virtually nothing to file paths which may indicate the nature of program.

Why use Jump Lists at all?

When dealing with a forensic investigation it is often best to imagine yourself standing in a court room explaining how you came to that conclusion with someone of greater experience rebutting you. A lot of artefacts leave possibilities open. By proving the same thing from multiple angles you are removing doubt from the mind of the jury. Rather than thinking you are putting a guilty person into jail, think instead that you are trying to keep an innocent person out of jail.

Jump Lists can confirm that programs were run or files existed (or at least a file with that name) on that machine at some point in the past. Jump Lists are also not the type of place anti-forensic tools may look. With the modern registry hive data is stored in multitudes of locations whether in complete evidence or in fragments which need to be pieced together.

Add Jump Lists to your forensic locations and you will not be disappointed!

Posted in Jump Lists, Windows Forensics | Tagged , , , , , , , , | Leave a comment

Incident Response Process Phase 3 – Containment

First Steps

When moving into the containment phase an incident has already been declared. It is now time to categorise the incident and relay this to the customer/management. The categorisation or characterisation of the incident can be broken down into 4 parts.

  • What type of attack is it?
    • External compromise/Internal compromise/Malware etc
  • What systems are effected?
    • Business critical assets will need to be dealt with?
  • Who can be told?
    • Media/employees/Directors/Law Enforcement
  • What does the attacker want?
    • A little more difficult to answer, will need a “we suspect” statement

Once you have an answer to all four you have begun to shade in the outline set up from phase 2.

Keeping Quiet

At this stage it is important not to tip-off the attacker that you are there. The last thing you need is a game of whack-a-mole with the attacker during phase 4. If you have a pretty good idea of what the attacker is after you have a better chance of containing the attack.

For example, if the attacker is collecting a group of files into a zip file in a specific location you may be able to configure security devices, such as an IPS, to detect and block any zip files leaving the environment. This would not tip-off the attacker as they are collecting the files and haven’t extracted it yet. But would also alert you if they attempted to exfiltrate the data.

This whole phase relies on the skill of your team, if your team is poorly trained or poorly prepared the attacker may notice the team’s presence and do a ‘smash and grab’.

It is also possible the attacker is long gone, but this assumption should not be made early.

Initial Containment

The attacker is already in the network, that is why you are here. The goal now is to limit the attackers movement, to stop them gaining further access. Try changing the DNS name of a server, if the attacker is still attacking it then you know they are using IP addresses over DNS names, this means a backup system can be created clean to allow the company to continue while the attacker is still on the system which is no longer live.

There are many other options to limit the attacker, the trick is to make it look like normal network maintenance or failures. Can the attacker be put into an ‘infected VLAN’ while the business continues to operate outside of that. Can filters be set up on networking devices to limit the capabilities.

If you know the attacker has access to emails consider sending mis-information; for example an email from the CIO to the CEO saying “all critical IP information has been moved onto the secure sever, as you need to access if for the meeting later here are the details <honeypot details>”

Forensication

Now is the time to be taking forensic images of the worst hit machines. Try to find patient zero, that is the first infected machine, as this will have the most useful machine. It may not be possible to take an image of every machine, so triage tools such as Crowdstrikes Crowd Response tool will be invaluable at determining which machines are important.

Plan

At this point you should already have a pretty good idea about what measures could have prevented this. Start writing those down for the end report. I have previously mentioned how important note taking is, this is another part of the same idea. You don’t just need to document what you did, but also what you thought (obviously professional thoughts only!!).

Blame

As I pointed out in my photo blame game post, the attacker is the one to blame. Sure the network should have been better protected, but pointing that out right now will not help anyone and simply raise barriers at a point when you need co-operation. Save those comments for the report so they may be written in a constructive way, reviewed by a peer and authorised by you management.

Final thoughts

  • Make sure you have written consent before taking any systems offline which may affect the productivity of the customer
  • Work with ISP’s where relevant
  • Make sure your staff know which incidents do not require you to consult the customer before contacting the authorities (illegal pornography is usually the top of that list)
  • Make sure your IR team have practiced with their tools enough to be competent when the time comes…… grow up 🙂

Other than that, keep calm, don’t panic and write everything down.

Posted in Containment, Incident Response | Tagged , , , | Leave a comment

Photos and who to blame

In light of the recent apple/icloud incident I thought I would bring up a little bug bear of mine. Blaming the victim, if you are mocking the celebrities and commenting on how “it’s their own fault” please stop.

Why do people even take these types of photos?

Why not? Anyone who has been in an intimate loving relationship would have either taken photos, videos or been asked to do so. If this is something you aren’t comfortable with then obviously it wont happen, but I believe this can be down to personal insecurities more than any philosophical stand point (and I accept I will be wrong in some cases, our differences are what make us human 🙂 )

Now imagine that the relationship has a distance element, perhaps your loved one works away a lot. A few keepsakes can be nice.

Celebrities are in loving relationships just the same as the rest of us, and they work away a lot. So having these photos is no real shock to me, in fact I think it’s perfectly normal and expected.

But they stored them online!

Apple back up your ‘Camera Roll’ by default, so saying people are stupid to store things online becomes a little mean. What is actually the case is manufacturers, like Apple, assume we want them to hold all of our data, acting like parents keeping hold of their children’s important items.

Disabling this feature means you need to be a little tech savvy and a. know it’s turned on and b. know how to turn it off.

Can you select which photos are backed up? Perhaps you want to keep the photos of your family online in case your device is lost/stole, meaning you end up backing up everything!

Ok, it’s Apple’s fault

From what I have seen Apple did have a vulnerability in their “find my iPhone” feature which allowed a brute-force attack to be carried out, without locking the account and I assume without alerting Apple.

I would hope that the Apple Security Operations Centre (SOC) can see brute force attempts and act on them, but as I have no idea how their security is set up I will stop there 🙂

Apple were apparently slow to patch the venerability, this is historically the case with Apple who in 2012 were accused of being “10 years behind Microsoft in terms of security” while things have undoubtedly improved, the fact that iProducts are becoming more popular means Apple need to up their game as they become targeted more and more.

Regardless of how much Apple did or did not do, the important thing to remember is that they are also the victim here.

So two victims? But I want to blame someone!!

Blame the thief!

I like my analogies, so lets use one here. A thief breaks into a celebrities house, steals photos from a bedside table and posts them to every household in the world. The house was locked with a normal lock. Do we blame the house? The celebrity who wasn’t home? No we blame the thief and call them despicable for posting all these photos.

Why is this different?

Someone broke past a security system designed to keep them out, OK it could’ve been stronger (but once upon a time people used to leave their doors open and invite neighbours in), but it was still a security system. They then intentionally (I assume) targeted these celebrities and intentionally took any provocative photographs, without the knowledge or consent of the victim.

The last part, posting them online, is open to debate. It is possible that the original attacker never posted them, but instead that person was compromised and the second attacker posted them online after discovering them. We may never know exactly what happened in this part of the scenario.

Concluding thoughts

Too often in cases were a high profile person gets “hacked” I see people immediately blaming that person, saying “what did you expect?” (I think they expected their data to be secure and not shared without consent), we need to change our mindset. Instead of shaming the victims of cyber crime we should be supporting them. In the same way that a girl dressing in an attractive manner on a night out, does not mean she deserves to be attacked, a person taking provocative or sexual pictures does not mean they deserve to be hacked.

No more shame. A lot more support.

Posted in Cyber, My Two Cents | Tagged , , , , | Leave a comment

Tip of the Hat to Phase 2a – Assessment & Engagement

This step is not included in the 6 step model which I set out at the start of this series, however during my research I was directed to this post by Steve Armstrong. In it he mentions:

“Assessment and Engagement (<— new stage for assessing the impact of the incident and working with legal and external support staff to develop a per incident response plan)”

[all credit to http://www.crisisplanningroom.com ]

When I read this a little bulb switched on!

This is obviously a vital part of the investigation and try as I may, I couldn’t quite fit it into the other 6 steps. Instead, I would like to be a little bold, and talk about my interpretation of step 2a.

Too often IR teams will burn ahead to ‘resolve’ the incident and get back to normal operations. This is what the customer wants, but not necessarily what the customer needs. In the same way you may want the car mechanic to service your car; that is what you want. What you may need is a new steering column and you trust and listen to the mechanic when they tell you that if it isn’t done something really bad could, and probably will, happen.

Bringing in external resources can also make the customer feel uneasy, it may be they want to keep this incident quiet until they have a handle on it and their PR staff can put a positive spin on it. The more people who are out of the customers control, who know about this, increases the risk of a leak.

What can we do about that? Be professional! Simple as that; if the people we bring in are also professional, then the customer’s secrets are safe.

Posted in Uncategorized | Leave a comment

Incident Response Process Phase 2 – Identification

Identification

I was going to do another section on Preparation, but I realised I could continue with that until the end of days.

So lets move on to Identification

How does the Identification phase start?

There are a multitude of ways this phase can begin

  • If you believe a lot of the vendor reports out there right now, you will most likely to be told you have an incident by a 3rd party (unless of course you buy the vendors product – some of which are actually worth buying)
  • You could get an alert on one of your security tools (SIEM/IDS/Sandbox etc etc). You do monitor those, right?
  • Your user base could report suspicious activities for example Spearphishing emails. This does rely heavily on user awareness training carried out in Phase 1.
  • Your non-security IT staff could tell you “something doesn’t feel right”. Listen to them, their midichlorian count may not be as high as yours, but they know their systems. It can’t hurt to look.
  • And finally a laughing skull on all of your screens, or a pirate with a parrot on his shoulder

There may be sources which I have not listed, as always, this is not an exhaustive list. The 3rd party one is vague enough to cover most that I missed though 🙂

Who can start the identification phase?

Simple, anyone. Once it’s started however, make sure only a select few can finish it. I have seen the analogy of a fire alarm system. I was trying to think of my own, but sadly that one fits the best. Anyone can pull the alarm, but only qualified people can say it’s safe to go back to work. Similar idea for this.

Team setup

Leading on from Preparation you should have a fully trained and well balanced team, capable of dealing with incidents in your environment.

If your IR team is brought in as an additional resource you need to make sure you have versatility. If the client wants a mobile phone forensicating; you need to be able to provide that service (or at least be able source that service quickly).

Having a point of contact for the client is important, this person can act as a buffer to the investigators. Keeping the client informed and updated is important, but not at the cost of the investigation!

Acquiring Evidence

There are many ways to acquire evidence, and many types of evidence to acquire. This part could probably be a post on it’s own. But if you break your mindset down into these three areas, there is less chance of missing something:

  • Network Capture – usually just before the NAT device, or before the proxy server. Don’t be afraid to capture in more than one place
  • Host Communications – once you have narrowed down your search you may wish to capture network traffic as it leaves the individual host or subnet
  • Host data – Look at Windows log files, application log files, anti-virus data and artefacts such as Registry Hives

Make sure you have a plan on how to deal with the volume of information you are about to receive. If you get triaged host data from 5,000 hosts how will you parse it? How will you search it? What are you looking for?

Communication

Depending on the size and nature of the breach, you may have the media asking a lot of questions. Make sure your team knows what to say and what not to say. Have a single point of contact to refer the media to and don’t make guesses or assumptions!

Communicating within the team is important, a good incident lead will know who is looking at what and will avoid duplication of effort. If something deemed as ‘critical’ is found that lead may need to divert resources quickly to investigate this new find.

Correlation

Can you confirm what you are seeing?

If you see communication at the network perimeter, can you track that back to the host perimeter and then further onto the host itself? It may be that two of the three sources prove something the third doesn’t see. It may be possible a rootkit is in play.

Finally

Once you think you have finished Identification be prepared to re-visit it during the containment phase. The two phases can go hand in hand on many investigations. It is important everything is identified and ready to be contained ready for the eradication phase!

Posted in Cyber, Identification, Incident Response | Tagged , , , | Leave a comment