Ringzer0team – Forensics Challenge 35 – Poor internet connection

This writeup is to explain how to get the answer (flag) to the Forensic Challenge named “Poor Internet Connection”

I will not be posting the flag here as I am giving you all of the instructions to get it yourself!

You start by downloading a PCAP file which has 3 TCP streams. If you do a search for “flag” in Wireshark (select string and search in packet bytes) you get 2 hits. One for flag.txt another for flag.zip.

One common rabbit hole is to assume the flag.txt file is in flag.zip file. It’s not. This may or may not have thrown yours truely for a little while…. we won’t discuss that.

Basically ignore flag.zip and look at flag.txt.

You will need to carve the zip file out manually, this may seem daunting, but it’s really not too hard. First find flag.txt, you will see packet 1139 (left hand column) is highlighted. You can follow the TCP stream (right click menu on the packet) and you will see that there is a lot of text that doesn’t make a lot of sense.

In order to find the file you need to view the Hex of the stream (bottom of TCP Stream screen, change the drop down from ASCII to Hex Dump).

Next we need to know what the header and footer of a ZIP file is….. Google time.

This page shows that the header should be 50 4B 03 04 14 and the footer should be 50 4B 05 06 00 so do a search for the header within the TCP Stream Hex Dump window.

If you don’t get a hit, start deleting characters, the way Wireshark displays the header means there could be a new line or double space in the header, and the search function isn’t that bright

When you get a hit, confirm that ‘flag.txt’ is just below the line you have highlighted. Then look for the footer (either manually or search).

Now for the irritating part, copy out the selection from header to footer and you will notice you get the byte offsets and text conversion too. With a small file you can manually remove these with a text editor, if not use your imagination 🙂

Paste the hex in a hex editor such as HxD and then save the file as a zip file (just name it as one). If you copied only to the footer then you can simply open the zip file, if not it will need to be repaired first (which will look for the footer and remove the extra data).

You now realise that the zip file is password protected, shocker right? A quick way to look for files included in the PCAP is by going to File > Export Objects > HTTP this will pop up another window with all the files Wireshark thinks is included. Ignore the files with a number for a name (never did figure out what they were) and scroll to the bottom, you will see a file named “secret.txt”, extract this and you get the password for the zip file.

You now have all the information you need to get the flag for yourself 🙂

Posted in Competitions, Cyber, Network Analytics, Network Forensics, PCAP Analysis | Tagged , , , , , , | 1 Comment

TTLs and where to find them

Recently I have been conducted a lot of interviews for SOC Analysts; one of the questions I ask is as follows:

You are reviewing your DNS logs and find an answer to a DNS query which shows rabbitcoldhotel.evil.com on <AnyExternalIP> with a TTL of 600. The initial Query came from 10.3.22.45.

  • Does this seem suspicious (no points for ‘evil.com’)
    • Why?
  • What would your next step be?
  • Where else could you look for information? (assuming you had access to any internal log source you needed)

From this I am expecting the candidate to talk me through their thought process, if they say this is innocent and give a really good reason why, I will be happy to debate and ask further questions, but they would not be ‘wrong’.

However

What I am finding is people do not understand DNS TTLs. So, I thought perhaps I am being a bit mean as some of these people were coming in for a junior role, so I decided to break the question down into starter questions:

What is an IP TTL, how is it generated and why is it important?

What is the difference between an IP TTL and a DNS TTL?

By asking these two questions first, I can decide whether or not to move onto the bigger question above. I have found however that many candidates do not understand TTLs at all!

So, let’s look at TTLs and then answer the first question last.

What is an IP TTL?

An IP TTL sits on the 8th byte offset of an IP header (if I just lost you, don’t panic, this bit is just for reference), as we can see from the header below (from http://www.securitywizardry.com)

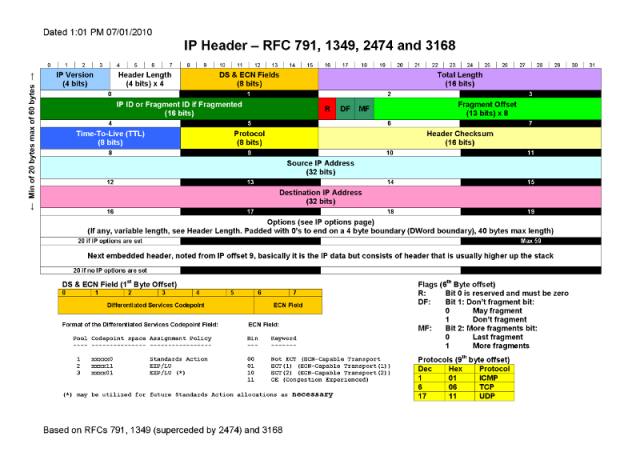
If someone said that in the interview I would assume they either have a photographic memory or knew what question I was about to ask and had googled it; I just had to look it up myself 🙂

So, what is the point to the TTL field?

Well…. it pretty much stops the internet from DoS’ing itself. Routers are interesting devices when it comes to actual routing. If the router doesn’t know where to send the packet it has received it will quite often have a ‘route of last resort’ or ‘gateway of last resort’ or ‘default route’, the terminology isn’t important. Basically, if the router doesn’t recognise the destination network it will dump it out of this one and let another router worry about it.

This means in theory a packet could be sent forever around a load of routers that have no idea where the end network is. This was identified as an issue pretty early on, so some clever people decided that packets should be given a finite life span; a time to live. In the early days, this was measured in seconds (I believe the RFC may still say that… might be wrong… should really google… not going to though), however this was changed at some point to be ‘hops’. A hop would be each time the packet passed a routing device.

We now know that a TTL is the amount of ‘time’ a packet can live and that time is measured in ‘hops’. That is pretty much the first part of the answer.

How is it generated?

This is a little unfair, the question is not asking how does the operating system, or network stack write the value into the 8th offset, it is asking what generates the value that has been assigned. Not all TTLs are created equal.

The operating system in use will determine the TTL value there is a nice list over here

Why is it important? (to a network analyst)

It can aid in detection of an operating system and help to identify spoofing, is the short answer.

Imagine a 3-way handshake. The SYN comes in with a TTL of 60, you see your webserver respond with a SYN/ACK and a TTL of 128 and you see a RST come back with a TLL of 249. This implies that the IP was most likely spoofed in the first place, the different TTLs make up exhibit A and the RST on the 3-way handshake suggests the server was not expecting a SYN/ACK from you; exhibit B. (this is another interview question I have used).

How is an IP TTL different from a DNS TTL?

Short answer: IP TTL is counted in hops, DNS TTL is counted in seconds. IP TTL gives the life span of a packet based on how many routing devices it can pass. DNS TTL shows how long that DNS record can remain on your device.

For the purpose of this article all we need to know about DNS TTL is that it defines the lifespan of that DNS answer on your machine (device, whatever).

Why have a TTL on DNS?

Surely if google.com is on 172.217.6.174 it will always be on that IP? Nope. First off Google most likely has a whole load of IPs set up for ‘google.com’, this can be for load balancing (if too many people connect at the same time it shares the love across multiple IPs) for DDoS mitigation or for maintenance.

Imagine for a second the IP that google.com is hosted on falls down, after all it is only a router on the internet (probably more complex with a whole headache of architecture, but let’s keep this simple). So Google’s router has gone down, 172.217.6.174 is no longer responding to any network requests.

Now what? Well we don’t actually care that 172.217.6.174 is not responding, we care that google.com is not responding. As such a new DNS record can be requested that, for example, may say google.com is now on 172.217.6.175. But how does your device know to send out a DNS request? It already has an answer, and isn’t smart enough to know it’s not responding. A TTL value will mean you will automatically re-request the information when that time expires. You can also manually do it by clearing the DNS resolver cache, but this is about TTLs.

Back to the original question

To answer the first question we need to consider a few more things…

Legitimate sites will typically have longer TTLs to avoid overloading the DNS servers (or nameservers), there are exceptions to this! Sites that may be malicious could have shorter TTLs as this will allow the attackers to avoid bad reputations, blacklists and security researchers.

Does this mean a shorter TTL = evil? No, not at all. A short TTL can be used by dynamic DNS services for example. Malicious sites may also have long DNS TTLs. This is simply an indicator that something *may* be suspicious (not malicious, as currently there is nothing to indicate that!).

So the TTL value of 600, gives this DNS answer a 10 minute lifespan. That is quite short, but not outside the realms of legitimate. So lets put 2 points in suspicious, 1 point in normal (arbitrary scoring mechanism I know, but whatever works for you).

Next we look at the domain rabbitcoldhotel.evil.com. I could just have easily made it klulnvovvslvhsldf.evil.com (random text) but that makes it a little easier. This *could* be a new style of DGA (domain generation algorhythm) where the attacker is using dictionary words together in order to avoid the ‘random’ detection methods. It could also just be a person typing random words in. Evil.com doesn’t count, it could easily be Mom-and-Pops-Bakery.com. In terms of score; if it was random I would put 2 in suspicious, but as its weird I am not so sure. So 1 for suspicious and 1 for normal.

Finally (on the initial read) we see the internal IP. With current evidence 1 and 1 again for the score, we have no idea what that is.

So there we have our first answer, if that’s all you say I wouldn’t be reaching for the cheque book. What I then expect is some actual analysis, or steps you would take to carry out analysis.

Lets do this as a quick to-do list

  • First and foremost, was this domain actually visited?
    • Some security devices will do DNS lookups of blacklisted domains, Firewalls are annoying for this as some only block IPs and do not know how to block domains. So will do lookups of domains you have told it are malicious.
    • Can you see proxy logs for this domain?
    • Get the IP from the answer and check Firewall logs
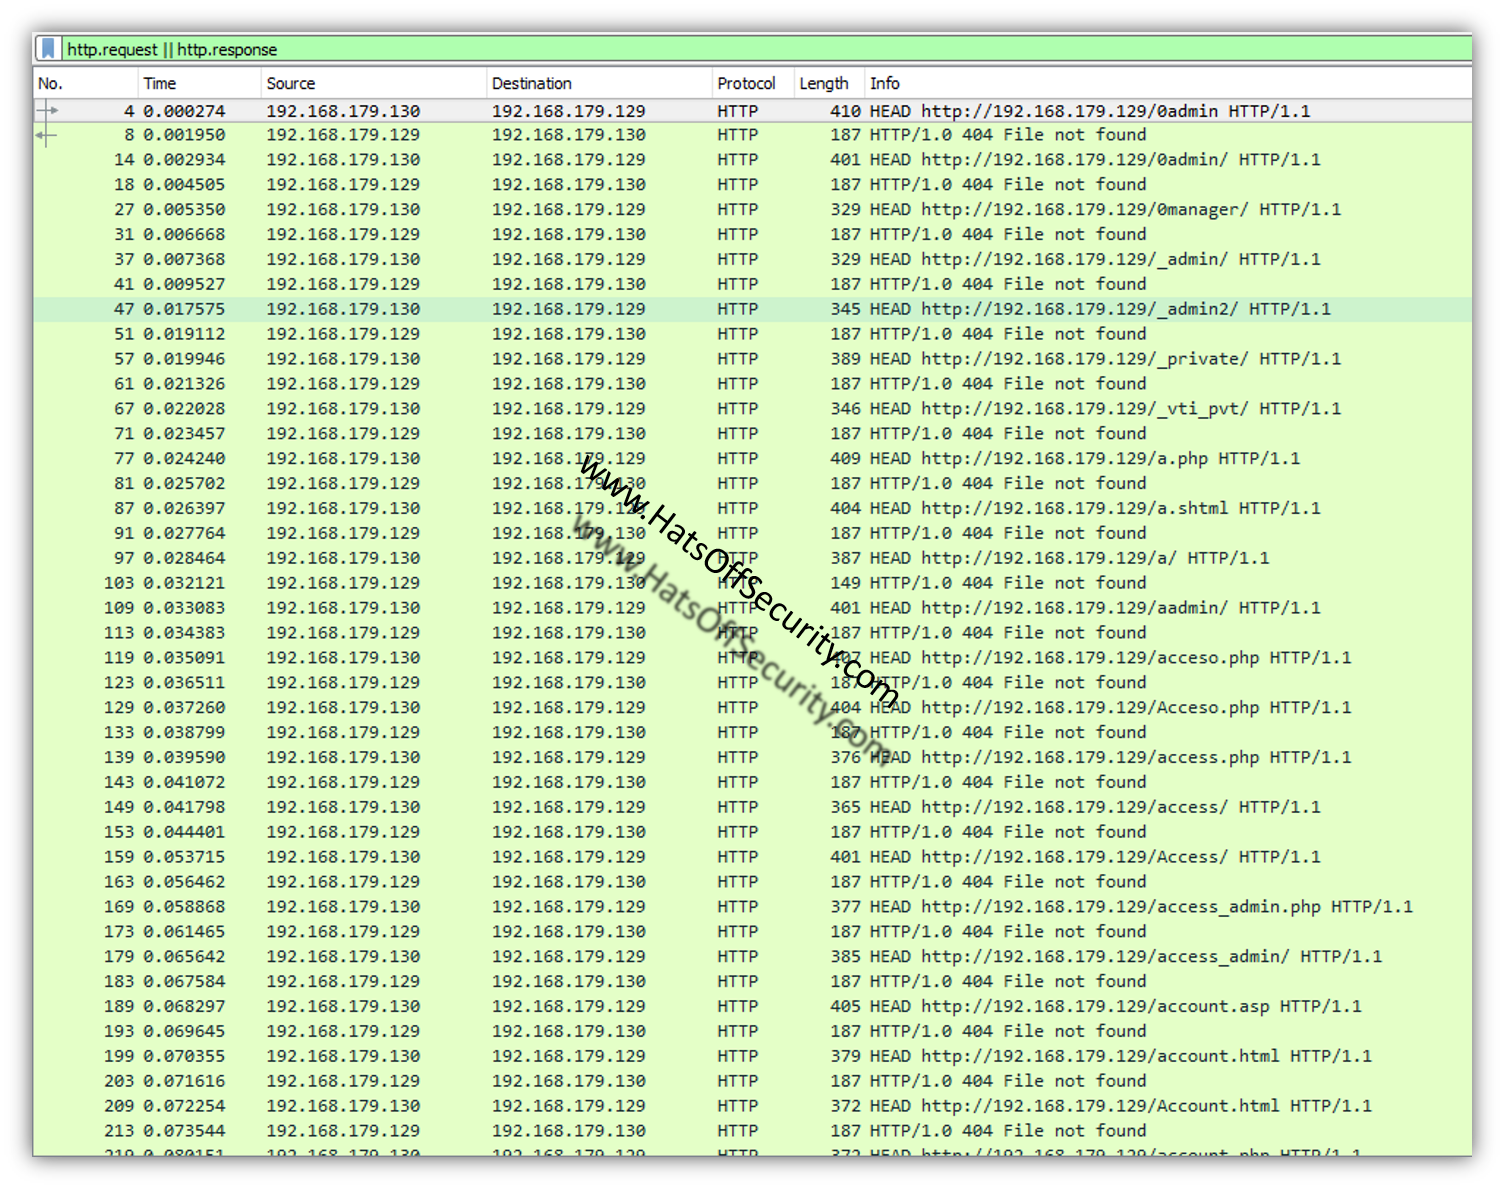
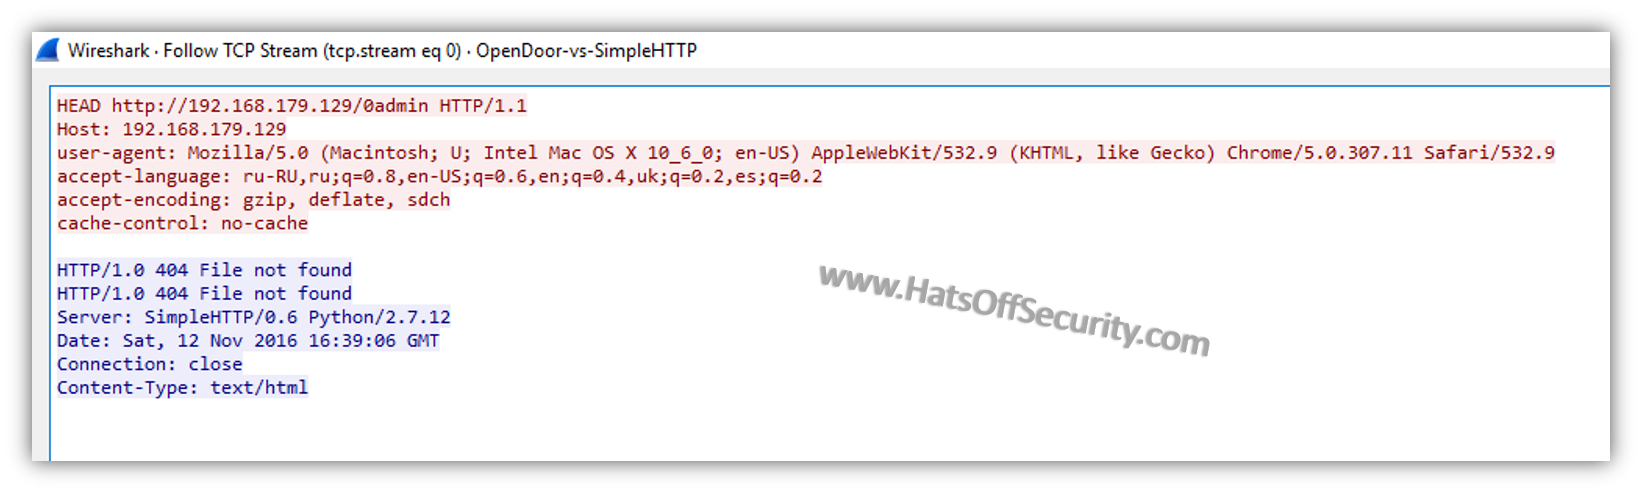
  • Use full packet capture to confirm the HTTP response codes (can also be seen on proxy devices, but where is the fun in that)
    • If all the user got were 404 codes and no hidden content was delivered then high-fives all round and have a cup of tea. If however there were 200 OK, or redirects (301, 302) then more work is required
    • Full packet capture can also give the payload/malware of the page
    • Referer may shed light on how they got to that page
    • Look at browsing before/after do they paint a picture? Is this a lone request?
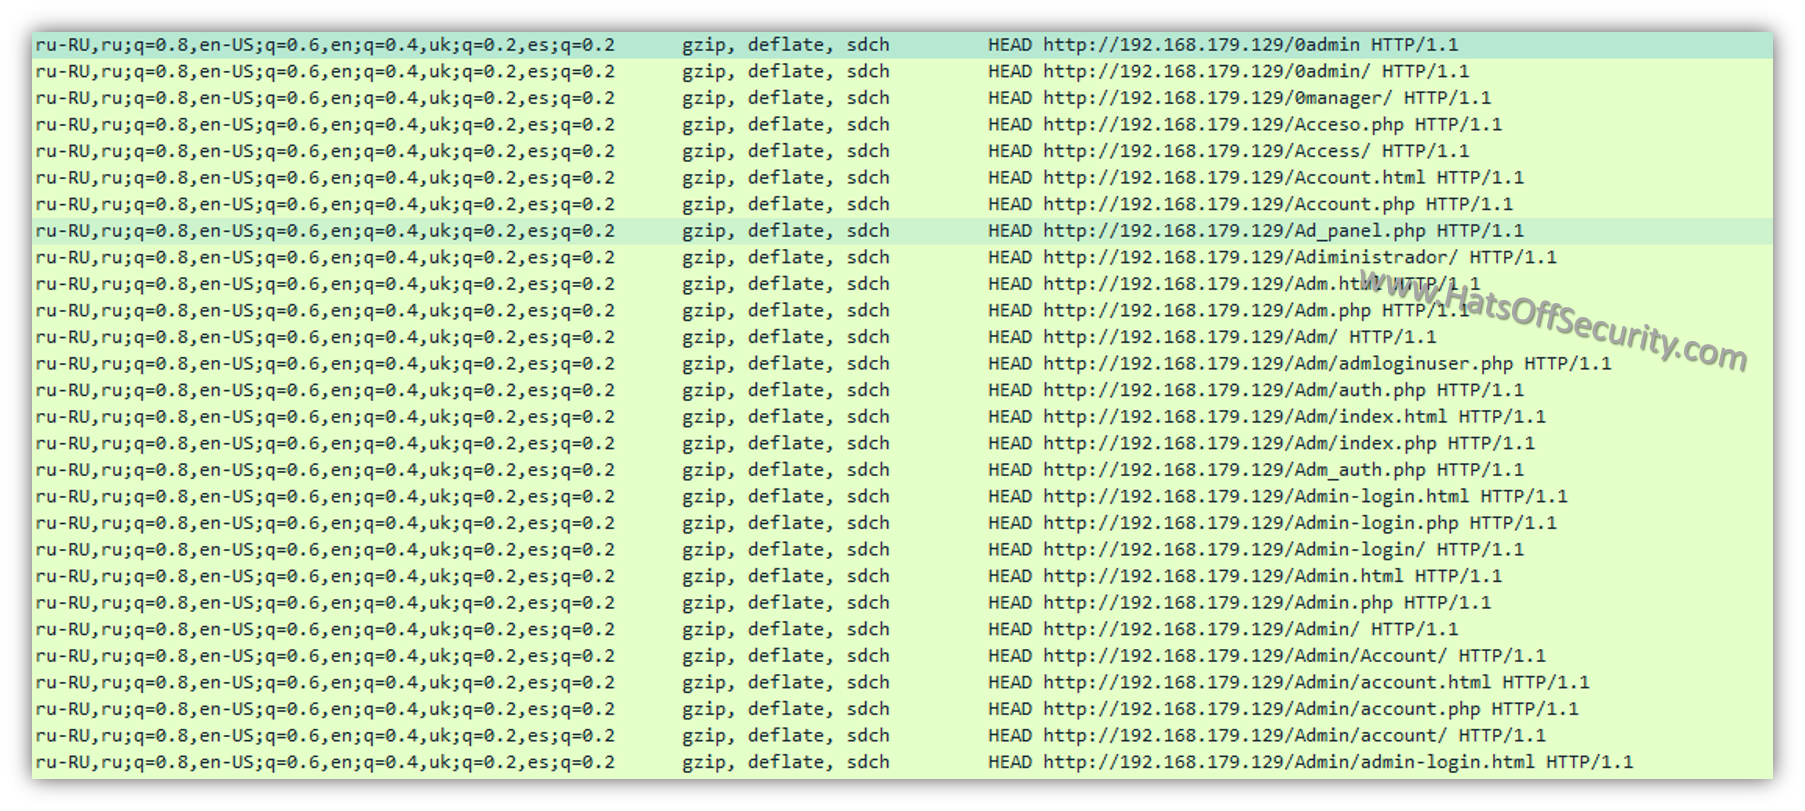
    • Does the user-agent match the other browsing? Could this be an already compromised host?
  • Internal DNS logs can show the hostname of the local IP address
    • Is this a workstation or a downstream proxy?
    • Do you need more proxy logs?
  • Did any other security appliances alert?
    • Correlation!
    • Network IDS
    • Host IDS
    • etc etc
  • Open source int on rabbitcoldhotel.evil.com
    • Google it! It’s amazing how many people don’t do this.
    • Is it an IOC on malware analytical sites (malwr.com malwaredomainlist blogs?)
    • Any blacklists? What are they for
    • VirusTotal score? Needs to be more than 1 or 2, especially if you have never heard of them
    • URLQuery or URL2PNG to view the page (use with caution, if you even slightly suspect inappropriate/illegal images skip this step) does it match the theme of the main page (evil.com)
    • HTTP Viewer by Rex Swain, works as a proxy to view the source code of the page
    • CentralOps (or other similar tools) to view the owner of the domain and IP
  • Speak to the user, or get local manager to speak to them
    • Do they recall visiting the page
    • Have they received any unusual emails
    • Any other information you can get

I could probably add more, as can you. This list does not need to be exhaustive, it just needs to show that you do not take information at face value. Analysis is all about questioning what you see. Just because a snort signature fires does not mean something is malicious, and just because your anti-virus doesn’t pop on a downloaded flash file doesn’t make it safe.

I hope this helps some people, if I am interviewing you, you can tell me that you have read this, as that answers a later question regarding research 🙂 This field should be a passion and should be fun (weird right!). I enjoy it and I enjoy the challenges it brings everyday.

Posted in Network Analytics, Network Forensics | Tagged , , , , | 2 Comments

Windows Spotlight Image Location

Bit of a change from my typical security related posts. I was hunting around on my machine for a new blog post when I stumbled across a folder full of oddly named files. The files were named as their SHA1 hash value with no file extension.

I opened them in Notepad++ (too lazy to open a Linux VM…. shoot me) and saw they were image files. After I opened them in PhotoViewer I noticed they were the images I see when my screen is locked; Spotlight Images.

So if you are looking for a cool picture that you saw on your Windows 10 Spotlight, look no further than:

Drive:\Users\<UserName>\AppData\Local\Packages\Microsoft.Windows.ContentDeliveryManager_<randomstring>\LocalState\Assets
Posted in Content Delivery Manager, Windows Spotlight | Tagged , , , , , | 1 Comment

OpenDoor Scanner vs SimpleHTTPServer (PCAP)

Often when analysing attacks, scans or just general traffic it is difficult to identify the specific tool or technique in use. This is simply because there isn’t a reference database for every tool.

So I thought I would upload a nice simple PCAP of OpenDoor Scanner so that if this is being used against you, you have the possibility of spotting it.

Quick disclaimer: this was used with no options, arguments or exclusions. This is the tool used with the default command line:

"python ./opendoor.py --url "http://privateIPaddress/"

One of the first things to note about this tool is that by default it only does “HEAD” requests. This only requests the header from that specific page and not the body (i.e. no data from the page; images, text etc). It also runs alphabetically, which is not uncommon, but certainly helps easily identify a scan.

packets

The User-Agent field changes, in fact it does not appear to be the same for any two requests. This may be an attempt to avoid automatic blocking, or maybe just the author was a little bored 🙂

user-agent

The ‘accept-language’ and ‘accept-encoding’ fields remain the same throughout. This is probably one of the best identifiers.

stream0

language-and-encoding

Analysing the PCAP

In order to see if you were affected by this I recommend the following filter in Wireshark:

http.request || http.response

This will show all requests (GET, HEAD etc) and all responses (404, 302 etc). You are looking for anything that is not a ‘404 not found’ response.

200 OK – Generally what the attacker is looking for, this means a page was delivered. Bear in mind however, some devices show a custom 404 page, meaning a 200 response is shown, but it is not the page the attacker wants.

30x – Typically a 302, however could be 301, 303 or 307. This will be in place if the page has moved, but may also redirect to a HTTPS version of the page. Watch what the responses are and work with the web dev team to decide if any action needs to be taken. I have seen a 302 give an IP of the internal interface of the webpage. While this isn’t a critical failure, it’s not good.

403/404 – Unauthorised and Not Found respectively. 404 is by far the better option. 403 gives the attacker hope the page is up, but not available to them right now. They may try to pivot back at a later attack stage.

418 – I’m a Teapot. If your server responds with this; either your web dev team have a sense of humour or you’re already screwed 🙂

I hope this helped. Please leave a comment with any constructive feedback and pop back anytime!

Download PCAP

Posted in Network Forensics, PCAP Analysis, Research, Wireshark | Tagged , , , , , | 1 Comment

Cyber Security Challenge Masterclass 2016

This year’s Cyber Security Challenge Masterclass saw over 40 contestants battling to become crowned the winner. I was fortunate enough to be invited as an assessor for the whole event. What follows are my views and interpretation of the event.

The challenge was set, and created, by PwC this year. This was the first year the company had picked up the mantle and was attempting to top the likes of HP, Airbus and BT to name just three; no small feat! Previous Masterclasses had seen a wide variety of features from disabling the guns on the HMS Belfast to dealing with a critical infrastructure compromise in the Churchill War Rooms.

The location this year was in the Shoreditch area of London in a beautifully set photography studio. The railway arches and traditional brickwork lit by red, blue and green lights created an ambiance that was both pleasant and terrifying.

Day 1

Wednesday late afternoon was the kick off to this event; all of the contestants were brought together in the Tower Hotel, split into their respective teams and shipped over to the venue. Upon arrival, they were immediately told that a large sum of money had gone missing from fictitious power company Bolt Power.

The company were sure this was an insider threat and had compiled a list of suspects; these suspects were available to be interviewed by the contestants. Some excellent acting then ensued from the PwC representatives, playing Bolt Power staff. A particularly commendable performance was from the “secretary” who was considered the central point of gossip for Bolt Power.

By the end of the first night most of the teams had a good idea of who was to blame. The evidence however, took a little longer to compile.

Day 2

Thursday morning the candidates turned up bright eyed and bushy tailed. They still had to gather the evidence of the insider threat, but were also presented with a 9GB PCAP (network traffic capture) file. This was intentionally made so large that it could not be opened with the traditional tools; instead the teams had to use their imagination.

Many teams carved the file up using Editcap, a program from the Wireshark suite of tools. This gave them multiple files to view. Some teams realised a single ‘stream’ in the PCAP was making up the bulk of the size and used TShark (also part of the Wireshark suite) to remove this single flow of data.

While the teams were working out how to deal with this issue, an email was received from Bolt Power SOC, explaining that Bolt Power were under cyber attack. They gave the teams access to Alien Vault IDS and log files using Kibana. The teams then had to demonstrate not only time management but task prioritisation. This attack was live and for every false positive that was reported points were deducted, in order to demonstrate the analytical skills of the teams.

As if this wasn’t enough, the teams were then provided with a memory capture and disk image of a compromised host within the Bolt Power environment. Volatility was the tool of choice for the memory dump, and a combination of tools was used on the disk image.

The teams discovered that there had been a compromise involving a flash exploit allowing a reverse shell to be established and data to be exfiltrated. There was also evidence that this was a nation state sponsored attack, however it was difficult to identify an individual or group.

The second day was by far the longest; the teams worked until 17:30 and were lured into a false sense of security and allowed to relax with alcohol. At around 19:00 an alarm sounded and all teams were asked to return to their workstations. Ransomware! There had been an infection of ransomware on the network and the teams were tasked with reverse engineering the malicious program to see if the data could be released. The ransomware was intentionally written with a symmetrical key, meaning the answer was available to the contestants if they knew where to look. Additional questions were also posed to the teams, including ‘what registry keys were created?’. There were some very imaginative ways of getting the required answers, however by the end of the evening all teams had dealt with the problem and were ready for Day 3

Day 3

Friday was very much a continuation of the previous day’s work with a Penetration Test (Pen Test) thrown in for good measure. The idea of the pen test; like the forensics considerations, was to see if the candidates understood how to carry out the task while taking into account legal considerations. A letter of authorisation was then issued to any team that requested it.

The end of Day 3 saw the teams given 30 minutes to create a verbal presentation to give the board of directors at Bolt Power, the people manning this board were actual directors from sponsoring companies meaning this is as real as it can get within the game environment. The teams were given a time to report to PwC Head Office were Bolt Power had set up their board room. Each team were expected to set their own timings with Bolt Power paying for the taxi journey. No help was given in terms of timings, adding to the pressure.

Each team sat in front of the board and had to explain what had gone on. As with previous competitions, the board intentionally played down their technical knowledge in order to show the candidates that explaining a ‘reverse shell’ to the CEO is not a simple task, especially when they have just been told a nation sponsored attack may have just hit their company. The pressure was turned up if the team hit a buzzword. Words like ‘safety’ would instantly get a strong reaction as Bolt Power controlled the nation’s nuclear power facilities.

Each team faced the board; each team survived the ordeal and was commended on a variety of topics.

Once the board meetings were completed, the candidates were told to go and relax in the hotel until the awards dinner later that evening; where the winning team, and winning individuals, would be decided.

Conclusion

I have assessed at several Cyber Security Challenge events, and this was one of the first to cover off almost all disciplines within the Cyber Security field, as such the assessment team noticed there was no obvious winner that excelled across every area, instead we had many strong contenders for the top slot and picking the winner was not an easy task. As always there was a passionate debate with strong arguments for and against many of the candidates.

As a result of this the assessment team were all very impressed with PwC’s competition. This is the first time we have had such a broad sweep of challenges, and I personally hope this will set the standard for all future challenges.

I would strongly encourage any company interested in embracing new talent, of all age groups, to contact the Cyber Security Challenge and register their interest. Next year’s Masterclass could contain your future analysts, consultants, engineers or even your future CISO.

Posted in Competition, Cyber, Cyber Security Challenge, Memory Forensics, Network Forensics, Pen Testing, Windows Forensics, Wireshark | Tagged , , , , , , , , , | 1 Comment

Flash Cookies – aka Locally Shared Objects

Flash Cookie Location

[Throughout this article I will use the term ‘flash cookie’ over ‘LSO’ as these posts are currently about finding and removing cookies]

%AppData%\Macromedia\Flash Player\#SharedObjects\<random text>\

Under this folder you will a list of the sites which have stored the Flash Cookie on your machine.

The following location will save the settings for these cookies

%AppData%\Macromedia\Flash Player\macromedia.com\support\flashplayer\sys\

As I don’t have Flash installed on my host machine I had to ‘infect’ a virtual machine to get these cookies populated. One thing I noticed is that very few sites use flash cookies now. For example YouTube used flash cookies in 2011 (as I found in my research), however as they no longer use Flash, there are no cookies stored.

Rumours are that Adobe are looking to end Flash. However, nothing official as yet.

Removing Flash Cookies

There are a couple of options for removing these cookies

Option 1

Go to this page on the Adobe site which will fire up the Flash settings page and allow you to delete cookies and change settings

Adobe_Site_Settings

Option 2

Install a Firefox add-on like Better Privacy which will allow you to delete the cookies from the browser.

Option 3

Just delete the files! Sounds a bit brutish, but as with most cookies, they will recreate themselves if they are needed. Flash Cookies are rarely needed, I haven’t had Flash installed for 6 months and I have only noticed a couple of sites that don’t load correctly.

Cross Browser – but not Cross Site

Flash Cookies can persist between different browsers, so if you have a preferred browser for certain tasks you may notice other browsers picking up on certain habits.

Cookies cannot talk to other domains however. So if you got a cookies from ‘cdn.aaa.com’ that wouldn’t be accessible from ‘cdn.bbb.org’.

Is there a risk in deleting them?

The only risk is losing basic settings, or website specific settings. For example some Flash games will store your score in the flash cookies. However as most games are moving away from Flash this should be less of an issue.

Posted in Browser Forensics, Cookies, Firefox | Tagged , , , , | Leave a comment

HTTP Cookies – Part 4 – Safari Cookies

Safari Location

Pretty sure this location has been the same for a number of years now, if not let me know in the comments:

~/libraries/cookies

Removing Safari Cookies

I am not a MAC expert, so I am going to bow out on this part and pass you over to a blog post I have found on the subject 🙂

http://www.leancrew.com/all-this/2013/03/deleting-safari-cookies-via-applescript/

Posted in Browser Forensics, Cookies, Safari | Tagged , , , , , | Leave a comment

HTTP Cookies – Part 3 – Chrome Cookies

Chrome Location

Windows 7 onwards:

%LocalAppData%\Google\Chrome\User Data\Default

Unlike Internet Explorer (and like Firefox) Chrome does not use individual text files, but instead uses a SQLite database. In order to view this you will need a SQLite browser (easy to get via Google).

Chrome Removal

As with Internet Explorer and Firefox Ctrl + Shift + Del will shortcut you to the delete history page to allow fast removal.

If your wife hasn’t just walked through the door, and you don’t know what Private Browsing is, follow these steps:

  • Click on the “Customize and control Google Chrome” menu in the top right of the browser
  • Choose “Settings” – or type “chrome://settings” in the URL bar
  • Scroll down to the “Privacy” section and click the “Clear browsing data…” button
  • Choose the appropriate tick boxes and time frame from the drop down
Posted in Browser Forensics, Chrome, Cookies | Tagged , , , , , , , , | Leave a comment

HTTP Cookies – Part 2 – Firefox

Firefox Location

Windows 7 and onwards
%AppData%\Mozilla\Firefox\Profiles\<profile.name>\cookies.sqlite

Unlike Internet Explorer (and like Chrome) Firefox does not use individual text files for storing cookies, instead it uses a SQLite database. In order to view this you will need a SQLite browser (many free ones via Google).

You will notice Firefox is the only browser (of the big 3) that stores the Cookies in the Roaming folder.

Firefox Removal

As with IE you can press Ctrl + Shift + Del to access a quick menu to remove browsing history.

I am tempted to rename this the “Oh shit the wife’s home” combination, either that or the “pre-private browsing” combination. Let me know which sounds better in the comments.

You can also remove the cookies via the following steps

  • Press the “Open Menu” icon in the top right of your browser
  • Go to “Options” – this will open the options tab
  • Go to “Privacy” on the left hand menu ribbon
  • You then have two options:
    • “clear your recent history” – press the down arrow to ensure you clear the correct artefacts
    • “remove individual cookies” – does exactly what it says on the tin.

The “remove individual cookies” option is a good way to view what cookies are installed without the need for a 3rd party SQLite browser.

Posted in Browser Forensics, Cookies, Firefox | Tagged , , , , , , , , | Leave a comment

HTTP Cookies – Part 1 – Internet Explorer and Microsoft Edge

Finding Internet Explorer/Edge Cookies (Windows 7-10… possibly Vista, but who uses Vista?!)

Microsoft introduced a cool new way of finding your cookies. From the Run prompt or any Explorer window type “shell:cookies” and you will be taken to the Cookies location. Like a Windows Hearthstone 🙂

Location of Cookies

Just in case you want to do it the old fashioned way…

Windows 10
%LocalAppData%\Microsoft\Windows\INetCookies

Windows 8.1
%LocalAppData%\Microsoft\Windows\INetCookies

Windows 8
%AppData%\Microsoft\Windows\Cookies

Windows 7
%AppData%\Microsoft\Windows\Cookies

As you can see there was a shift from Windows 8 to 8.1. the “Roaming” folder was designed around “Roaming Profiles”, these are used in some domain environments and allow users to have things like Desktop icons and favourites when they move to a new machine.

I would suspect one of the reasons for moving them to “Local” would be because of all of the tracking cookies and other nasties that can reside there. You are basically offering free lateral movement to an attacker if they managed to get some clever attack based around cookies.

Speaking of which….

“Low” Folders

The “Low” folder was introduced in Vista to allow for browsers to run and contain certain artefacts in a segregated place.

Removing Cookies

Like most HTTP cookies these can be removed easily via the browser.

Edge

  • Click on the ” . . . ” button in the top right of the screen.
  • Click on Settings – Or press Ctrl + Shift + Del to jump to this step
  • Under the heading “Clear browsing data” press the button “Choose what to clear”
  • Ensure “Cookies and saved website data” is selected
  • Press “Clear”

Internet Explorer

  • Press Alt to bring up the menu options and go to “Tools”. Or go to “Tools” from the tool bar.
  • Go to “Internet Options”
  • Under the “General” tab, under the “Browsing History” sub-section, click “Delete” to bring up the options page – Or press press Ctrl + Shift + Del to jump to this step
  • Select the appropriate tick boxes.

Windows 7’s Internet Explorer has a lot more inverted options. For example you can keep a box ticked to keep some cookies whilst ticking another box on the same page to remove other cookies. By default removal of the “Do Not Track” cookies is ticked.

Things got a lot simpler by Windows 10.

Posted in Browser Forensics, Cookies, Internet Explorer, Microsoft Edge | Tagged , , , , , , , , , , | Leave a comment