Incident Response Process Phase 1 – Preparation

This phase is open-ended, you will always be tweaking and fiddling policies and technologies to make the environment as secure as you can. Just as you think it’s fixed, a zero day comes along and ruins your picnic.

So what can we do?

Start by thinking ‘what would an attacker do?’. Chances are a good one wouldn’t bang on your firewall for days on end with NMAP hoping you get bored and open a port just to shut them up. A good attacker starts out with:

Reconnaissance

That’s where you should start.

There are way too many tools out there  to list fully. However a very intelligent guy named Cedric did pretty much most of the hard work on the Airbus Defence & Space blog  he goes into far more depth than I will regarding how to defend yourself against reconnaissance by doing reconnaissance on your own company. This is not a small task and is one of the parts which will always change.

A couple of additions to Cedric’s post. Shodan-HQ which is hailed as “Google for devices”. Have a play, but stay off the webcam section, some things CANNOT be un-seen!!

The other is pastebin this is where a lot of generic attackers will post details about sites or servers they have compromised. Mostly though it can be useful for seeing if your company is listed on either a password dump list or a Hacktivism hate list.

Other preparation techniques are more straight from the IT Admin book, change passwords regularly, have monitoring in place…. and actually look at it!!

Internet Whitelisting

Some more advanced techniques involve Internet Whitelisting. Usually this would get a HUGE BOOOOOOOOO from the crowd of users, but John Strand of Black Hills Security who is also a SANS instructor mentioned a good technique for this. Allow *any* website the users request. If they request porn, you should probably sack them. So Facebook, LinkedIn, Twitter, Outlook, General Interest Forums for lunch time surfing. Say yes to them all! This keeps the user base happy. Have you restricted around 99% of the internet? Yeah pretty much. At least 99.9% of evil sites have been blocked, meaning you only need to worry about the ones which you know about. A lot easier to manage than the ones you don’t!

Disable lateral communication between hosts

Another recommendation is to not allow lateral communication between hosts. Does Dolly from Marketing’s PC really need to speak with Mustafa’s PC in Sales? No! If the two of them want to communicate (as in the people) they can send an email or, and forgive me for being radical here, get up and walk to each other and speak! The desktops do not need to speak to each other. Secure them so the only portion of the network they can communicate with is the segment containing the servers.

Providing your local admin passwords are not the same as your domain admin passwords (if they are….. have a word with yourself) lateral movement becomes exceptionally difficult for the attacker.

Protect your Crown Jewels

You need to know what your company does, that no other company can do. Why are you not out of business, what is your companies Crown Jewels?

For some companies this could be a project about the latest Aircraft they are building, for others it may be customer credit card details, and for others it may be as simple as how much they can undercut the competitors. The basic fact is you need to know what makes your company special in order to protect it.

The sad fact about security right now is not about if you will get attacked, but when. The attack may be small and easily fended off, or it may be complex and very difficult to detect. But if you were to see “copy c:\CrownJewels\*.* r:\mwuhahaha\” and there was no R: drive, you may have an issue. Now answer me this, would you see that? Chances are the answer was no, mostly because I never gave any context as to how it happened 🙂 If the files were copied out from under you, or worse yet deleted. You would want to know how, why and when. Logging enabled on this folder would be a very basic start to seeing what happened.

Defence in Depth

Still referring to the Crown Jewels here, but I felt it was a good time to point out the defence in depth model. This is usually best visualised as a Top Secret piece of paper that want protected. How would you do that (physically, not virtually). Let me make a quick list, it may not be complete, but it makes a point.

  • Put the paper in a safe with an expensive lock
    • Put the safe in a secure room, no windows and a heavy duty locked door
      • Have that room in a secured building with security systems in place
        • That building is located inside a military camp which has a fence around it
          • The camp is patrolled by armed personnel
            • With dogs
              • The dogs have teeth
                • And are hungry

In a very broad speaking way this is the defence in depth model; any layer can be beaten alone, however the entire stack makes that Top Secret piece of paper pretty safe.

The same idea can be used with IT systems. I hear people say that Anti-Virus is pointless, why have it. Because that may be the chain link fence of our layer, alone it is kind of flimsy as a security measure, but combined with other layers it becomes far stronger than it is alone. Let me see if I can do a similar model for a digital document…. this may go wrong….

  • Photo of your cat
    • Placed in an NTFS folder with permissions set (correctly)
      • Auditing turned on for that folder (and monitored)
        • Host based IPS
        • Windows Firewall configured to only allow specific connections
        • Boot order set to Hard drive first with BIOS password (deliberately on the same level)
        • No Firewire port (or PCMCIA!!)
          • I will continue with the assumption of network based security, otherwise this list could get crazy
          • Contained on a Windows <latest> domain with strong password policies
            • Network based IPS
            • Network sandboxing (including email)
              • Correctly configured Gateway Firewall

Now I know that isn’t complete, I can already here people screaming “yeah… but….”. To those people I say….. shut up. I know it’s not perfect, its meant to show an idea. If you’re still confused Google “defence in depth” I know there are hundreds of different examples and they are probably better than mine.

Now…. where was I?

Ah yes preparation! As you can see it easily becomes a beast. Knowing your own environment is key. Check your egress points, look for old systems that you’re not even sure what they do any more. AS400 systems sat getting dusty in a corner that Louis in Finance uses once a year? Can it be switched off for 11 months? Is it still supported?

Staff Training

Staff training is another big one. Don’t use this as a stick to punish people, make it an education. Don’t shame people if they click a fake spear phishing email, engage with them and find out what made them click and explain what to look for in the future. Most people already think of us as unsociable sweaty nerdy acolytes of the Mainframe, don’t reinforce this.

Money!

Put policies in place and then PRACTICE them! You need to know them inside out when an attack happens. This includes upper management too. Try to arrange a small budget to buy emergency items, maybe £3-5000 or more. Make sure it does not need to be approved before hand (obviously it will need to be reconciled afterwards. If not, I will have a new motorbike please) this can be used for buying food for the staff who are being expected to work all night to get this sorted. Or buying hardware you didn’t even know you needed.

Communications

Do you want to phone the CEO at 3am to update her about the latest evolution of the malware? I am guessing no. Having a chain of command for communications not only protects you from the management, but it protects the management from you.

What happens if your IP phone network is compromised, or is taken out? Do you have mobile phones? Are you expected to use your own? These questions need to be answered before the attack happens.

Equipment

I hope your not planning on using your corporate laptop to resolve this incident are you? Oh dear, you do know the corporate network is riddled with Malware right?!

Get a Jump Kit! Have equipment on standby that you know is clean and fully patched. Use it, know it, learn it, love it.

There is a whole load of equipment needed for this, the laptop is just a start.

Extra help

As I have already said, this stage is HUGE! And potentially never ending. But without it the other steps become weaker. So a couple of links for preparations and mitigations

Australian Government Top 35

US Government

Google

Good luck and remember to protect what you know, you need to know what to protect!

Posted in Incident Response, Preparation | Tagged , , , | Leave a comment

Incident Response Process

Today I am going to discuss the basics of an Incident Response process. I did not create this, I would love to give credit to those who did! There are other variations out there, however they all follow the basic “prepare > fix > recover” type model.

I will discuss each phase in detail in later posts.

Phase 1 – Preparation

This is the stage which takes place before there is an attack. This obviously only applies to companies with dedicated Incident Response (IR) teams, whether that be outsourced or internal.

Phase 2 – Identification

The attack has occurred, but to what extent? How did the attack start? What systems have been compromised? What type of Malware is currently running rampant in your environment?

Phase 3 – Containment

The most important point for this phase, is to make sure you have thoroughly completed Phase 2, unless you like playing whack-a-mole with Malware.

Phase 4 – Eradication

You have your Malware trapped! Caught in the network with no one to control it and no where for it to go. It’s scared, it’s alone, it’s still evil. Kill it!

Phase 5 – Recovery

A nice cup of Tea…. no? OK, fine, rebuild any systems that need it, reset some passwords and generally tidy up the mess you and the malware made battling for the Cyber landscape.

Phase 6 – Lessons Learned

Also called Lessons Identified or the Wash Up. This is the time to sit down and talk honestly about what happened. Explain how to prevent it from happening again (also ask for a larger budget).

Posted in Incident Response, Introduction | Tagged , , | Leave a comment

Chrome – Basics

Google Chrome, or just Chrome, is (at the time of writing) the most popular web browser by a fair amount. Twice as popular as Mozilla’s Firefox.

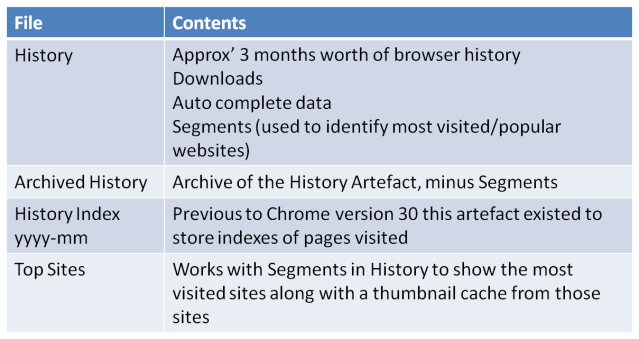
Chrome stores its artefacts in SQLite, JSON (JavaScript Object Notation) and SNSS (Session Saver) formats. The Artefact locations for Windows 7+ is

%USERPROFILE%\AppData\Local\Google\Chrome\User Data\Default

It is worth noting that SQLite files used by Chrome do not have file extensions.

chrome_artefact_locations

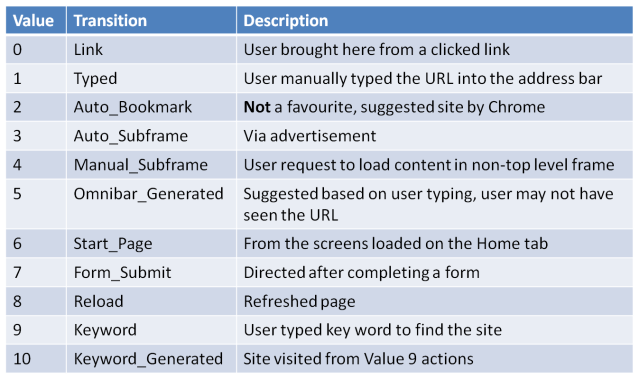
Within the “visits” table of History, there is a “transitions” field. This shows how the page was visited. The values of this field are difficult to parse manually as they are stored in 32bit values, there are forensic tools (like Chromium, Woanware ChromeForensics or Nirsoft Chrome History View) which can be used to decode the values.

The transition values then relate to: chrome_transition_values

Timestamps

Chrome timestamps are stored in “Webkit” format which is the number of microseconds since 1st Jan 1601…. I know right?! Luckily DCode has a Chrome time decoder, there are other ways to figure it out. Which… feel free.


Posted in Browser Forensics, Chrome, Google Chrome, Windows Forensics | Tagged , , , , , , , , , | Leave a comment

Internet Explorer – Basics

As IE comes bundled with Windows as standard it is often the browser (of choice?) used by a lot of organisations. Larger organisations are also often slower to update IE, in my experience, as they have integrated business critical applications to an older version and do not see the urgency of the upgrade.

As such IE makes a perfect target for attackers seeking out businesses.

Windows 7

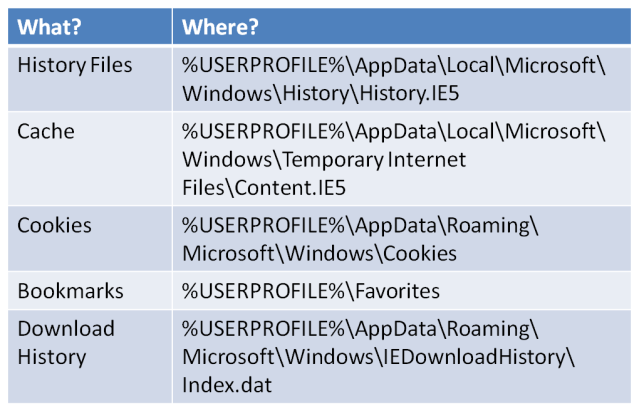
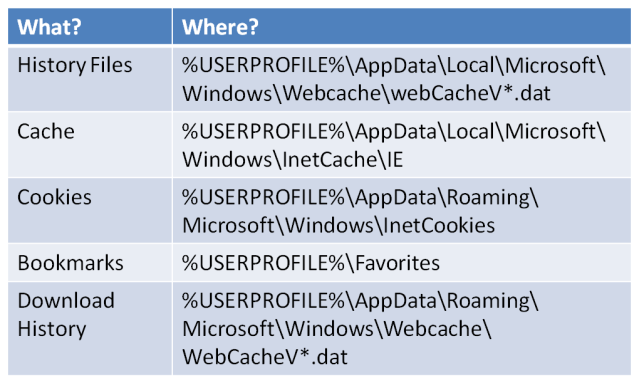
With previous versions of Windows the History files have pretty much remained the same, Windows 7 also uses something very similar to this system. The location does change from OS to OS though:

Internet_Explorer_W7_Artefacts

Windows 7 locations. It is also worth noting that a “low” folder exists when the browser is being used in “Protected Mode”, items in this folder are from unprivileged use.

Windows 8

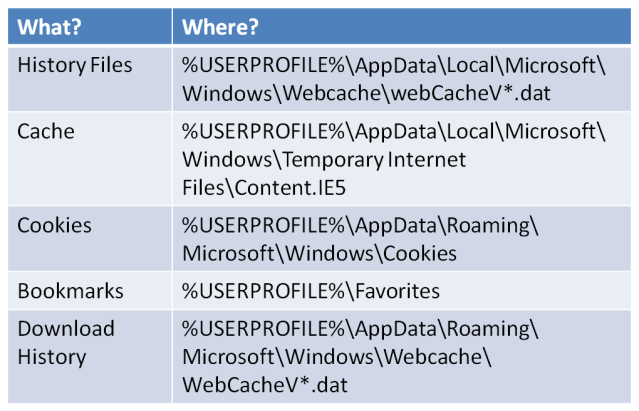
Internet_Explorer_W8_Artefacts

With Windows 8 there are a couple of changes, including the introduction of the “WebChache” folder and “WebCacheV*.dat” (the * will be replaced with a number). This is then extended into Windows 8.1

Both the History Files and the Download History have been moved to the .dat format.

Windows 8.1

Internet_Explorer_W81_Artefacts

Finally we come to Windows 8.1, possibly another term for Windows 8 Service Pack 1, as discussed by Peter Bright.

Windows 8.1 pretty much finishes off the rest of the artefacts into .dat files leaving only the Bookmarks in the US spelling of Favourites, don’t get me started on the “US English or International English” debate!

Final note

As with the previous locations of these artefacts, the locations are hidden by default.

Posted in Browser Forensics, Internet Explorer, Windows Forensics | Tagged , , , , , , , | Leave a comment

Mozilla Firefox – Basics

Mozilla Firefox was the most popular back in 2011, and although its popularity has been surpassed by Google Chrome (which I will cover later), it still holds around a quarter of the internet’s browser base.

With Windows 7 there were some changes made to the location of browser artefacts. Firefox artefacts are now located:

%USERPROFILE%\AppData\Roaming\Mozilla\Firefox\Profiles\<randomstring>.default

  • History
  • Cookies
  • Bookmarks
  • Auto-Complete

and

%USERPROFILE%\AppData\Local\Mozilla\Firefox\Profiles\<randomstring>.default\cache

  • Cache

The AppData folder is hidden by default, this can be addressed using Folder Options from the ‘tools’ menu in any open Explorer window (press Alt to show menu)

The <randomstring>.default folder is a profile, there may be more than one profile per user.

SQLite files

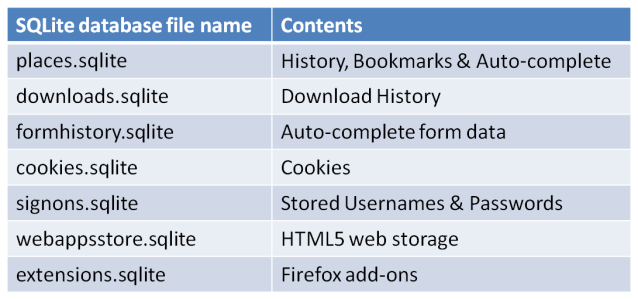
There are several SQLite files which are of interest during an investigation, although these can be parsed with nothing but an SQLite viewer it is recommended to use a specific parser for the SQLite file you are investigating. The SQLite parser can be used to confirm critical or incriminating evidence.

Firefox_SQLite_Locations

This table shows each of the SQLite databases for Firefox and what each one contains.

That’s it for an introduction to Firefox, stay tuned, same geek time, same geek channel!!

Posted in Browser Forensics, Firefox | Tagged , , , , | Leave a comment

USB Forensics Final Part! (aka Pt. 7) Device first/last plugged in

The USB forensics thread can continue until the end of time, or at least the end of my free space on here, with this in mind I am only showing you the basics of USB forensics. I may cover more depth in later posts, I may not. What I can tell you is if I do, I wont be using that bloody Seagate Hard Disk!!

For the final part of this puzzle we are going to visit a file not yet seen:

%WINDIR%\inf\setupapi.dev.log

This is very similar to the setupapi.log from Windows XP, except Microsoft moved it slightly further away. They have a habit of doing this I suspect its to charge more for consultancy or something.

Setupapi.dev.log can be viewed in a highly complex program known as Notepad, this program baffled many a developer by using a feature called “word wrap”. Seriously just turn it on and resize their window, then sit back and laugh!

Setupapi_First_Plugged_In_FOR408

As you can see highlighted above is the Device Serial Number all the way back from Part 1. This is the string you will need to search for to find the device. The area in the red square is showing the time the device was first connected.

WARNING!! The time shown above is in the System local time not UTC!!

I was going to put that warning in red, but after the word wrap incident I don’t think the dev’s could handle it.

And typically the Seagate Hard Disk decided, like a petulant child, not to bother showing up in the log. I tried a search on the Serial Number, GUID, PID and VID. Nothing!

Last time device was connected

We know the first time the device was connected, now we need to know the last.

A change from Windows XP worth pointing out, this next step used to be how you found out the first time a device was connected, now it’s for the last time (from Vista upwards), I am sure Microsoft had their reasons and I strongly suspect word wrap was involved somehow.

Go to the following Key (again):

SYSTEM\CurrentContolSet\Enum\USB\VID###&PID###

If you are using Registry viewer you will see the last write time of this key. This is the last time the device was connected. It is also possible to confirm the last time a specific user used the device by going to:

NTUSER\Software\Microsoft\Windows\CurrentVersion\Explorer\MountPoints2\<GUID>

These times are in UTC not system local time. Timestamps are annoying and this is one of those times! I would recommend recording everything in UTC and annotating which were displayed in local system time. This helps with your time line.


Posted in USB Forensics, Windows Forensics, Windows Registry Forensics | Tagged , , , , | 1 Comment

USB Forensics Pt. 6 Which user account used the USB device

Having all this information is all well and good, but right now all we can say for sure is that a USB device was used on this machine. Just because someone logged on to that machine doesn’t make them the target of the investigation. As forensic investigators we need to ensure that all of the links in the chain are connected. We need to prove User X used USB Device Y in Machine Z (we also need to say when it happened, but that’s for part 7!)

What do we know so far?

  • 2x Devices are relevant to this investigation
  • A ‘generic’ USB device was attached
  • named “FOR408-USB”
  • with a serial Number of 92B0564
  • A Seagate USB Hard Drive was also attached
  • named “My Drive”
  • with a serial number of 2GE4D91T

In order to find which user had these devices plugged in, we need the GUID. This can be found under the previously seen key:

SYSTEM\MountedDevices

Registry_Viewer_Mounted_Devices

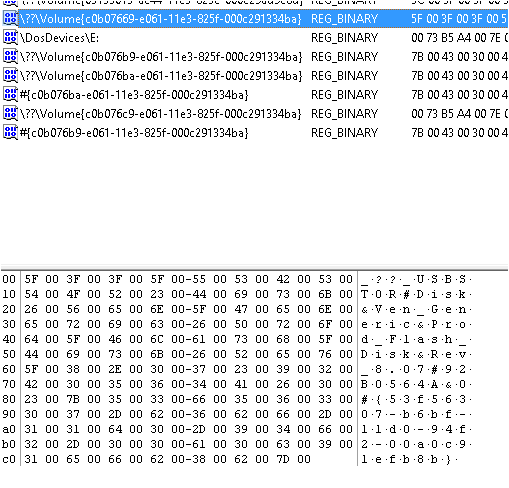
From this previous screen capture we can see the Generic USB device highlighted. After \??\Volume you can see there is a string. This string is in fact the GUID of the device, make a note, you will need this later.

As you may recall, we could not find the key entry for the USB Hard Disk at this stage, the GUID for that device is actually remarkably hard to find (this could well be due to knowledge limitations, however I shall not be beaten). Should the investigation into the USB devices be stopped here? Nay! To the Nay sayers, I say Nay!

I will start off with the easy win. The USB Flash drive known as FOR408-USB. The GUID for this device is:

C0B07669-E061-11EF-825F-000C291334BA

Now we move onto the NTUser.dat, if you have lots and lots of users…. you have my sympathy, just kidding, try Grep see if that works, if not…. read previous statement.

I however have a strong suspicion that this one user (me) is the target of this investigation, how do I know? Simple. I told me.

So I open the NTUser.dat file and browse to the following key

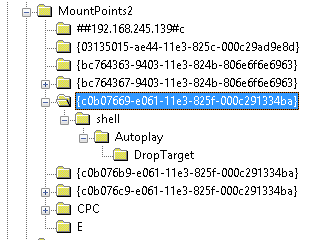
NTUser.dat\Software\Microsoft\Windows\CurrentVersion\Explorer\Mountpoints2


Registry_Viewer_NTUser_Mountpoints2

As you can see the GUID matches, proving this device was used by this user!

What about the other device?

So this annoyed me a little, I know the other device was used by this user, so I wanted to be able to prove it. I manually looked through the other GUIDs in the list to see if there were any tells. Luckily for me, there was!

Registry_Viewer_NTUser_Mountpoints2_FreeAgent

It turns out my USB Hard Disk has vanity issues and likes to carry around it’s own icon! This is far from forensically sound, but it does make me think this is the same device. I test the theory by plugging the device in to see if this file (e:\FreeAgentGoNext.ico) exists:

Freeagent_Icon

And it does! So I figured that the GUID shown has a good chance of being the USB Hard Disk:

C0B076C9-E061-11E3-825F-000C291334BA

I did a search in the SYSTEM hive for this string and found it in the Mounted Devices section

GUID_Seagate

Still not 100% proof, but certainly proves that a device with the same GUID, as a device which holds an icon file, with an identical name to the Seagate drive, was plugged into that machine.

It may be a coincidence but the Hex value for this GUID is also the same Hex value for the E: drive letter in the Mounted Devices key (0073B5A4007E000000000000) possibly showing that the USB Hard Disk was the last device to be associated with the drive letter E:

Adding to that the NTUser.dat reference to E:\FreeAgentGoNext.ico certainly reinforces that theory.

Final thoughts

I will admit there was a fair amount of luck involved with finding the GUID for the “My Drive” device, and it’s not 100% proof. But I believe that if you can convince a non-biased technical person that this device was plugged into that machine using only the evidence above, then you have a good enough case to attempt to convince a jury. As previously stated, make a note and move on.

Posted in USB Forensics, Windows Forensics, Windows Registry Forensics | Tagged , , , , | Leave a comment

USB Forensics Pt.5 Determine the Drive Letter

Finding the last Drive letter used by the USB device is actually quite simple…. or at least it should be! Go to the following Key:

SYSTEM\MountedDevices

Each drive letter is listed, however in my example on the VM the E: drive has no usable data in it (correction at the bottom of the page). The Seagate drive is not identifiable in the list, neither the volume name or serial number are in the descriptions, I am assuming this is because of the previous issues with it being an actual Hard Disk and not flash memory.

The Generic USB device *is* in the list with the serial number

Registry_Viewer_Mounted_Devices

But as you can see from the details of the data, there is no mention of a drive letter.

In an ideal world highlighting the last drive letter (seen above under as \DosDevices\E:) would have, in its description, the serial number of the last attached device. I believe it is not there because the Seagate hard drive was the last device to use the E: drive, which as we saw in a previous post was quite stubborn about sharing its serial number.

Conclusion. Fail?

You may be wondering why this is lack of data may be important, after all its just a fail right? Wrong. By including this in your report you are showing that you have covered the bases, there is an explanation as to why the drive letter is not showing the data you expected. If this is missed out of a report which ends up in court the defence lawyer will use it to show that you are omitting data which may “prove” his client innocent. Obviously this is not the case, but you do not want the guilty to be let off because of a lack of confidence from the jury in your technical integrity.

Obviously that’s a worse case scenario, but even if you wind it down a little; I write every technical report as if another person with a higher level of experience than myself will criticise it. That way you find yourself justifying the parts of the report that don’t work.

Does this lack of data prove anything?

Yes. This proves that both devices were not present at the same time, if they were there would be another drive letter present. After all

  • A: – Reserved for floppy drives (still!!)
  • C: – Main system drive by default
  • D: – CD-ROM by default
  • E: – Next available drive letter

of course check to make sure the other drives are being used at their default settings! You may look silly if there is no CD-ROM and your report assumed there was.

To prove it does work

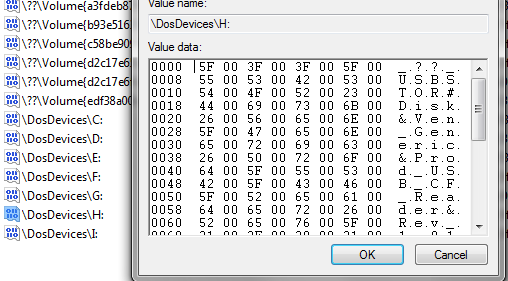
Just to show you what you would expect to see, I had a look at my Windows 7 host live registry and found the USB device was last plugged in as the H: drive on my machine.

Registry_Viewer_Mounted_Devices_LocalE: drive has no usable data in it


***Late Addition***

Disk Signature

I would like to make a correction to the first paragraph of this post, I stated that “E: drive has no usable data in it” after continuing research I have discovered that is not accurate. The data held under E: does have useful information in it! From the screen capture above we can see the Hex value “00 73 B5 A4” this is the “Disk Signature” of the drive used. Using a Hex editor like HxD it is possible to open the physical disk and find this string under 0x000001B8-0X000001BB – this is where I have found it in relation to “00 55” marking the end of the MBR sitting at 0x000001FE-0x000001FF on the devices I had available to me.

This ID assigned to the Master Boot Record (MBR) so is not  permanent, but if the disk has not been formatted or you can recover the data around the MBR, it may help to prove this device was connected.

Posted in USB Forensics, Windows Forensics, Windows Registry Forensics | Tagged , , , , | 1 Comment

USB Forensics Pt. 4 Volume Serial Number

On to Part 4 of our ongoing discoveries about USB forensics.

A quick recap

So far we have managed to get details of two devices which have been connected to our image. We have looked at how to get:

We are now going to move on to the Volume Serial Number, this is created by Windows Vista and up Operating Systems each time the device is formatted. We will be looking in the EMDMgmt key for the Volume Serial Number, which according to this Technet blog around Windows Vista, is where the Operating system store details regarding “Ready Boost”; the idea behind Ready Boost was to use external USB devices as additional memory to increase performance. It never really took off. In my opinion this is a good thing from a forensics stand point, would we really want to be chasing down another USB device that has memory artefacts on it? I personally would rather have as much evidence in one place as possible. Especially when it comes to large scale jobs.

USB Hard Drive vs. USB Stick

As I mentioned in Part 3, one of the devices we are looking at is a cylindrical hard drive, it will be interesting to see if the Volume Serial Number exists in this key, as obviously it wont be fast enough to pass the benchmark…… let’s go find out.

Navigate to the following key:

SOFTWARE\Microsoft\Windows NT\CurrentVersion\EMDMgmt

And you will see the following

EMDMgmt_Tree

As you can see “My Drive” which we identified as the Hard Drive is listed, and above that we see “FOR408-USB”, so the answer is yes, it will be listed here!

EMDMgmt_Serial_Number

I have highlighted here the string at the end of the Key name, this is a Decimal value of the Volume Serial Number, which is a Hexadecimal value (isn’t the registry fun…..). Convert this value, using Windows Calculator is probably easiest,  into the Hex and you have your Volume Serial Number.

The Volume Serial Number of this device is “40034B65”. To confirm that this is correct there is another tool we can use, which is a command line tool called “Vol.exe”, this requires you to have the device connected, so use appropriate protection and document when and why you did it. The output of Vol.exe is shown below:

Vol_output

As you can see, the Volume Serial Number matches what we worked out manually above. Therefore showing that this device was installed on this machine and has not been formatted since (this is an important footnote, the Volume Serial Number can change for the device if it is formatted, as the Volume Serial Number is allocated after the Format!).

Make a note of the Volume Serial Number and the Volume Name for use in analysing the Link (.lnk) files, which I will cover later, as they can correlate this device to those Link files.

***Late Addition***

An important side note: As I have done more investigations I realised that this key will not be populated if the machine is deemed “too fast” for Ready Boost. This also changes depending on the OS

  • Windows 7 – If an SSD is present Ready Boost is defaulted to off
  • Windows 8 – If an SSD is present the system will test to see if Ready Boost is required

The reasoning behind turning off Ready Boost as far as I can tell is to do with write times to an SSD. As we all know SSDs are not as write tolerant as the older cylindrical disks therefore automatic defrag is disabled as is pre-fetch (which is another pain in the backside from a forensics standpoint!).

Knowing more about Ready Boost means that it should hopefully help to understand why a drive may not appear as expected in the EMDMgmt key; Windows wouldn’t attempt to make a cylindrical disk a Ready Boost device as there would be no increase in performance associated with it.

Posted in USB Forensics, Windows Forensics, Windows Registry Forensics | Tagged , , , , | 1 Comment

USB Forensics Pt. 3 Discover the Volume Name

Part 3 of our investigation is to discover what the Volume Name of the USB device was. This can be helpful when looking into Link (.lnk) files (which I will cover in a later blog post). It can also occasionally go as supporting evidence if the user has named the volume after their own name, or better yet something telling like “Hacking Tools”.

Windows 7 upwards introduced a new key to the Registry which makes finding the Volume Name a lot easier than previous versions. Navigate to the following location:

SOFTWARE\Microsoft\Windows Portable Devices\Devices

This key is not particularly user friendly, in terms of readability, there are worse ones out there though! The Serial Number as identified in Part 1 will be the string you are searching for.

Windows_Portable_Devices

As you can see above the Unique Serial Number is displayed in the red box.

Windows_Portable_Devices_Name

And this shows us the Volume Name of the USB stick from SANS named “FOR408-USB”

Before we continue……

Something I noticed while looking at these keys, the highlighted key is not the device I wanted to demonstrate, the one I wanted to show is below it it. The second key however does not have the Serial Number in the key name. So how can we prove this is the same device?

I went back to the USBSTOR key for a little more information, after all this key was created as a result of the installation of the USB device the same as in the USBSTOR. Therefore logically there must be a way to correlate one to the other. So I started looking at the other characters in the key.

The “SWD#SPDBUSENUM#” is repeated on the third key, which is not the same device, therefore I discounted this from this investigation. I next looked at the bracketed string starting “{C0B076c6….. ” and discovered it is a reference to a value held under

SYSTEM\CurrentControlSet\Enum\USBSTOR\<Device>\<SerialNumber>\Device Parameters\Partmgr

USBStor_PartMgr

Under “DiskId” as highlighted on the right, you can see the corresponding string (this is not true of the other USB device however).

Windows_Portable_Devices_MyDrive_Name

Using this correlation, albeit a weak one, you can see that the Volume Name is set to “My Drive”, which is the correct device.

Conclusion?

I cannot explain why this is like it is, my only working theory is because the “My Drive” device is an external cylindrical hard drive, where as the first device “FOR408-USB” (with the Serial Number) is a USB Stick. Occasionally Windows struggles to differentiate between external hard drives and internal hard drives, the “My Drive” device is around five years old now, and only used for backups, I may try this again in the future on a modern drive and see how that plays out.

Thoughts

My thoughts on this are that as a forensicator we need to be dynamic and have the ability to adapt. While the above process is open to debate, it is a smaller part of a bigger picture. If we can find other evidence to reinforce this then convincing a jury becomes a little easier. I find it unlikely this would be the only evidence to be brought forward in court case, and to quote (paraphrase maybe) Chad Tilbury “make a note of it and move on”.

This once again brings us back to note taking. If in your notes you can explain why you did what you did, and another forensicator would come to the same conclusion after following your process, then it is justifiable. Windows is not designed with forensics in mind, this is both good and bad, it helps make anti-forensics difficult, but by the exact same process it makes forensics difficult….. and fun 🙂

As always comments on this subject are welcome, this is a learning blog and I believe constructive comments are a critical part of learning for us all.

Posted in USB Forensics, Windows Forensics, Windows Registry Forensics | Tagged , , , , | 2 Comments